 HTML
HTML  CSS
CSS  PHP
PHP  JavaScript
  SQL
SQL  Bootstrap
  Solidity
  jQuery
  Git
Git  Chrome DevTools
  C++
C++  Python
 TL;DR – HTML layout represents the arrangement of all the elements in the document. It is an important part of basic page design.
Contents
Basic Elements of Website Layouts
A well-made HTML layout improves user experience in two significant ways:
- Simplifies navigation by clarifying the structure
- Makes the design more visually appealing
There are four basic elements you will find in pretty much every page layout design:
| Part | Definition | Tags |
|---|---|---|
| Header | The very top of the page (usually introductory content, e.g., logos) | <header> |
| Navigation bar | An HTML container for hyperlinks to different parts of the website | <nav> |
| Content | The main content of the webpage | <article>, <section> and others |
| Footer | The very bottom of the page (usually authorization data, e.g., copyright info) | <footer> |
Here you can see a simple example of a page layout design that involves various HTML containers, simple styling and an image:
- Easy to use with a learn-by-doing approach
- Offers quality content
- Gamified in-browser coding experience
- The price matches the quality
- Suitable for learners ranging from beginner to advanced
- Free certificates of completion
- Focused on data science skills
- Flexible learning timetable
- Simplistic design (no unnecessary information)
- High-quality courses (even the free ones)
- Variety of features
- Nanodegree programs
- Suitable for enterprises
- Paid Certificates of completion
- A wide range of learning programs
- University-level courses
- Easy to navigate
- Verified certificates
- Free learning track available
- University-level courses
- Suitable for enterprises
- Verified certificates of completion
Tags to Use in an HTML Layout
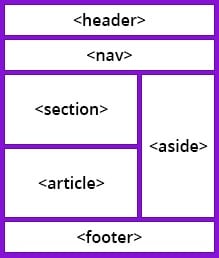
In this section, we will review the HTML elements needed for the HTML layout in more depth with code examples to illustrate them. To understand the way they are used to create page structure, refer to the table above or review the illustration on the right.
To define the HTML container for the header at the top of your layout, use the <header> element:
<header style="height: 50px; width: 100%; background-color: #333; text-align: center;">
 <h1 style="color: white;">I am a header</h1>
</header>The function of <header> might seem similar to that of the headings. However, the <header> defines the title of the whole site, not a separate article. It can also include other introductory information, such as a logo.
The <nav> element specifies a customizable navigation bar for your website. It is not mandatory to include – however, having a navigation bar allows your users to navigate the website in a simpler and quicker manner. A navigation bar is usually displayed below the <header>:
<nav>
  <ul>
    <li><a href="https://www.bitdegree.org/tag/interactive-learning">Gamified Courses</a></li>
    <li><a href="https://www.bitdegree.org/tutorials">Tutorials</a></li>
    <li><a href="https://www.bitdegree.org/course/learn-solidity-space-doggos">Space doggo course</a></li>
    <li><a href="https://www.bitdegree.org/tag/game-dev">Game Dev Courses</a></li>
  </ul>
</nav>The <aside> element works quite similarly to <nav>. However, it defines space on the side and can function as a sidebar. However, you can upload content there, too:
<aside>
	<p>Many movies and graphic novels have been based on this Greek hero.</p>
</aside>Note: it is rather common to use the <aside> element to display various advertizing banners.
You can use the <section> tag to define a separate content section in your website. This element has no restrictions related to the type of content, so you can add anything to it – text, pictures, videos, etc.:
<section>
  <h1>Section Heading</h1>
  <p>The section tag can contain any elements.</p>
  <img src="image.png" alt="section example">
</section>If you want to write a big article or a story, the <article> element is your best option. It separates a huge chunk of the website and allows you to put the article there neatly:
<article>
  <h1>Fun Fact</h1>
  <p>Fun fact: most of the fun facts on the Internet are not actually fun.</p>
</article>The <footer> element creates space for footnotes on your web page. It may contain the least important information or be used as an HTML container for copyright or contact data:
<footer style="width: 100%; height: auto; border: 1px solid;">
  <h1>This is a footer</h1>
  <p>Copyrights are defined here</p>
</footer>Using the <style> element allows you to design any HTML container. Using inline styling is essential for creating a striking and outstanding page layout design:
<style>
  header, footer {
      padding: 1em;
      color: white;
      background-color: #007196;
      clear: left;
      text-align: center;
  }
</style>Note: keep in mind that colors are very important in the design.
HTML Layout: Useful Tips
- Don't use tables to create HTML layouts! While it might have been a popular method in the past, it's not recommended now as it slows down the rendering in the browser and complicates redesigning later.
- You can also create website layouts using CSS floats or flex containers. Floats are simpler to use, while flex containers offer more design possibilities.
