 HTML
HTML  CSS
CSS  PHP
PHP  JavaScript
  SQL
SQL  Bootstrap
  Solidity
  jQuery
  Git
Git  Chrome DevTools
  C++
C++  Python
 TL;DR – HTML syntax are rules and conventions that define correct usage of the markup language.
Contents
Basics of HTML Syntax
The first and most important thing to understand in HTML syntax is the usage of elements and tags. Every HTML element is defined by an opening tag and a closing tag wrapped around their content:
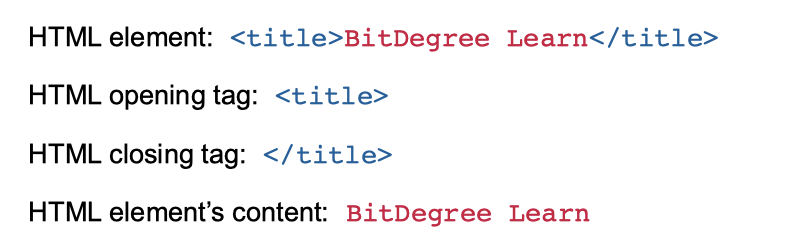
A pair of angle brackets (< and >) surround each tag. The difference between the opening tag and a closing tag is a single forward slash (/). See a simple example of using the HTML <style> tags:
<head>
<style>

/* This is internal styling */
h1 {
    color: indianred;
}

p {
    color: red;
}

</style>
</head>Tip: the HTML <style> tag will help you use HTML and CSS together to achieve both functionality and design.
These days, every developer is encouraged to use semantic tags. They help HTML5 structure a page better, and that in turn helps you create a nice HTML5 layout for your webpage.
Closing Elements
It is not necessary to close all elements in HTML5. However, if you're writing in XHTML or simply want a more readable and syntactically correct code, you should practice closing all the tags:
<section>
  <p>This element is not closed which can cause problems in the future.
  <p>This is a closed element. The range where it starts and where it ends is clearly defined</p>
</section>An empty element only has an opening tag and doesn't require closing. However, XHTML requires all elements to be closed. If there is a chance that XML software will be accessing your page in the future, you should close your empty elements, for it may cause inconveniences.
You can make an empty element close itself by adding a forward slash (/) before the second angle bracket (>):
<meta charset="utf-8">   not closed

<meta charset="utf-8"/>  closed
HTML Attributes
You may add various attributes in the opening tag. They are written in name-value pairs with the value wrapped in double quotes:
- Easy to use with a learn-by-doing approach
- Offers quality content
- Gamified in-browser coding experience
- The price matches the quality
- Suitable for learners ranging from beginner to advanced
- Free certificates of completion
- Focused on data science skills
- Flexible learning timetable
- Simplistic design (no unnecessary information)
- High-quality courses (even the free ones)
- Variety of features
- Nanodegree programs
- Suitable for enterprises
- Paid Certificates of completion
- A wide range of learning programs
- University-level courses
- Easy to navigate
- Verified certificates
- Free learning track available
- University-level courses
- Suitable for enterprises
- Verified certificates of completion
Uppercase or Lowercase?
In the code snippet below, you see the document type declaration. It should always be the first line of the document. Although all the examples you see work, HTML syntax rules recommend to stick to either uppercase or lowercase:
<!DOCTYPE html>

<!DOCTYPE HTML>

<!doctype html>

<!Doctype Html>
Technically, you could mix uppercase and lowercase letters in HTML5. However, it's generally deemed good practice to use lowercase letters for element and attribute names. That improves both the look and the readability of your code:
<section>
  <p>I'm a paragraph that is easy to understand.</p>
</section>Note: to prevent issues, it is recommended to always use lowercase when naming files too, as web servers are often case-sensitive.
Long Lines and Blank Spaces
All your HTML5 code should be viewable by scrolling from top to bottom. It is extremely inconvenient for a user to have to scroll sideways. It is also unprofessional regarding HTML syntax rules. Try not to make your code lines longer than 70 characters.
You shouldn't add blank lines without a good reason. You can add a blank line to separate large code blocks, but don't overuse them.
White space is tricky too. You can add two spaces for indentation:
<!DOCTYPE html>
<html>
<body>

<section>

<h1>Without indentation it is hard to read</h1>

<p>This example has unnecessary blank lines and no indentation.</p>

</section>

  <section>
    <h1>Indentation is cool</h1>
    <p>This example has indentation instead of blank lines. It is easy to read and saves space.</p>
  </section>
</body>
</html>However, avoid unnecessary spaces between symbols. E.g., while you technically can put spaces around = signs, HTML syntax recommends to avoid them for better readability:
<link rel = "stylesheet" href = "styles_file.css">

<link rel="stylesheet" href="styles_file.css">
Adding HTML Comments
Code comments are written between <!-- and --> tags. They do not affect the web page on the user side, as their purpose is to only make notes for the developer:
<!--
This is commented out text.
This is commented out text.
-->

<body>
  <p>This is visible <!-- this is an invisible comment --> text.</p>
</body>HTML Syntax: Useful Tips
- If you worry about forgetting to close your tags, start by typing both of them and then fill in the content.
- You can also try syntax highlighting (e.g., from highlight.js if you think it will help you understand the HTML5 document structure easier.
- If you are still unsure about your HTML syntax, try a simple syntax validator such as Freeformatter which will display all syntax errors.
