 HTML
HTML  CSS
CSS  PHP
PHP  JavaScript
  SQL
SQL  Bootstrap
  Solidity
  jQuery
  Git
Git  Chrome DevTools
  C++
C++  Python
 TL;DR – CSS padding adds space around the content inside elements. The padding is between the border and the content.
Contents
Padding and Possible Values
CSS padding refers to space on all four sides of an element. Specifically, it is the area between the border and the content. Therefore, padding is within elements.
Adding HTML Space Between Texts
To add spaces between texts, you can use special HTML symbols. For better results, we recommend using padding or margins to add blank space elements.
In the following example, we are using internal CSS, class, and padding-left to add HTML space between text.
Similarly, you can add HTML space between lines by using padding-bottom. Look at this example:
CSS padding vs margin
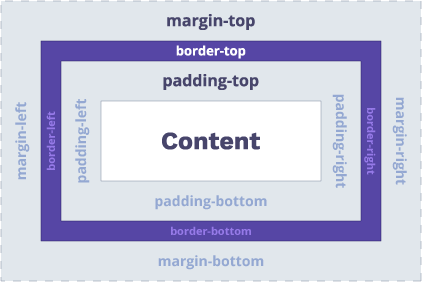
The padding and margin are a part of the Box Model.
The main idea of CSS padding vs margin is that padding is the innermost part of the box model (it is inside an element). Margins add space around elements.
Note: another important difference is that margins allow negative values and padding does not.
Use of the padding Shorthand
The padding shorthand allows defining four properties in one declaration.
In the example, we assign padding property to a <p> element and describe all four values individually.
| Property | Description |
|---|---|
| padding-top | Sets the top padding of an element |
| padding-right | Specifies the right padding of an element |
| padding-bottom | Sets the bottom padding of an element |
| padding-left | Specifies the left padding of an element |
If you include values for two or three properties, the CSS padding order of values changes:
- One value — sets the same padding to all four sides.
- Two values — the first value applies the padding on top and bottom. The second adds padding to the left and right sides of an element.
- Three values — the first value applies padding to the top. The second adds padding to the right and left sides. The third value adds padding to the bottom.
Note: when declaring four values, a specific CSS padding order needs to be followed: top, right, bottom, and left.
padding-top
The CSS padding-top property indicates the height of the padding area above an element.
In this example, we assign padding-top property to a <p> element.
You can specify values for this property in two ways:
<length>— use a number and a unit (for example, em, px, cm).<percentage>— use percentages to indicate percentage value relative to the element.
Remember: these options for adding values apply to all the following padding properties.
padding-right
The CSS padding-right property specifies the width of the padding area on the right side of an element.
In the example below, we specify that the element <p> will have space equal to 10px on the right side.
- Easy to use with a learn-by-doing approach
- Offers quality content
- Gamified in-browser coding experience
- The price matches the quality
- Suitable for learners ranging from beginner to advanced
- Free certificates of completion
- Focused on data science skills
- Flexible learning timetable
- Simplistic design (no unnecessary information)
- High-quality courses (even the free ones)
- Variety of features
- Nanodegree programs
- Suitable for enterprises
- Paid Certificates of completion
- A wide range of learning programs
- University-level courses
- Easy to navigate
- Verified certificates
- Free learning track available
- University-level courses
- Suitable for enterprises
- Verified certificates of completion
padding-bottom
CSS padding-bottom property specifies the height of the padding area below an element.
The example shows how to create a padding equal to 15px below the <p> element.
padding-left
CSS padding-left property specifies the width of the padding area on the left side of an element.
In the example, we assign a 5px left padding to the <p> element.
Padding & Width Conflict
Setting padding to elements that have a specific width will have unexpected results.
The padding will be added to the width of the element. Padding won't be a part of the element. Developers see this as unwanted because the width of elements changes every time padding changes.
Note: the same situation happens with the height of elements. However, height is rarely set.
Let's say you have described your element width as 225px and padding (shorthand) as 25px.
Your resulting element width would be 225 + 25 + 25 = 275px (25px twice because padding is added on both sides).
WITHOUT box-sizing: border-box;
You can easily fix this issue with the box-sizing property. It tells the element to keep its original width when you increase the padding. Additionally, it makes the available content space smaller.
WITH box-sizing: border-box
CSS Padding: Useful Tips
- By leaving out values for specific properties in
padding, you set those properties to their initial value of 0 (no space). - Use CSS
paddingto define all four sides of elements and write shorter code.
