 HTML
HTML  CSS
CSS  PHP
PHP  JavaScript
  SQL
SQL  Bootstrap
  Solidity
  jQuery
  Git
Git  Chrome DevTools
  C++
C++  Python
 Discord is a free communication platform that lets you chat in both text and voice calls. It also allows creating and using Discord server bots – automated users that perform actions assigned to them by the developer.
Contents
Setting up in Discord
Bots are one of the unique features in Discord and if you want to know how to make a Discord bot for your server, you came to the right place. You can do it using either JavaScript or Python.
Either way, the first steps that you take in the Discord platform itself remain the same.
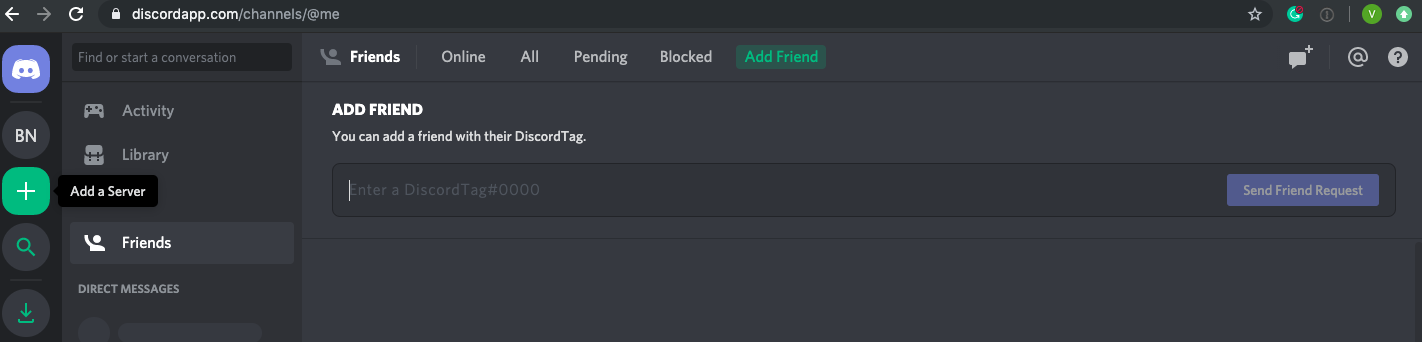
You need to have an account with at least one server on the platform. To create one, log in and find a + button on the left:
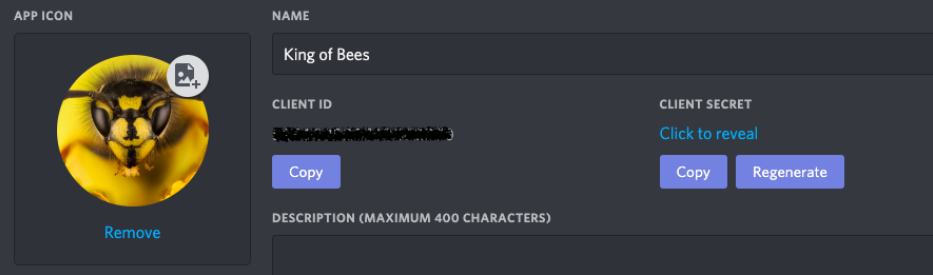
Open your new server, then open the list of your applications. Click New Application, create a name for your Discord bot, and save the changes.
How to add bots on Discord
First, find Bot in the left sidebar menu. Open it, click Add Bot and select the application you just created. If you only have one, Discord will select it automatically.

In the General Information section, you will see two important pieces of your data: client ID and client secret. The client secret is an authorization token used in the application code: it allows you to control your Discord bot. If you believe your token has been compromised, you can always regenerate it.
- Easy to use with a learn-by-doing approach
- Offers quality content
- Gamified in-browser coding experience
- The price matches the quality
- Suitable for learners ranging from beginner to advanced
- Free certificates of completion
- Focused on data science skills
- Flexible learning timetable
- Simplistic design (no unnecessary information)
- High-quality courses (even the free ones)
- Variety of features
- Nanodegree programs
- Suitable for enterprises
- Paid Certificates of completion
- A wide range of learning programs
- University-level courses
- Easy to navigate
- Verified certificates
- Free learning track available
- University-level courses
- Suitable for enterprises
- Verified certificates of completion
Making a Discord bot the JavaScript way
First, we will have to create three files using a text editor. Simple Notepad++ will work just fine. You will have to save all three files to the same folder.
The first file should be called auth.json. It will be used for authentication. Therefore, it must contain your client secret:
{

"token": "client_secret"

}
For the details of your Discord bot, make a second file called package.json. Insert the required values as needed:
{
"name": "your_bots_name",
"version": "1.0.0",
"description": "your_bots_description",
"main": "bot.js",
"author": "your_name",
"dependencies": {}
}
Note: for your files to work properly, make sure to save them with .json and not .txt extension.
The third file you need is bot.js. You can see it is listed as the main file in package.json. The main file defines how your Discord bot functions. Our bot will greet and compliment every user who types Hello in the chat room:
var Discord = require('discord.io');
var logger = require('winston');
var auth = require('./auth.json');

logger.remove(logger.transports.Console);
logger.add(new logger.transports.Console, {
    colorize: true
});
logger.level = 'debug';

var bot = new Discord.Client({
   token: auth.token,
autorun: true
});
bot.on('ready', function (evt) {
    logger.info('Connected');
    logger.info('Logged in as: ');
    logger.info(bot.username + ' - (' + bot.id + ')');
});
bot.on('message', function (user, userID, channelID, message, evt) {
    if (message.substring(0, 1) == 'Hello') {
        var args = message.substring(1).split(' ');
        var cmd = args[0];

        args = args.splice(1);
        switch(cmd) {
            // !ping
            case 'ping':
                bot.sendMessage({
                    to: channelID,
                    message: 'Morning! Not looking too shab-bee!'
                });
            break;
         }
     }
});
After you place all three files in your folder, open the Command Prompt via the Windows start menu on your computer. Type cd and enter the file path to the folder.
Type npm install discord.io winston –save to install the files your Discord bot requires into the folder. To install additional dependencies, type npm install https://github.com/woor/discord.io/tarball/gateway_v6. To run your bot, type node bot.js.
Come back to your Discord server to test the bot you created. If you did everything correctly, typing the phrase you specified (Hello, in our case) will trigger the answer.
Creating bots the Python way
To make a bot using Python, you first need to use the pip package manager to import a discord.py library. Type pip install discord. Now, open a new file with the .py extension on the Python coding environment you prefer and import the new library to it.
First, we will have to establish the bot as the client:
import discord

client = discord.Client()
Note: Python versions prior to 3.4.3 do not support Discord library.
There are various events in the Python library that your Discord bot may react to. For example, the following code will make it print out the specified text when it becomes available to use in the server.
@client.event

async def on_ready():

    print("Ready for a bee-autiful day!")
We can also make our bot respond to a certain phrase (i.e., Hello), just like we did with JavaScript in the previous section:
@client.event
async def on_message(message):
    if message.author == client.user:
        return
    if message.content == "Hello":
        await client.send_message(channel, "Buzz buzz!")
Note: don’t forget to specify the server channel as the first parameter of send_message.
This is important – at the end of your code, you must include a client.run command with your authorization token as the only parameter:
client.run(client_secret)
Last steps
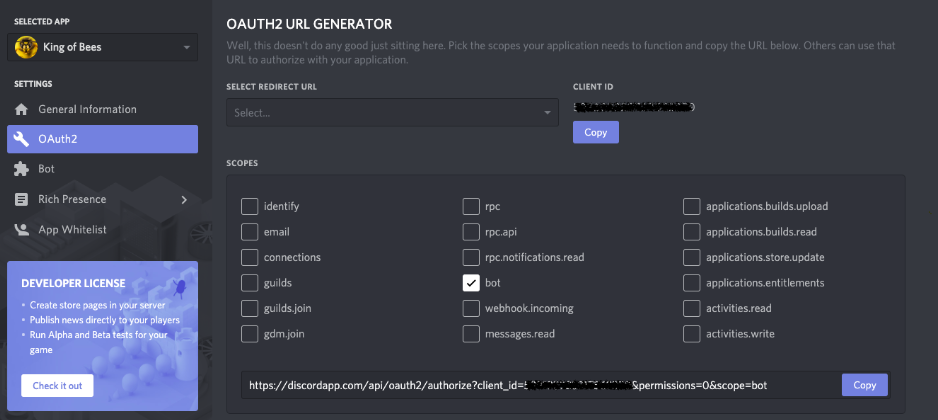
To connect your Discord server bot, you will need to go back to your Discord developers area and choose the OAuth2 URL section to generate a URL address. You will need it to invite your bot into the server:
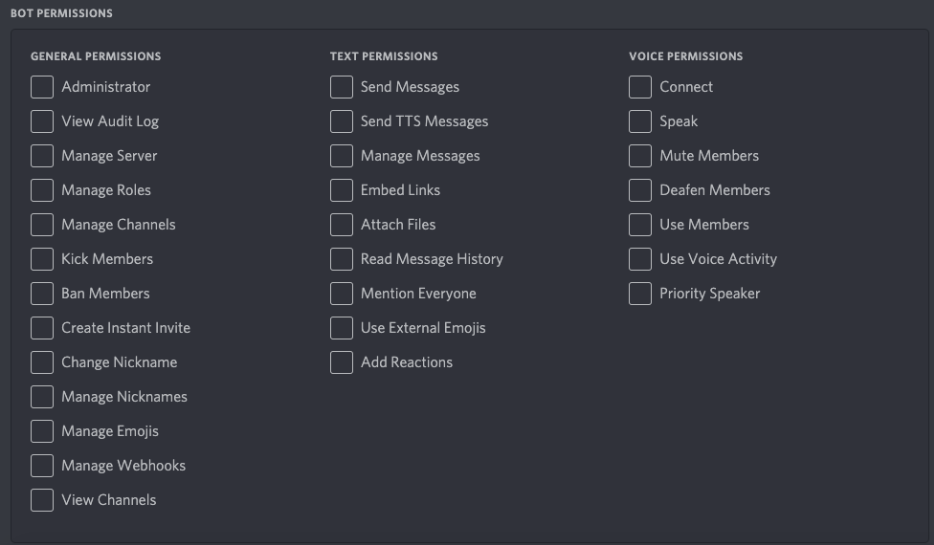
If you only need your bot to send messages as in the examples above, your job here is done. However, you might want to create Discord RPG bots or other more complicated types. In that case, you can add more choices in the Permissions section:
Finally, to check if you have successfully added a Discord server bot, go to the server and check if it shows in the list of members.
You can also download and use a Discord bot someone else has made. Check out databases like discordbots.org.
