Key Takeaways
- Futures trading on Toobit supports up to 200x leverage with cross or isolated margin options for flexible risk control;
- Toobit API lets you automate your strategy through custom scripts or ready-made tools that support direct integration;
- Convert lets you make instant, zero-fee swaps, while DEX+ helps you discover and trade on-chain tokens with ease.
Stop overpaying - start transferring money with Ogvio. Sign up, invite friends & grab Rewards now! 🎁
Among all the platforms out there, Toobit proves to be a solid place for leveling up your trading skills. It strikes a nice balance between an easy-to-navigate interface, helpful onboarding tools, and advanced features. That said, figuring out how to use Toobit efficiently can be a bit of a challenge, especially if you’re going at it alone and not quite sure where to start.
That’s why I'm here to walk through it with you, starting with futures trading, dipping into API-based automation, trying out quick asset swaps, and exploring on-chain trades. Toobit has plenty of other advanced tools too, but I’d say these are the ones that can help sharpen your strategy and take your trading further.
So if you're serious about stepping up your game, let’s take it one step at a time together.

Did you know?
Subscribe - We publish new crypto explainer videos every week!
What is Yield Farming in Crypto? (Animated Explanation)


Table of Contents
- 1. Getting Started With Toobit
- 1.1. Creating an Account
- 1.2. Funding Your Account
- 2. How to Use Toobit Futures
- 2.1. Overview of Toobit Futures
- 2.2. Futures Trading Walkthrough
- 2.3. Understanding Liquidation
- 3. How to Use Toobit API
- 3.1. Setting Up Access
- 3.2. Making API Calls with Your Key
- 3.3. Securing Your API Access
- 4. How to Use Toobit Convert and DEX+
- 4.1. Toobit Convert Walkthrough
- 4.2. Toobit DEX+ Walkthrough
- 4.3. When to Use Spot, Convert, or DEX+
- 5. Conclusions
Getting Started With Toobit
Before we hit the gas and head straight into learning how to use Toobit's more advanced features, let’s ease into it with a quick stop in first gear. After all, every trading journey has to start somewhere, and in this case, it begins with setting up your account and getting some funds in.
Latest Deal Active Right Now:If you’ve already got everything ready to go, feel free to skip to the next section. But if you want a quick refresher, let’s take a moment to walk through the basics together.
Creating an Account
Every professional trader starts with the basics. Thankfully, figuring out how to create an account on Toobit is just as easy as it is quick.
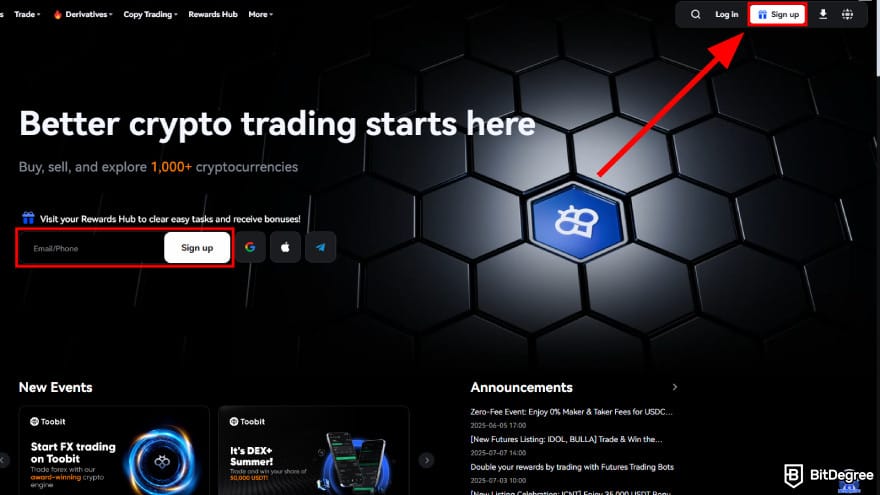
.jpg)
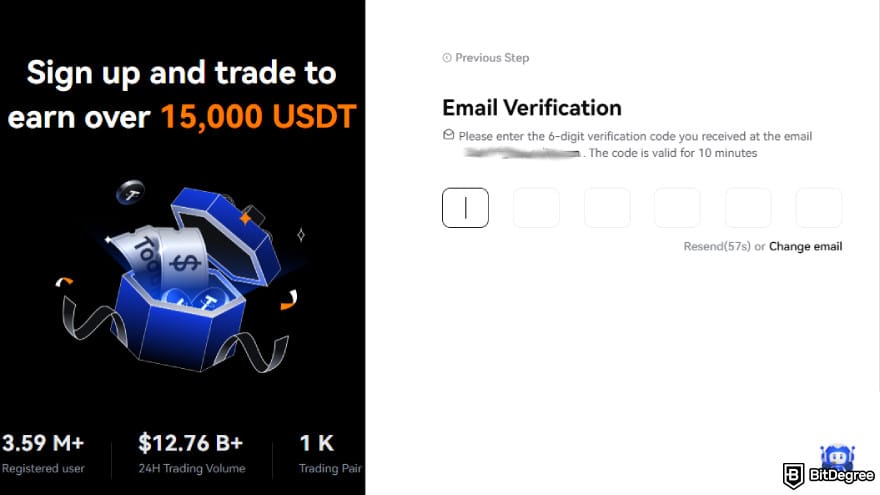 And with that, you’ve completed the Toobit registration process.
You can now start trading on Toobit spot and futures markets. However, if you plan to buy crypto using a debit or credit card, you’ll need to complete identity verification first.
Funding Your Account
Now that you know how to create an account on Toobit, the next step is getting some crypto into your wallet.
.jpg)
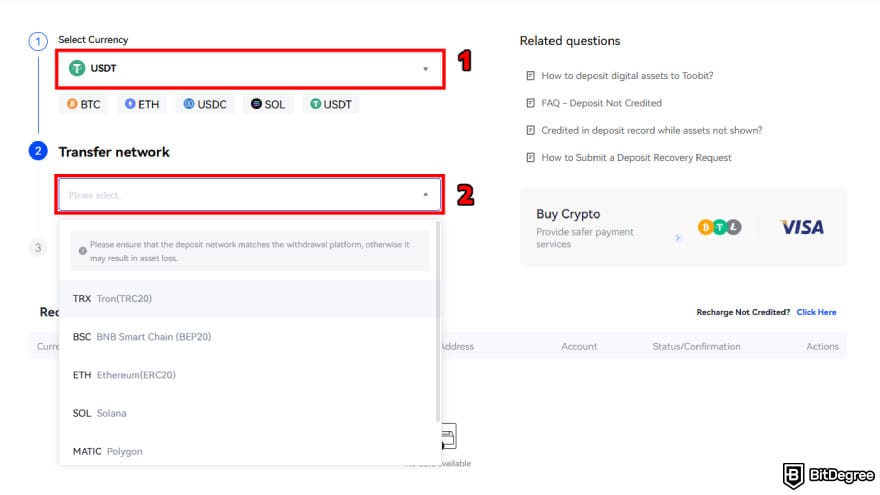
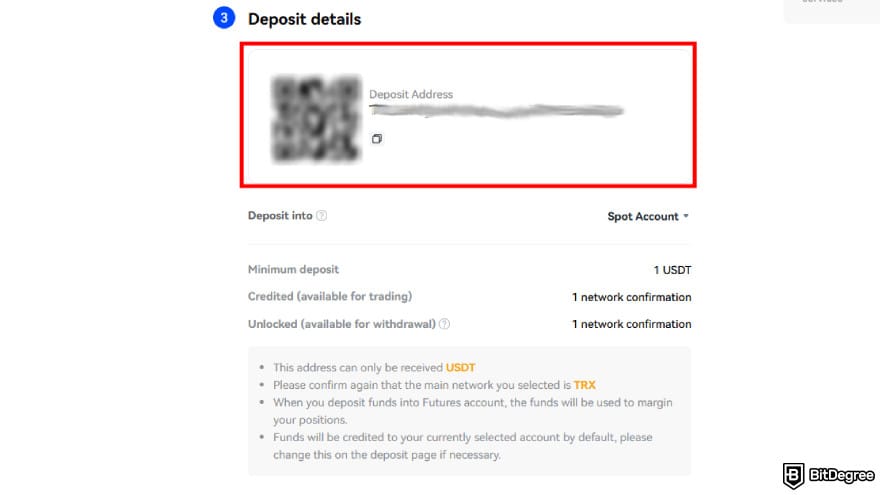
Congratulations! Your Toobit funding process is complete.
How to Use Toobit Futures
Now that your account is set up and funded, the next step is learning how to use Toobit’s futures trading page.
Overview of Toobit Futures
Toobit offers perpetual futures contracts that let you speculate on price movements without owning the underlying asset.[1] On top of that, it offers up to 200× leverage on select contracts like BTC/USDT and XAUT/USDT, giving you more flexibility to scale your positions when needed.
There are two main contract types available:
- USDⓈ-M Futures. Settled in USDT, this is the main section where most trading activity happens.
- USDC Futures. Settled in USDC, this tab includes a smaller list of contracts for those who want to use USDC as margin.
You can also switch between cross and isolated margin modes based on your risk strategy. Plus, Toobit supports a range of advanced order types, including margin, limit, and trigger orders.
The interface is clean and compact, seamlessly integrated with TradingView. It gives you access to advanced charting tools, multiple timeframes, and technical indicators, all laid out in a familiar way for anyone who’s used charting platforms before.
Futures Trading Walkthrough
Let’s walk through how to trade Toobit futures, from opening the panel to placing a position and tracking it in real time.
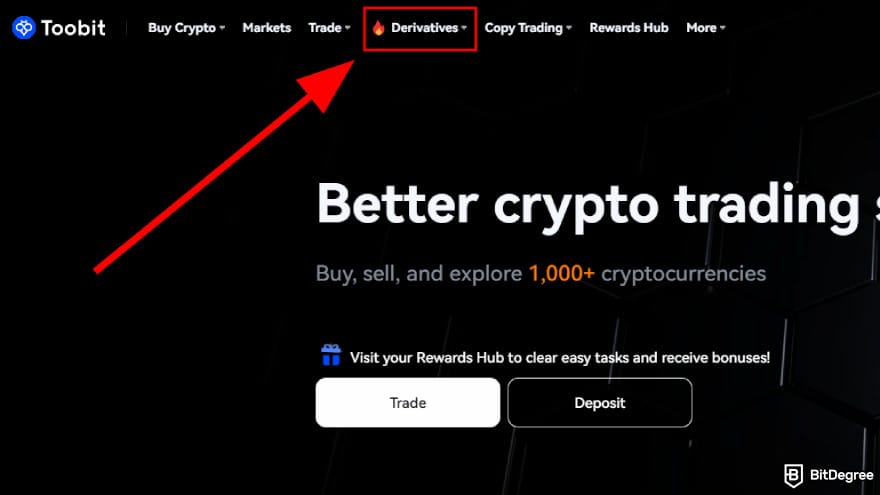
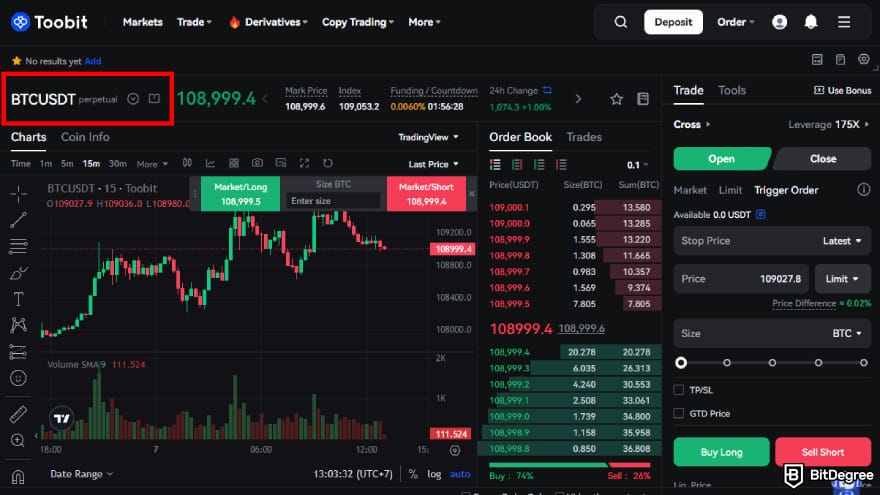 You’ll see a full list of available futures contracts pop up. Use the search bar or scroll through the list to find the pair you want to trade.
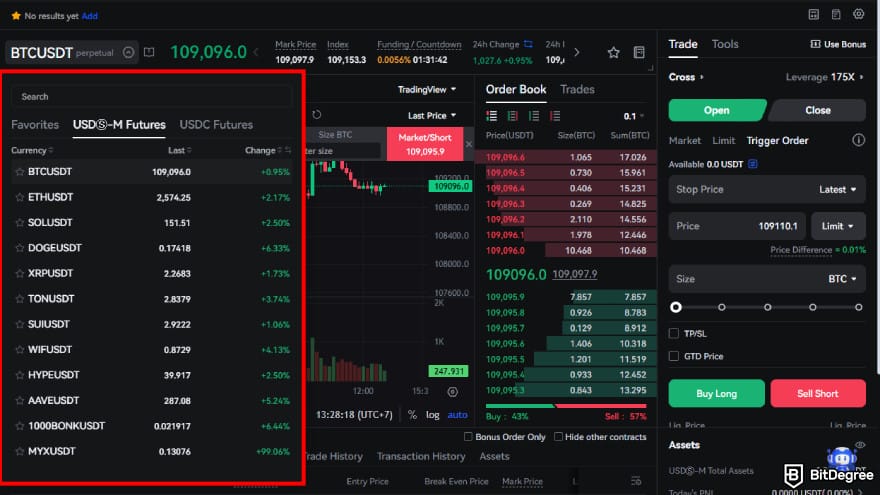 Once you select one, the chart and trading panel will refresh automatically.
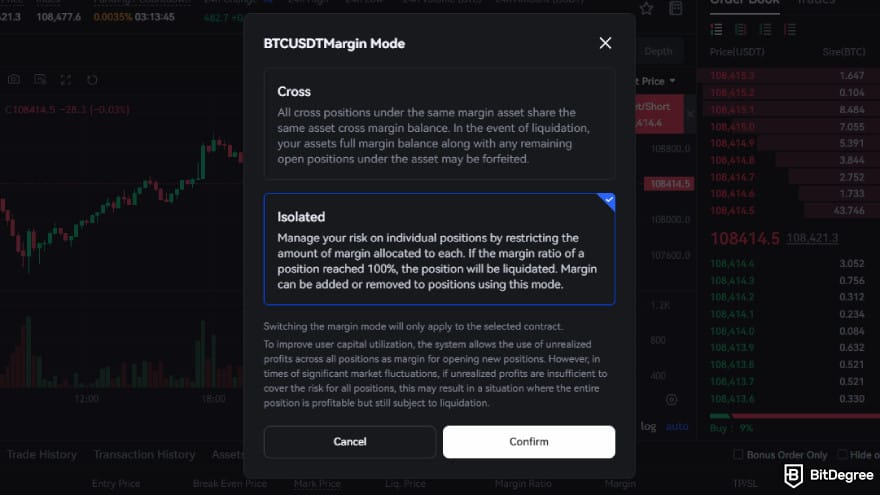
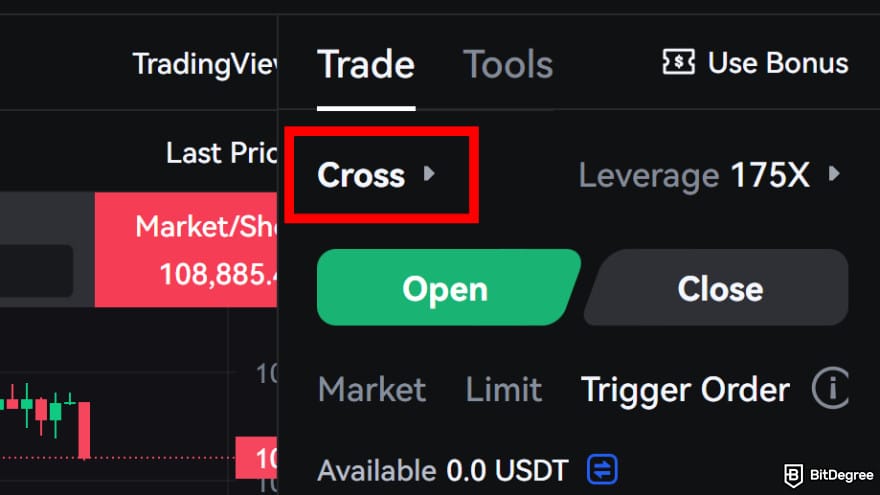 Toobit futures supports two margin modes that determine how your available balance is used when opening and managing positions:
- Cross Margin. Share your available balance across all open positions under the same asset. It helps reduce liquidation risk when you’ve got multiple trades open, but if things go south, your entire margin balance is at stake.
- Isolated Margin. Keep your risk limited to the specific amount allocated to one position. If the trade gets liquidated, only that isolated amount is affected.
If you’re just getting started, I’d recommend using isolated mode, as it gives you more control over each individual trade and helps limit potential losses. To switch between modes, click the margin label, select your preferred option, and hit [Confirm].
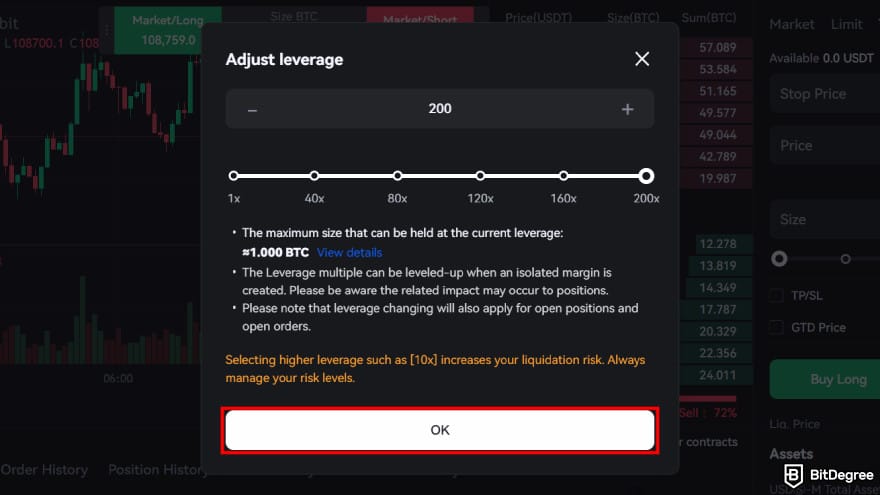
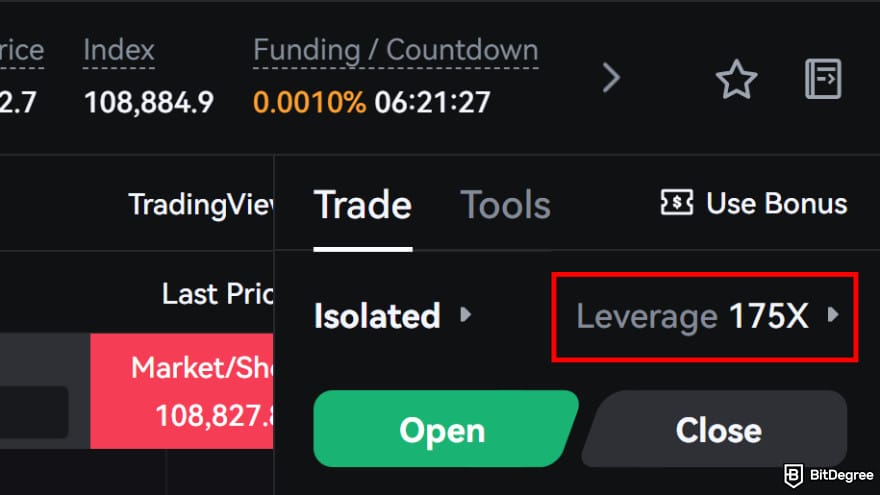 Clicking it opens a slider where you can adjust the leverage level. Since Toobit lets you set leverage per position, you can fine-tune your risk depending on the pair.
- Lower leverage (e.g., 3–10x). A safer option that gives you more breathing room before liquidation. Ideal for beginners or anyone who wants to keep risk in check.
- Higher leverage (e.g., 50–200x). Offers bigger potential gains with less upfront capital, but even a tiny price swing against you can liquidate your position.
If you’re just getting started, stick with something modest like 5x and not putting too much money into it. You can always scale up once you get more confident managing entries, exits, and liquidation risk.
After setting your leverage, click [OK] to apply. Your position size, required margin, and liquidation price will update automatically based on your selection.
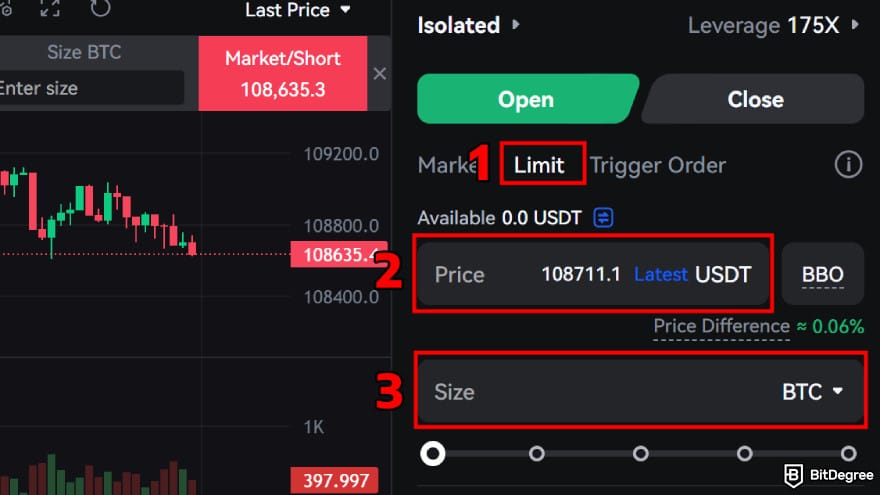
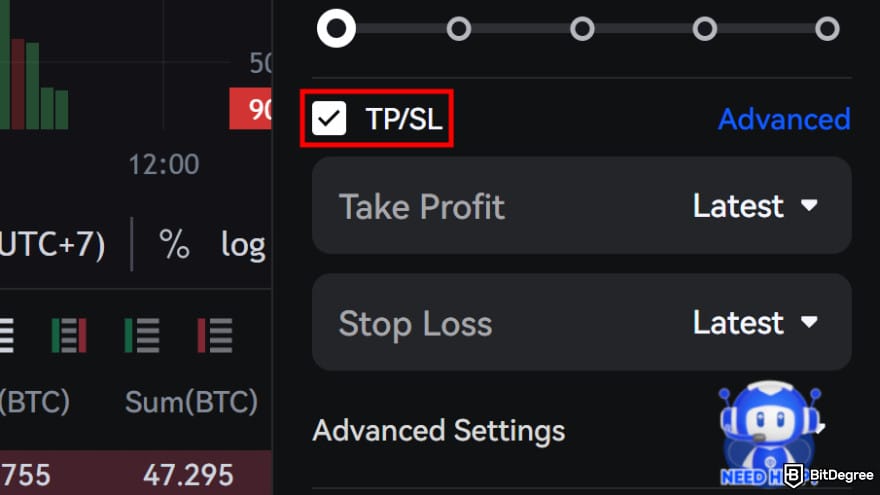 Use the [Latest] button to auto-fill the current market price or input your own values. If you prefer to do it later, you can also set TP and SL separately using Trigger Orders.
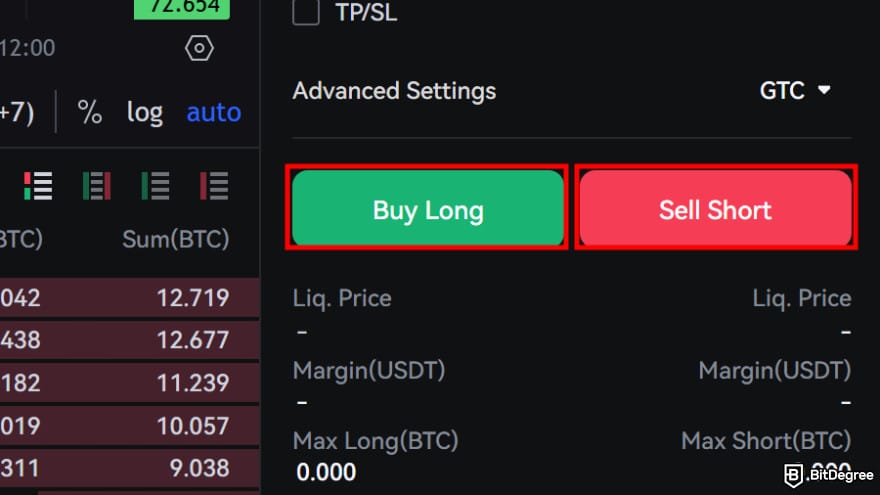 Before the order is submitted, Toobit will show a confirmation screen summarizing your key settings. Take a moment to review the details, and then click [Open Long] or [Open Short] to confirm the trade.
Your position is now live! You can track it anytime under the "Positions" tab.
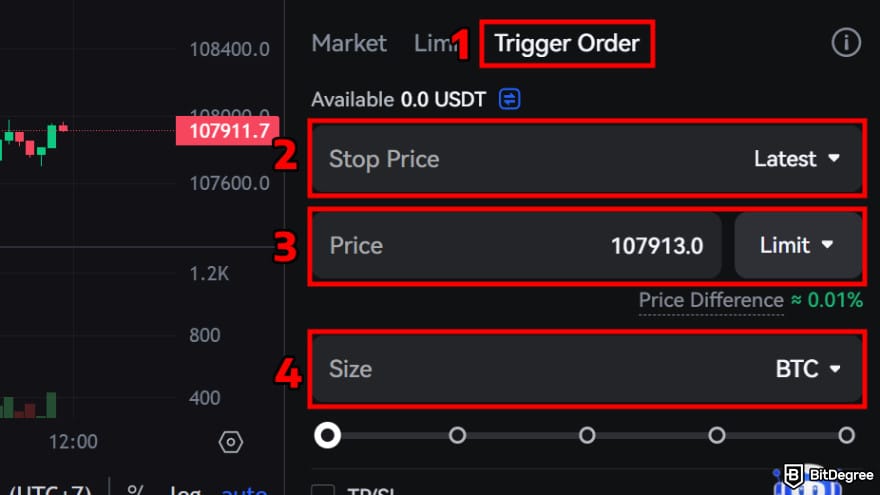
Toobit supports trigger orders, which let you automate your trades based on price conditions. These orders only activate once the market hits your specified stop price. To set it up:
- Choose [Trigger Order] as the order type.
- Set your [Stop Price] to define the trigger level.
- Choose your [Price] execution method (limit or market).
- Define the [Size] of the order.
Trigger orders are useful for automating entries or exits, especially around breakouts or key support/resistance levels.
Another way to automate your entries or exits is with an OCO (One-Cancels-the-Other) order. It lets you place a limit order and a stop-limit order at the same time. And once one gets filled or triggered, the other is instantly canceled.
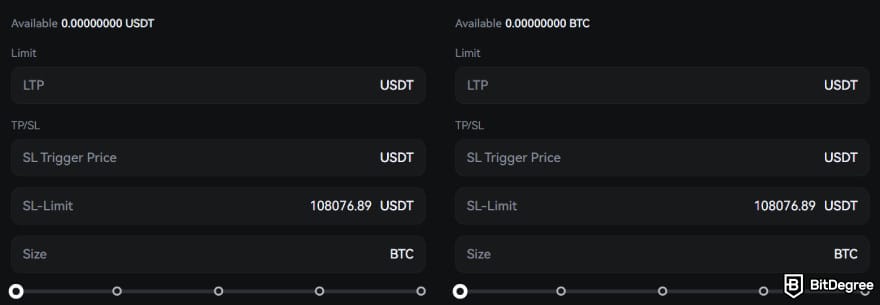 Here’s how to fill it out:
- Set a [Limit] price under the top field to define your take-profit level.
- Enter an [SL Trigger Price] to activate your stop-limit if the market turns against you.
- In the [SL-Limit] box, enter the fallback price the order should execute after the stop is triggered.
- Adjust the [Size] field to decide how much of your position should close when either condition is met.
This setup is useful when you’re not sure whether the price will break upward or drop. Instead of picking a side, you prepare for both.
 If you didn’t set a stop-loss or take-profit earlier, you can still add them by clicking the [Add] button under the TP/SL column.
Don’t forget to check the Toobit funding rate while your position is open. Depending on the rate at the time, you might pay a fee or receive one.
And with that, you should have a solid start on how to trade on Toobit’s futures market.

Did you know?
Subscribe - We publish new crypto explainer videos every week!
Is Cryptocurrency a Good Investment? (5 PROS & CONS!)


Understanding Liquidation
Liquidation happens when your position no longer has enough margin to keep it open. If the market moves too far against you and your margin ratio gets too high, Toobit will automatically close the trade to prevent further losses.
Your margin mode also plays a role here. In cross mode, your available balance is shared across positions, which can help delay liquidation but puts more funds at risk. In isolated mode, on the other hand, only the amount you’ve assigned to that trade is affected, helping you contain the potential loss.
This is something you want to understand, especially if you plan to master how to use Toobit futures properly. Always be aware of the risks, since losses can exceed your initial position size. Make sure to do your own research and use the proper tools before committing to any high-risk trade.
📚 Check Out: Mastering Crypto Futures Trading Techniques
How to Use Toobit API
The next step in mastering how to use Toobit like a pro? Letting code handle the heavy lifting for you. Toobit’s API allows seamless data exchange and full trading automation, helping you boost operational efficiency.[2]
By generating API keys from your account and connecting them to your custom script (or a prebuilt trading bot), you can automate just about anything. From opening or closing positions, adjusting stop-loss levels, or scanning markets for price signals, it gives you hands-free control over your crypto trades.
And don't worry, you don’t have to be a senior developer to use it. If you’re comfortable following a guide, copying some code, or using third-party tools, you can start automating trades in no time. There are also ready-to-use platforms and bots out there that work with Toobit's API.
Setting Up Access
To get started, you’ll need to generate your API credentials. Let’s walk through it step by step.
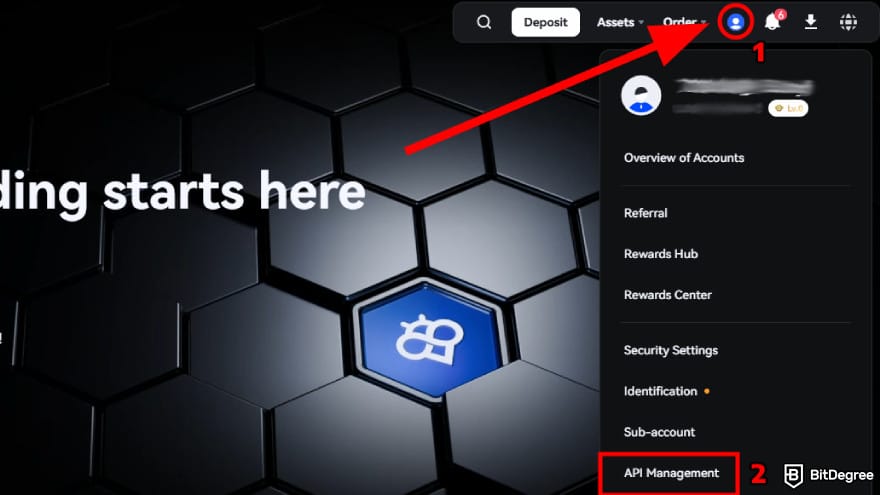
 After clicking it, you’ll be asked to name your key and choose what type of access it should have.
Note that you’ll need advanced verification to request read-write API access. Without it, you’re limited to read-only mode.
- Add a name under "Remarks".
- Choose Read-only or Read-Write access for the authentication setting.
- Select Spot, Contracts, or both depending on the markets you’ll automate.
- Pick either Unrestricted or restricted access by trusted IPs.
Once done, enter your 2FA code and click [Confirm] to generate the key.
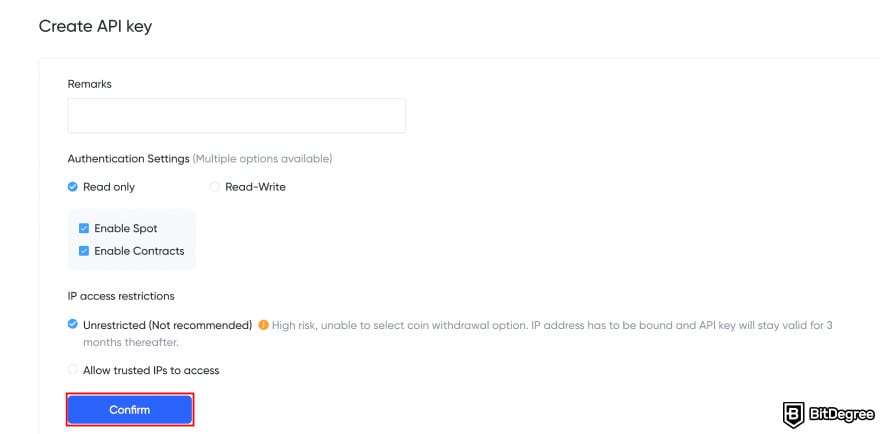 Be sure to copy the secret key immediately, as it won’t be shown again.
Making API Calls with Your Key
With your API key ready, the next step is choosing how you’ll use it. Depending on your comfort level with coding, you can plug it into your own script or connect it to a prebuilt tool.
Here’s a general outline of how that usually works:
1
Sign up on a platform that supports Toobit API integration (look for tools offering visual strategy builders, signal-based trading, or bot presets).
2
Head to the API integration or exchange connection settings.
3
Paste in your key and secret, then set your desired permissions.
4
Choose your strategy.
5
Launch the automation and monitor it from the dashboard.
Keep in mind, the exact steps may vary depending on the platform. Some tools offer drag-and-drop builders, while others use prebuilt templates or signal-based execution.
 Once your API connection is live, what comes next depends on the tool or approach you’re using. Some platforms stick to the basics, like placing spot orders or running a simple DCA strategy. Others go further, letting you fine-tune how to trade on Toobit with more control. The API itself opens up a wide range of possibilities, including:
- Placing spot or futures orders;
- Adjusting leverage for futures trades;
- Setting stop-loss and take-profit conditions;
- Monitoring open positions and wallet balances.
Whether you’re using a no-code platform or writing your script, the flexibility is there. How much of it you use comes down to the tool you choose or how far you want to go with automation.
📚 Check Out: How to Build AI Crypto Trading Bots
Securing Your API Access
Most API-based tools run into issues because of two things: rate limits and poor key handling.
Toobit’s API limits how many requests you can make in a short period. Go over that limit, and your requests may start failing or get blocked for a while. If you're using a third-party tool or writing your own script, make sure it includes basic error handling or slows down requests when needed.
 When it comes to security, think of your API key like the keys to your trading vault. Once it’s active, keeping it protected becomes your responsibility. Here are a few tips to help with that:
- Don’t hardcode it into your scripts or leave it in plain text.
- Use environment variables or encrypted config files to store it securely.
- Whitelist trusted IPs so only your system can use the key, even if it gets leaked.
- Avoid enabling withdrawals unless you have a very specific need and know exactly what you're doing.
A little caution here goes a long way. Whether you're using a bot or building something custom, your Toobit API key gives access to your real funds.
How to Use Toobit Convert and DEX+
Say you spot a promising new token, maybe it’s blowing up on Reddit, or it’s a project you’ve been tracking for weeks. You don’t always have time to mess with charts, especially when prices can shift in a blink.
That’s where Toobit gives you an edge with its Convert and DEX+ features, two streamlined tools built for fast & convenient trading.
Toobit Convert Walkthrough
The convert feature is available on both web and mobile, making it a handy tool when you want to trade or adjust your portfolio quickly on the go. It pulls directly from your Toobit spot balance, with zero fees and zero slippage.
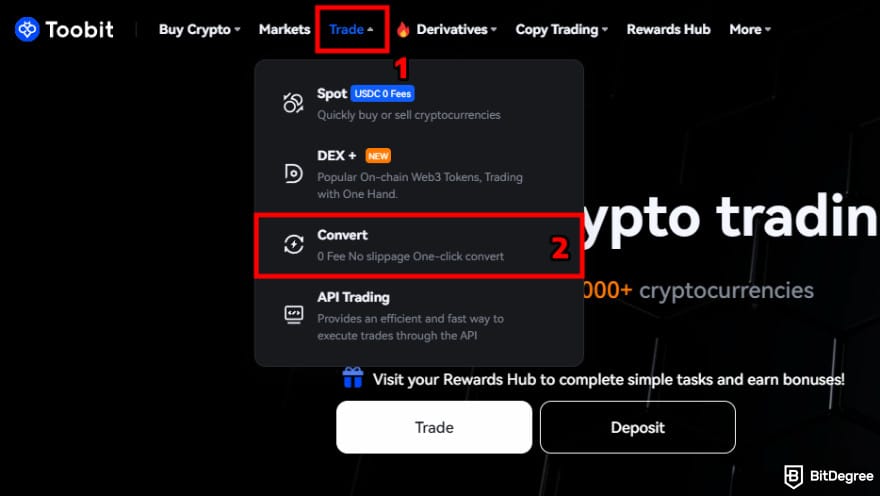
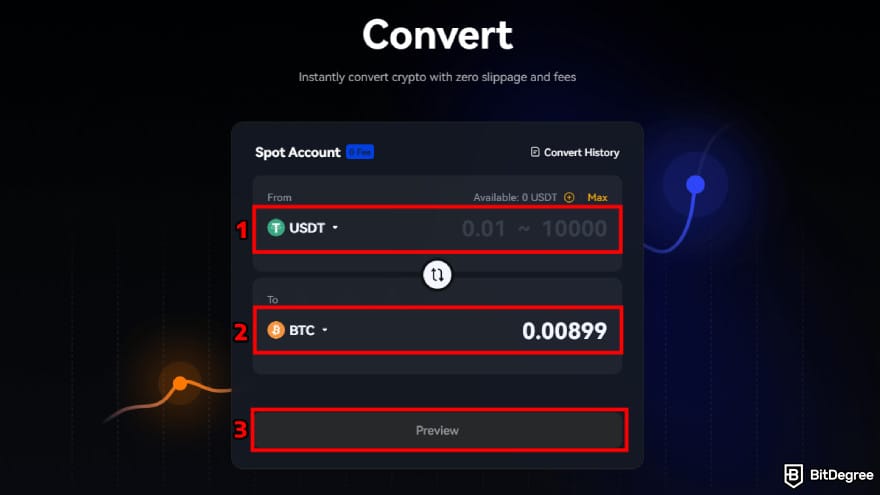 Then click [Preview] to generate a live conversion quote.
Convert pulls from your Toobit spot account, so make sure you have enough available balance.
Your new asset will show up in your spot account almost instantly. If you want to review past swaps, you can find them under "Convert History" in your account dashboard.
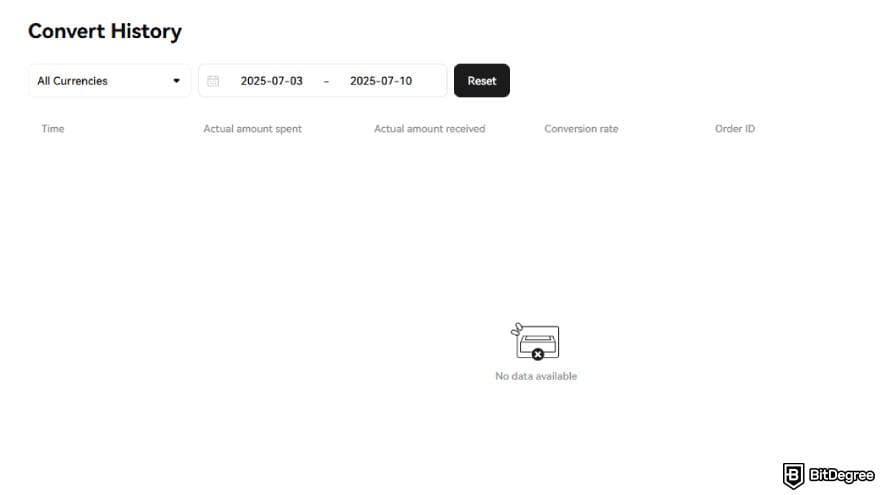 And that’s it! You’ve just mastered how to use Toobit Convert.
Toobit DEX+ Walkthrough
Toobit’s DEX+ brings DeFi-style trading into a more familiar setting. It lets you access on-chain assets without the usual hassle of setting up wallets, managing keys, or covering gas fees manually. You can trade directly from your Toobit account while still benefiting from the speed, security, and reliability of a centralized exchange.
DEX+ gives you access to a wide range of decentralized tokens. You can easily trade trending meme coins, Web3 projects, and early-stage governance assets that are typically only available on traditional DEXes.
As of writing, DEX+ is only available on the Toobit mobile app, with web support expected to roll out soon.
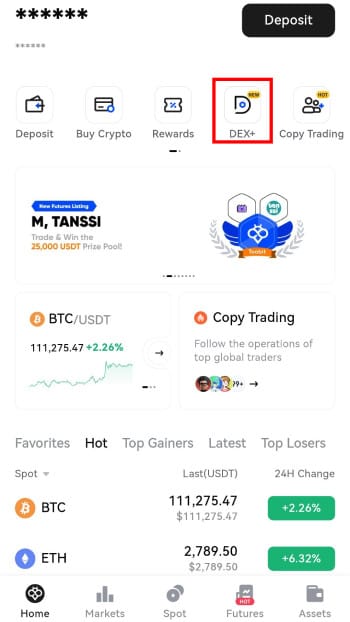
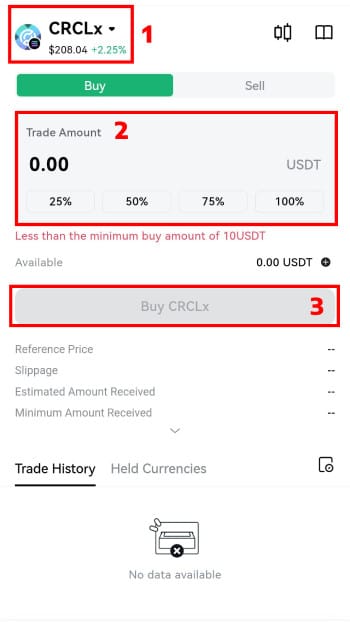
Once the trade is complete, the token will appear in your Toobit spot Account. And just like that, you’ve gained exposure to an on-chain asset without leaving the centralized environment.

- Secure and reliable
- Accepts fiat currencies
- Lots of trading options
- Reputable exchange
- Accepts fiat currencies
- Offers various trading options

- Huge trading variety
- Regulation-compliant around the globe
- Fair trading fees
- Beginner-friendly
- A wide array of features
- Vast number of different crypto coins & tokens

- Beginner-friendly
- Secure
- Decent trading and withdrawal fees
- Crypto.com Visa Card
- Automated tools & bots
- Ecosystem synergy with CRO
When to Use Spot, Convert, or DEX+
By now, you’ve seen how Toobit’s trading features work, and you’re one step closer to using them like a pro. But knowing how to use a tool is only half of it. A wise trader also understands when to use each one. Let’s break it down so you know exactly which to reach for.
Spot | DEX+ | Convert | |
|---|---|---|---|
Access | Web & Mobile | Mobile | Web & Mobile |
Assets | Major coins, stablecoins, and a wide range of listed altcoins | On-chain Web3 tokens, meme coins, and trending DeFi assets | Selected high-liquidity tokens |
Fee | 0.1% | 0% | 0% |
Control Level | Full charting, order types | Simple swap interface | One-click swaps |
Best for | Making precision trades | Discovering popular long-tail tokens | Executing instant swaps |
Toobit Spot VS DEX+ VS Convert
So when you’re just looking to swap between the popular tokens quickly, convert is your good friend. If you're after trending or early-stage DeFi tokens, like tokenized stocks, then DEX+ is your go-to.
That being said, if you’re the type who wants the full package of charting tools and advanced order types, there’s nothing like the good ol’ Toobit spot interface to get the job done.
📚 Check Out: Best Crypto Charts
Conclusions
So with that, I hope I’ve helped you learn how to use Toobit more skillfully and get you one step closer to becoming a professional trader. Getting comfortable with advanced features takes time, and it’s not something you figure out in a single day. I can share a few friendly pointers, but the rest is up to you to experience.
And of course, Toobit offers more than just futures trading, instant conversion, API integration, or decentralized features. There’s a lot more built into the platform that you can explore to help you trade smarter, stay agile, and keep developing your skills.
So take it from here, and see how far you can go with Toobit!
The content published on this website is not aimed to give any kind of financial, investment, trading, or any other form of advice. BitDegree.org does not endorse or suggest you to buy, sell or hold any kind of cryptocurrency. Before making financial investment decisions, do consult your financial advisor.
Scientific References
1. Ferko A., Moin A., Onur E., Penick M.: ‘Who Trades Bitcoin Futures and Why?’;
2. Ali M. A., Salih S. M.: ‘Impact of Application Programming Interfaces (APIs) Economy on Digital Economics in Saudi Arabia’.
