Stop overpaying - start transferring money with Ogvio. Sign up, invite friends & grab Rewards now! 🎁
Are you a digital artist looking to take your work to the next level? Perhaps an entrepreneur who’s heard about the NFT craze, and who wants to join the industry? Whatever the case might be, the very first step you need to take is learning how to create NFT art, without any coding or programming knowledge.
Generally speaking, creating NFT artwork isn’t necessarily all that difficult. This is especially true if you’re already familiar with the world of crypto, and know a thing or two about how blockchain technology works.
For complete newbies, though, everything might not be as clear as day. If you fall into this category of individuals, do not fret - I’m here to guide you through the process of creating your first digital art NFT, and publishing it on the most popular non-fungible token marketplace in the world!

Did you know?
Subscribe - We publish new crypto explainer videos every week!
How Does Cryptocurrency Work? (Explained with Animation)


Table of Contents
- 1. What’s the Point of Learning How to Create NFT Art?
- 1.1. Access to a New Audience
- 1.2. Continuous Royalties
- 1.3. A Large and Continuously-Growing Industry
- 1.4. Skillset Expansion Incentives (Creating AI Art)
- 2. How to Create NFT Art, Step by Step
- 2.1. Step 0: Creating Your Artwork
- 2.2. Step 1: Buying Ether, Setting Up a Crypto Wallet
- 2.3. Step 2: Choose the Correct Marketplace
- 2.4. Step 3: Connecting to OpenSea, Creating a Collection
- 2.5. Step 4: Creating and Publishing an NFT
- 2.6. Step 5: Working With Your Tokens
- 2.7. Step 6: Marketing Your Project
- 3. More Than Just Speculation
- 4. Conclusions
What’s the Point of Learning How to Create NFT Art?
If you’re one of the more-skeptical individuals out there, you might say - why should I learn how to create NFT artwork, in the first place? It’s just pure hype, and nothing more - this trend will pass in a few months’ time!
Latest Deal Active Right Now:Well, admittedly, if you’re reading this article, chances are that you don’t really view it that way. Perhaps the fact that NFTs are completely verifiable is your motivation? Or, maybe you're an artist who wants to create exclusive pieces, and are looking for the best way to start, without any programming or coding knowledge?
Whatever the case might be, though, it’s worth taking a look at some of the more common reasons why people choose to enter the NFT market.
At the same time, later on in the guide, we’ll also address some of the popular fears and criticisms of the space, and take a more in-depth look at them, in order to establish whether or not they hold any merit.
Access to a New Audience
Assuming that you’re already a digital artist - or simply a visual artist, in general -, one of the biggest benefits of entering the world of non-fungible tokens is exposure.
Crypto is popular - there’s no denying that. With governments making Bitcoin the official currency of the state, and churches accepting crypto as a form of tithe, it’s becoming increasingly more evident that mass adoption is on its way.
Following that, as you can imagine, crypto communities worldwide are large and ever-growing. This is also true regarding NFTs, as well.

Artists who enter the NFT markets usually expose themselves to completely new audiences and potential buyers of their work. While it’s true that you’d try to market your newly-established NFT business to your already-existing audience, this is just part of the equation.
If you’re a beginner artist, or if you haven’t been able to build a following up to this point in time, the NFT market can act as a sort of a launchpad to jump-start your career, too. Obviously, it isn’t simple to make your work noticeable in the vast sea of other artwork on select marketplaces, but it’s still a potential benefit of learning how to create NFT art, nonetheless!
Continuous Royalties
Whenever you create an art piece, and sell it, you receive that initial payment, and that’s it. Perhaps the buyer will recommend your work to their friends or colleagues, and you’ll receive follow-up orders, but that’s about the extent that it will go to.
Once you learn how to create NFT artwork, and start selling your digital art NFTs, you won’t be limited with one-time payments. Instead, you’ll actually be able to receive lifetime royalties for all of the follow-up sales that may happen in the future!
Each different NFT marketplace is going to have differing rates, as far as royalties go. Some will offer their artists around 2,5% in after-sale royalties, while others may bring that number up to 30% - that’s huge! Sure, the latter are very few and far in between, but that’s still a possibility, nonetheless.
A Large and Continuously-Growing Industry
As of writing this guide on how to create NFT art, we are currently in the honeymoon phase of the market. Everything related to non-fungible tokens is booming, estimated art values are increasing left, right, and center, and everyone constantly talking about it.
Naturally, it would be naive to think that this growth will continue indefinitely. However, one thing is becoming clearer by the day - NFTs are here to stay.
Being early to enter the industry has some exponential benefits. If you’re looking to earn money from your work, you need to establish a name and a reputation for both yourself, and the artwork that you create. The sooner you start doing so, the faster you’ll be able to see the results.

Think you’re already too late? That’s not true! While NFTs are super-popular already, sure, they are still far from being understood by your common person, and also explored by the general public, too.
Earlier on in the article, we’ve talked about the exposure that you’ll potentially receive once you join the ranks of NFT artists. However, financial incentives are a large part of why you might want to learn how to create NFT artwork, as well! With the crypto market being worth over $2 trillion, it’s definitely an industry that many people want to get into.
It's no wonder, really - the NFT market has generated quite a few outstanding numbers. Beeple's "The First 5000 Days" NFT sold for over $69 million. Jack Dorsey's first tweet sold for $2.9 million (even though now it's struggling to reach even a fraction of the original price). These are just a couple of the more well-known numbers - there are plenty of artists and enthusiasts who've made a fortune within this ecosystem.
The best part? You don’t need to be a developer or a day trader in order to make a profit with cryptocurrencies. NFTs open up this market to artists and other art-related people all around the world.
Speaking of which, however, artists aren't the only ones that can benefit from creating NFT art.
Skillset Expansion Incentives (Creating AI Art)
There's a common misconception that learning how to create NFT art is reserved solely for artistic individuals, or at least those who know how to handle a paintbrush or a pencil. Thanks to the technological advancements of today, that is no longer the case.
These days, anyone is able to create art, with the help of artificial intelligence (AI). There are seemingly countless different apps and software out there that will cater to the needs of virtually everyone - no matter how niche of an idea you might have, chances are that you'll find an AI solution to make it a reality.
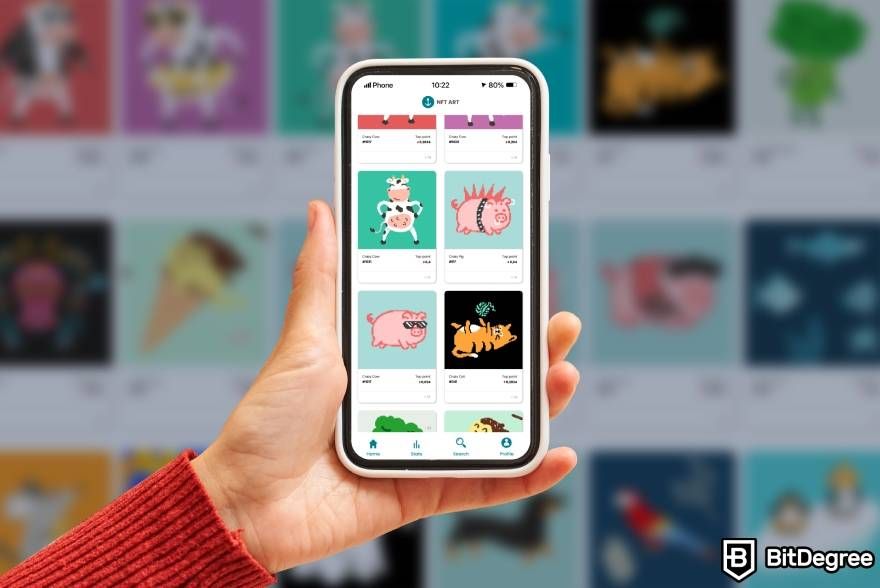
Naturally, if you plan to create AI NFT art, you need to really look into the terms and regulations of the AI that you'll be using, as well as the copyright laws that exist in relation to such artwork. That being said, oftentimes, these aspects shouldn't prove to be a burden. In any case, make sure that your collection is original and unique - you can draw inspiration, but nobody wants copy-pasted versions of the same collection!
With that, though, there are additional perks that you might not necessarily think about - for example, perhaps you'll fall into the rabbit hole of artificial intelligence, get really good at it, and find yourself with a handful of new career opportunities? The possibilities are endless!
As far as creating NFT art goes, though, one thing's for sure - nowadays, you no longer need to be artistically inclined in order to create NFT artwork.
How to Create NFT Art, Step by Step
Whether you relate to the above-mentioned aspects, or have your own, personal reasons for wanting to learn how to create NFT art, the process is going to look the same, either way.
While we do discuss the creation process in some other articles that relate to the topic of NFTs, here, we’ll go in-depth, with me guiding you through every step of the way. To start off, worry not - you don't need to have any prior experience or knowledge when it comes to creating NFT art without coding. What you do need, however, is to have your artwork ready. Consider this as a sort of step 0.

Did you know?
Subscribe - We publish new crypto explainer videos every week!
What is a Crypto Bridge? (Explained with Animations)

Step 0: Creating Your Artwork
I'm choosing to call this "Step 0", since it's something that you should have prepared in advance. There are, however, a few ways of how you can go about doing it.
First and foremost, the "traditional" approach - you create specific artwork for your NFT (or NFT collection) by utilizing your digital artwork, painting, drawing, and other art-related skills. This method is pretty straightforward, and doesn't really require a lot of explanation - the only point here is that, no matter the form of art that you choose to create, it will still need to be "digitalized", or made out to be an image file. More on that later.
The second approach has to do with the topic we discussed earlier in the article - specifically, AI-generated art. Here, you have a couple of choices.

The first and simplest one would be to visit one of the now-abundant AI digital art platforms, register, learn the ropes of how the service works, and start creating your art there. As a quick reminder, however, always make sure that the platform's terms of service allow you to later sell that artwork as your own, without relevant copyright attributions.
Another option would be to visit an "NFT maker, creator" tool - there are quite a few of them available, as well. These tools streamline the process of creating art, as well, but they are usually favored among individuals who are already familiar with the industry, understand how NFTs work, and what are the intricacies of creating NFT art.
Whatever it is that you decide to do (whichever approach to take), make sure that you have your art ready before you start looking into the actual NFT creation. As mentioned earlier, this includes having your art prepared in the appropriate digital format - most NFT marketplaces support the following formats:
- .png - the most popular format for digital artwork. Takes up more space, but is usually higher-quality, as well.
- .jpeg - an alternative to .png. The quality might not be as good, but the size of the file will be considerably smaller, as well.
- .tif - a format that is often used with pictures, .tif ensures high image quality, and is often used by photographers, or individuals who are looking to create large-scale NFT artwork.
- .gif - GIFs are either high-quality image files, or short and audio-free "videos" that can be handled as images, on the technical side of things.
There are other formats supported for NFT creation (even MP4, for example), but the above are some of the more common ones that you'll encounter. Once you have your artwork ready, in the form of one of the above-mentioned formats, all you’ll need to begin are some Ether coins, and a reliable crypto wallet to store them in.
Step 1: Buying Ether, Setting Up a Crypto Wallet
Ether is the native cryptocurrency of the Ethereum blockchain. This blockchain is home to most NFTs and NFT marketplaces that exist - naturally, if you’re going to learn how to create NFT art, you’ll be dealing with Ethereum a lot.
The very first step that you need to take in order to start creating digital art NFTs is buy some Ether coins on an exchange, and transfer them to a designated crypto wallet.
As far as exchanges are concerned, I would highly recommend you’d pick Binance. This is the leading crypto trading platform in the world, and offers its users a very beginner-friendly way of buying, selling, and trading crypto. You can also check out some Binance alternatives, too, but if you’re new to the industry, this is the exchange to go with.
Once you purchase some Ether, you will then need a cryptocurrency wallet to store it in. It’s not wise to leave your coins in an exchange, and on top of that, you would need a separate wallet in order to connect to an NFT marketplace, either way.
In order to use the aforementioned marketplaces, you will need to possess a MetaMask wallet. You could just create one, and store your ETH here - that being said, though, if you value security, and want to keep your crypto coins and NFTs protected, it’s a much wiser idea to invest in a hardware wallet. Here, the Ledger Nano X is the most likely contender.
With a Ledger wallet, you will still be able to use MetaMask, without needing to alternate between the two. You’d simply connect your Ledger device to MetaMask, and would be able to perform all of your processes via the latter.
Once you have both wallets set up, and your coins transferred, you can then start checking out guides on how to create NFT artwork on select marketplaces. This is because the processes up until this point were more of a precursor - they are still among those that need to be performed beforehand, though!
Step 2: Choose the Correct Marketplace
It would be impossible to talk about how to make NFT art without selecting an appropriate marketplace, first. This is because mostly all of the processes revolving around NFT creation happen in an actual marketplace itself.
If you already have a painting, drawing, photograph, or a character design (or anything else of a similar nature) all prepared and ready to be turned into an NFT, finding a marketplace becomes the next priority. With the right market, you will not only be able to narrow down your audience (there are niche-specific NFT marketplaces out there), but also make sure that the NFT creation process is as simple and smooth as possible.
How should you go about picking the best market for yourself, though? Truth be told, no matter if you’re just learning how to create NFT artwork, or are already a proficient seller, there is one platform that stands out among them all - OpenSea.
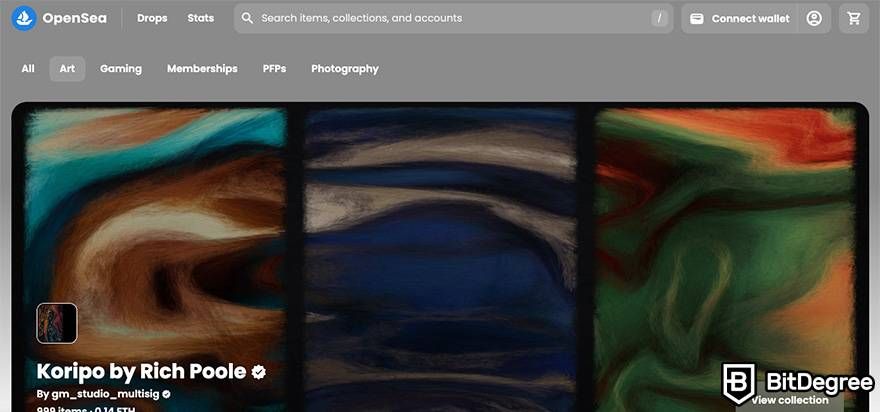
There are multiple reasons for why that’s the case, as well. OpenSea has the largest selection of NFTs on the market, aggregating almost 80 million tokens as of writing this article. On top of that, it’s the most popular platform to deal in NFTs, by far - the name of the marketplace has become synonymous with all things non-fungible, within the crypto space.
OpenSea is praiseworthy for a wide variety of reasons, but it’s also important to mention that simplicity and user experience are among the more-noticeable of them. While the marketplace is extremely simple to use, and will thus suit complete newcomers to the field, it also still provides users with all of the necessary tools that you might need in order to start selling NFT artwork.
There are other options out there, too. Rarible is another popular platform that’s worth checking out and exploring, and (as mentioned earlier) there are niche-specific markets available, too. These markets, however, are definitely not going to provide you with the exposure and options that OpenSea can.
In short, if you want to learn how to create NFT art, and start off your NFT journey on the right foot, you really can’t go wrong with OpenSea.
Step 3: Connecting to OpenSea, Creating a Collection
Now, in order to start creating your NFTs, you will need to log into OpenSea, with your MetaMask wallet. You’ll notice that MetaMask isn’t the only wallet that you can use - far from it! -, but it’s the best option both for beginners, and for those who want to keep things simple and quick.
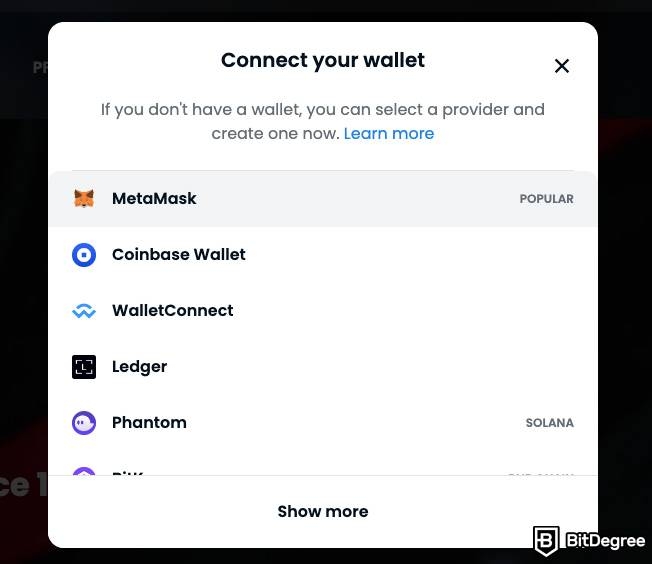
First, navigate to the upper-right corner of the screen of the OpenSea official website, and press Connect Wallet. Here, you need to select MetaMask.
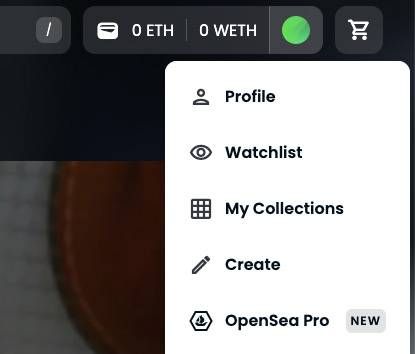
Once connected, you will then need to go to your “My Collections” tab. This is located in the drop-down menu, under your profile picture.
After selecting to create a new collection, you will be asked to choose a contract for creating it. You can either deploy your own contract or use the OpenSea contract. Let's go with the latter. Once you select it, you'll be sent to a page full of various customizations. Here, you can choose a logo and a banner for your collection, enter the description, create a custom URL, select categories, and more.
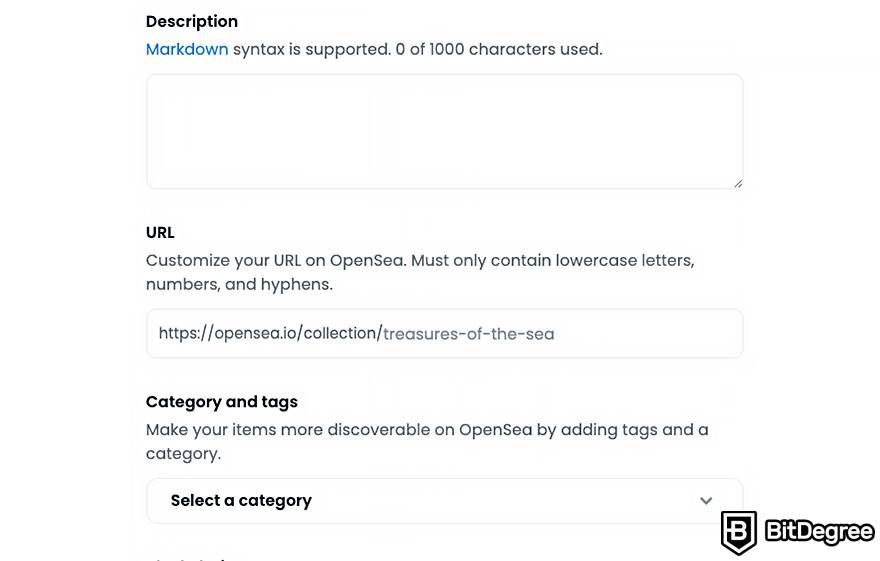
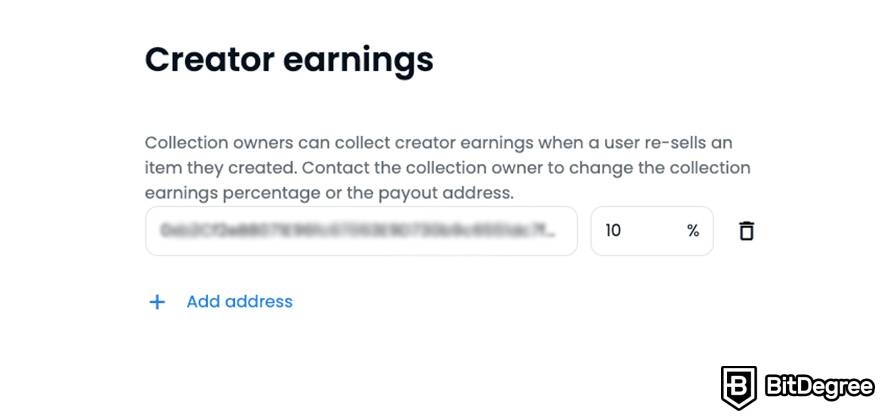
Once you’ve taken care of the visual side of things, you will then need to sort out your royalties, payment methods (you can pick between a few), and other data, too. Royalties need to be set by you, but cannot go over 10%. That’s the maximum amount that you can earn on OpenSea, follow-up sale royalty-wise. Go to the Earnings tab to set your desired royalties.
You will also need to choose the blockchain on which your collection will reside, too (you can do that in the Details tab). This will also determine the tokens that you can accept as payment for your NFT. If you’ve just started looking into how to make NFT artwork, and aren’t all that savvy regarding the topic of crypto, as a whole, it’s best if you stick with the Ethereum blockchain, and Ether as your preferred payment method.
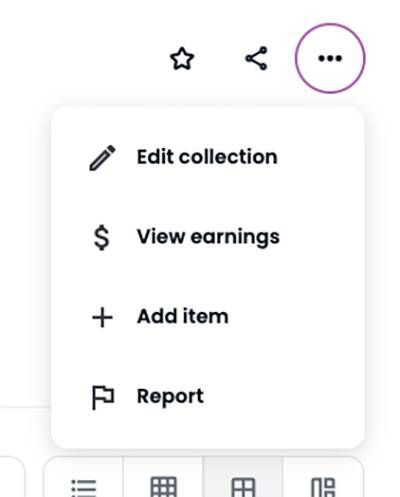
Once you’ve finished up with your collection, create it, and wait for the page to reload. After this happens, you will be sent to your collection - at the right corner of the screen, click on three dots and then add an item. This is where you’ll create a specific NFT.
Step 4: Creating and Publishing an NFT
We’re finally here - the point at which your NFT will come to life! In order for that to happen, though, you still need to fill out some forms, and set the properties of your token.
The first thing that you’ll need to do is - naturally - upload your file to the platform. This file can be almost anything - a picture, a photograph, a GIF, and so on. If your NFT artwork consists of 3D imagery, the file extensions are going to differ - OpenSea should still support them, nonetheless.
Once you upload the file, name it, and write a description, you will then need to select some properties and stats for your NFT. These are mostly optional, but they will make your token more unique - it's a very popular addition to various collectible NFTs.
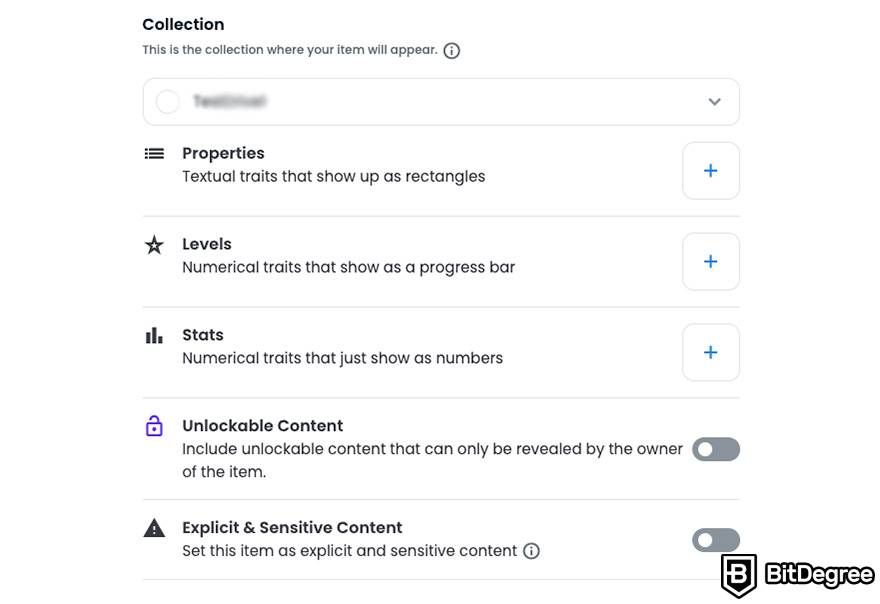
After all of that is done, you can press “Create” one more time, and that’s it - your NFT is created! You will be sent to the preview page, and will be able to see how it will look to your potential buyers.
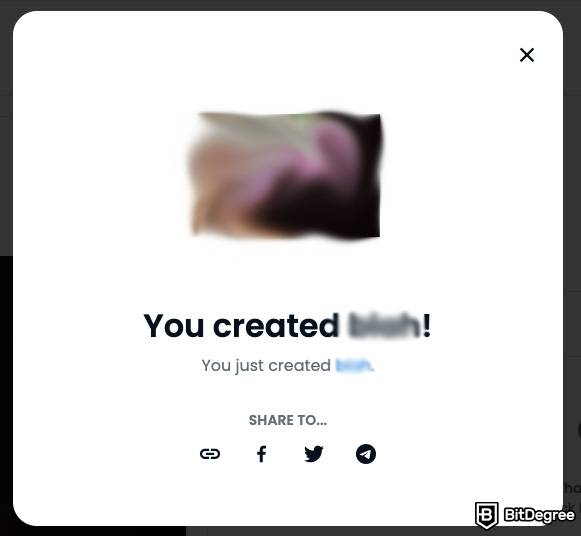
Following this, once you’re sure that you’re happy with how the NFT turned out, you can continue to the sales page, and set up the token to be either sold, or auctioned. This is where you yourself are able to pick the path that’s best for your specific non-fungible token!
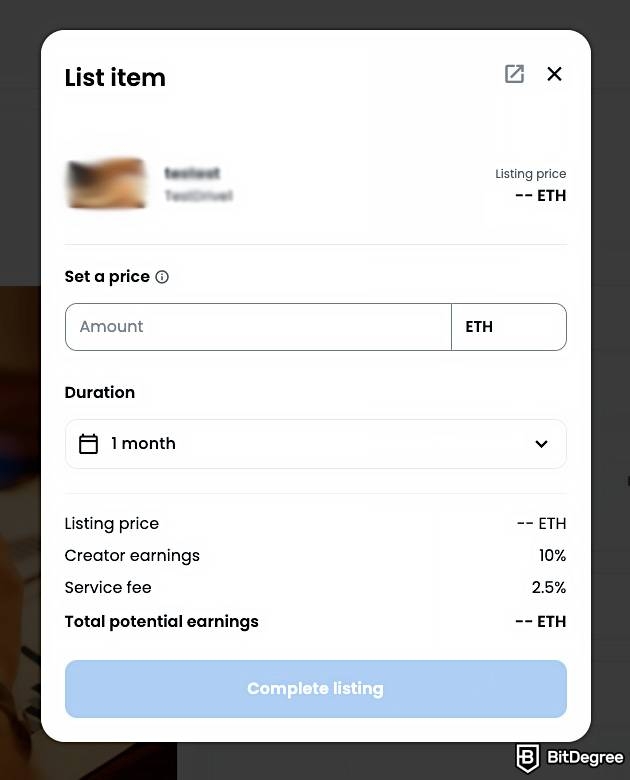
OpenSea even allows private sales, too - you can specify a single wallet address that’s going to be able to purchase your NFT. This is a great feature to have, for a variety of reasons!
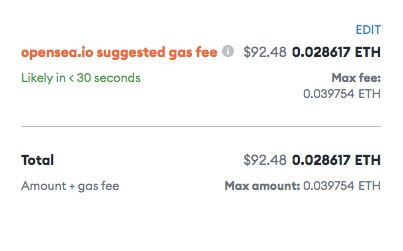
Once all is said and done, you may publish your NFT - a MetaMask wallet popup will appear, with the gas fee that you need to pay in order for the NFT to be minted. As you can see from my NFT publish experience, these fees can get pretty high! This is why you should always try and time the market, if you want to get better gas prices - they can be checked here.
Step 5: Working With Your Tokens
All of the aspects we’ve discussed up to this point relate to publishing your first NFT. While that’s great and all, it’s rarely the case that an artist would want to mint and publish but a single token - more often than not, you’d have a notable collection of your works!
This is where you need to start optimizing your processes, and think smart.
For starters, gas fees. If you publish your NFTs one at a time, chances are that you’re going to pay a huge amount in fees - that’s not ideal. Instead, you could look into bundled publishing - a way of how you can mint a select number of tokens at the same time, mitigating the gas fees along the way.
![]()
Staying up-to-date with recent cryptocurrency-related news is going to be super helpful, as well. Ethereum gas prices depend heavily on the congestion of the market - the more transactions are being processed at any given point in time, the higher the gas prices will be.
Transactions do also depend on the popularity of the network, apart from other things. So, if you’re able to time the market well, you might save a lot of Ether!
Following that, you should also work on your collections, as well. Since you can create a large number of them on your account, make sure that all NFTs reside in the right one - this will help your NFT artwork to be found, and will also allow potential buyers to access some alternative pieces, too.
Update 2023:
As a sidenote, it is currently possible to create NFT art for free, as well. This is often referred to as "lazy minting" - your NFT would only be minted on the network when someone buys it, and thus, they would pay the network gas fees, as well. This, in turn, would mean that you have zero upfront costs associated with the minting process - something worth keeping in mind!

- Secure and reliable
- Accepts fiat currencies
- Lots of trading options
- Reputable exchange
- Accepts fiat currencies
- Offers various trading options

- Huge trading variety
- Regulation-compliant around the globe
- Fair trading fees
- Beginner-friendly
- A wide array of features
- Vast number of different crypto coins & tokens

- Beginner-friendly
- Secure
- Decent trading and withdrawal fees
- Crypto.com Visa Card
- Automated tools & bots
- Ecosystem synergy with CRO
Step 6: Marketing Your Project
You have your NFT artwork published - now what?
Well, you could just leave it there, and hope that someone comes across it - sure. However, this is the bad way of going about it - learning how to create NFT art doesn’t just end when you press the “Sell” button. Truth be told, this is only half of the process done - the next half is just as important, and it revolves around marketing your tokens.
As I’ve pointed out earlier in the guide, OpenSea has nearly 80 million different non-fungible tokens for you to check out and acquire. That’s a huge number! While the marketplace might be *the* NFT hub of the industry, the huge numbers also mean that your digital art NFTs can get lost in the crowd pretty quickly.
So, how do you go about marketing your tokens? Well - it depends.
If you’re an artist with an already-existing audience, things are a bit simpler. This means that you already have a following who are interested in your work, and presenting the option to purchase it in the form of non-fungible tokens can be an interesting and attention-grabbing prospect.
If, however, you don’t have a following, or are just starting out with your social media presence, promoting your NFTs should go hand-in-hand with the creation of that presence.
This is, once again, a point worth emphasizing in this guide on how to create NFT art, too. You don’t really need to be an established artist in order to get into NFTs! While it surely does help with the promotion of your work, it’s not a necessity. You could find your initial footing in the crypto space, and branch out from here!
More Than Just Speculation
As pointed out earlier, probably one of the most popular pieces of criticism that skeptics express towards NFTs has to do with the speculatory nature of these tokens. Terms such as “overpriced” and “bubble” are being thrown all around - how much merit do they really carry, though?
The answer does, naturally, depend on who you’d point this question at. However, judging strictly by the tendencies of the market, it would seem that NFTs are surely here to stay.
The argument about non-fungible tokens being overpriced is extremely lackluster. Just like some famous pieces of art, digital art NFTs are priced so due to market demand - if there are individuals who are willing to pay large amounts of money for a specific piece of NFT artwork, the price kind of justifies itself!
As far as the bubble point goes, it’s worth pointing out that utility-possessing NFTs are becoming more and more recognized, by the day. If you create a standalone art NFT, good - however, if you make an art-based token that has some hidden, unlockable content (meet and greet tickets, a thank-you video, etc.), you might be contributing to the successful future of the NFT space.
At the same time, purely art-based NFTs aren’t going anywhere, either! In the same manner how people have been collecting physical pieces of art for centuries, the digital age simply brought another medium to the table - it’s really no different!
Naturally, though, it’s worth acknowledging the speculatory nature of this form of art, as well. Many pieces of physical artwork are tangible, and have some sort of established value - NFTs still need to earn that reputation within the industry. This should come with time, though.
Conclusions
What are the main takeaways that you should have from reading this article on how to make NFT art?
Well, there are a few, really! For starters, it’s evident that the process of creating NFT art has a somewhat steep learning curve. If you’re proficient with the concept of crypto, things are going to go much smoother than if you’ve never heard about it before.
That said, even if you’re completely new to the topic, it shouldn’t take you too long to understand the ins and outs of the concept. This is especially true once you have the core principles out of the way.
What are these principles, you may ponder? Well, they have to do with choosing the right wallet to keep your NFTs (and profits!) in, and also using the best marketplace for all of your NFT ventures, too.
|
|
|
|
|---|---|---|
| Hardware | Software | |
| Safely Storing, Sending, and Receiving Different Cryptocurrencies | Best for Storing Small Amounts of Cryptocurrency | |
| All Ledger Nano X Coupons | See All Coupons of Best Wallets | |
| The tried and true hardware wallet from Ledger with all the essential features. | An attention-worthy hot wallet for Ethereum, but there are better options around. | |
| Visit site Read review | See TOP10 Brands Read review |
Table: Some general information about the Ledger Nano X and MetaMask
Wallet-wise, it’s a no-brainer - if you want the best of the best, you should look at Ledger. More specifically, your attention should be pointed to the Nano X model of the company’s hardware wallets - it’s the wallet industry top-dog, and is known for providing users with superb security, UI features, and general usability, too.
Do keep in mind the fact that, even with Ledger, you will still need a specific software wallet in order to connect to most of the top-tier NFT marketplaces - MetaMask. This wallet, however, supports connectivity with Ledger, so you shouldn’t face any issues in this regard.
Finally, when it comes to NFT marketplaces, you can’t go wrong by choosing OpenSea. It’s the world’s most popular non-fungible token market, and allows both creators & sellers, and also buyers to have an awesome and beginner-friendly experience.
All of that being said, thanks for reading this article on how to create NFT artwork!
The content published on this website is not aimed to give any kind of financial, investment, trading, or any other form of advice. BitDegree.org does not endorse or suggest you to buy, sell or hold any kind of cryptocurrency. Before making financial investment decisions, do consult your financial advisor.
