Key Takeaways
- BitDegree allows anyone to create Guilds and interactive Missions for easy knowledge-sharing and skill-building in a custom-built environment;
- The BitDegree Mission Builder simplifies the creation of gamified learning experiences and lets builders offer rewards like cryptocurrencies to boost engagement;
- Below, learn how to build a crypto community and fill Missions with interactive rounds, including quizzes, social actions, site visits, video tasks, and more.
Stop overpaying - start transferring money with Ogvio. Sign up, invite friends & grab Rewards now! 🎁
BitDegree’s new features empower everyone – educators, companies, community leaders, or plain old regular people with a passion for crypto – to build a crypto community and custom Missions.
Thanks to Guild creation and the Mission Builder, BitDegree now lets anyone share their knowledge, raise awareness, and foster skill development in a fun and collaborative way.
In this tutorial, I'll walk you through how to build a community in crypto, create a Guild, and build custom Missions using BitDegree’s in-platform tools, so you can reach your audience, teach new skills, and do your part to contribute to a better future with Web3.

Did you know?
Subscribe - We publish new crypto explainer videos every week!
Paper Hands vs Diamond Hands: Crypto Slang Explained (ANIMATED)


Table of Contents
- 1. Why Create Guilds and Build Missions on BitDegree?
- 1.1. Easily Introduce the World to New Tech and Ideas
- 1.2. Find a Large, Friendly Audience
- 1.3. More Fun and Engagement
- 1.4. Effectively Promote Your Brand
- 1.5. Best Place to Create Custom Learning Experiences
- 2. What Is a BitDegree Guild?
- 3. How to Create a Crypto Guild on BitDegree
- 3.1. Step 1: Sign Up or Log In
- 3.2. Step 2: Access the Guild Creation Page
- 3.3. Step 3: Fill Out Your Guild’s Information
- 3.4. Step 4: Add Links to Your Website or Socials
- 3.5. Step 5: Invite Members
- 3.6. Step 6: Start Building Missions
- 4. What is the BitDegree Mission Builder?
- 5. How to Create a Crypto Mission on BitDegree
- 5.1. Step 1: Access the Mission Builder
- 5.2. Step 2: Create a New Mission
- 5.3. Step 3: Write the Mission Description
- 5.4. Step 4: Add Rewards
- 5.5. Step 5: Build the Mission Rounds and Tasks
- 5.6. Step 5: Manage Your Mission
- 5.7. Step 6: Publish Your Mission
- 5.8. Step 7: Sit Back, Relax, and Track Participation
- 6. 5 Pro Tips for Creating Fun and Engaging BitDegree Crypto Missions
- 7. Time to Create the Cryto Guild and Crypto Mission of Your Crypto Dreams!
Why Create Guilds and Build Missions on BitDegree?
So why put in the effort? Creating a crypto Guild and building crypto Missions on BitDegree offer tons of benefits:
Latest Deal Active Right Now:Easily Introduce the World to New Tech and Ideas
BitDegree provides a platform to share innovative ideas or technologies with a global audience, making it simple to teach and inspire people worldwide. Introduce the world to your crypto community!
Find a Large, Friendly Audience
Guilds provide a space for like-minded individuals to connect, while Missions allow you to deliver targeted learning experiences. You can captivate your audience with interactive content and grow a thriving crypto community around your passion or expertise.
More Fun and Engagement
Missions aren’t just a place to learn; they’re also fun and capture attention in a way that a course, article, or any other type of static content can’t. Your crypto community engagement can go off the charts!
Effectively Promote Your Brand
Guilds and Missions provide unique opportunities to showcase your expertise, build trust, and establish your brand as a leader in your niche. Whether you're an educator, business, or influencer, these tools help solidify your presence.

Did you know?
Subscribe - We publish new crypto explainer videos every week!
5 Best Crypto Portfolio Diversification Strategies (Animated Explanation)


Best Place to Create Custom Learning Experiences
With the Mission Builder, you can create content tailored to your crypto community's needs, whether it’s learning a new skill, solving a problem, or participating in a fun challenge.
What Is a BitDegree Guild?
On BitDegree, a Guild is your dedicated homepage where you can create Missions, build a proactive community, and incentivize your fanbase. It's a place that gathers people with shared interests, goals, or passions.
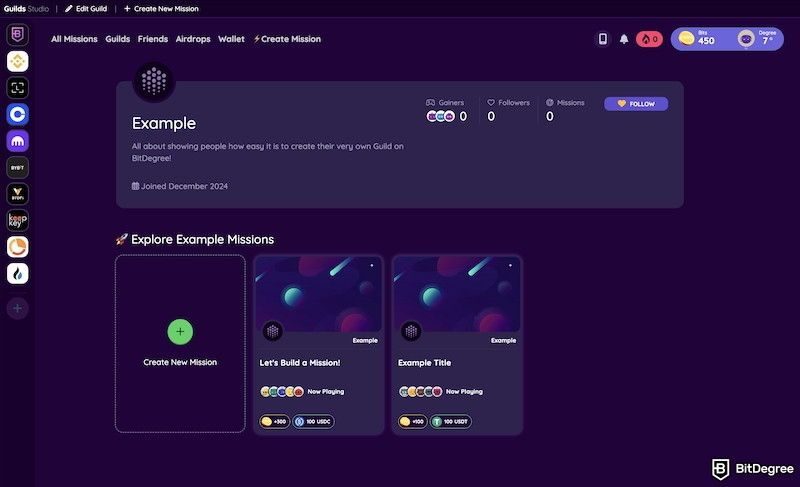
Guilds usually represent a brand, like Bybit, or a standalone Web3 project and provide a space for members to collaborate, learn together, and participate in challenges or Missions. By creating a Guild, you can connect like-minded individuals, facilitate learning, and even create custom learning content.
How to Create a Crypto Guild on BitDegree
Before creating any Missions, you have to create a Guild to host them.
Step 1: Sign Up or Log In
Before you begin, you need to have a BitDegree account. If you don’t have one, go to BitDegree’s website and sign up. If you already have an account, simply log in.
Step 2: Access the Guild Creation Page
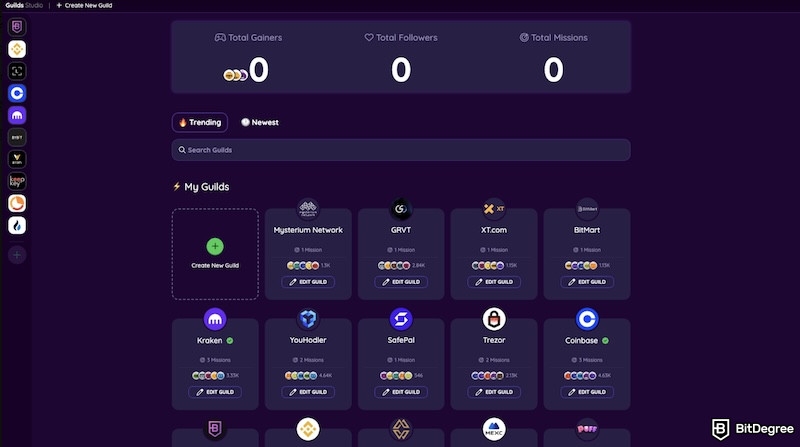
Once logged in, head over to the Guilds section on the platform. Look for an option to create a new Guild. This will be a prominent button or tab labeled “Create New Guild.”
Step 3: Fill Out Your Guild’s Information
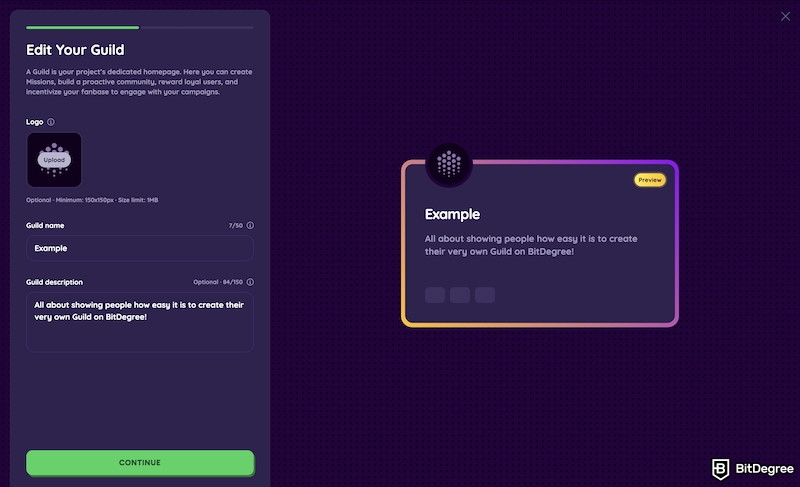
This is where you get to personalize your crypto Guild. You’ll need to provide details such as:
- Create a Guild Name: Something fun (and appropriate) that helps you stand out and lets people know what your Guild’s all about.
- Add Your Logo: Make it eye-catching and reflective of the Guild’s main focus. It’s best to upload a PNG with a transparent background.
- Write a Short Guild Description: A brief, engaging description of what your crypto Guild is about and why people should join.
Step 4: Add Links to Your Website or Socials
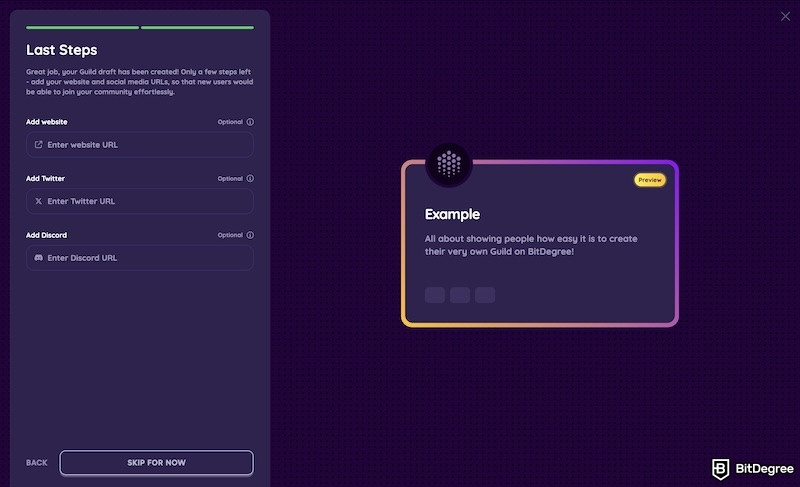
When prompted, add a link to your website, or a link to your X (Twitter) or Discord. Don’t have anything to link? You can always change or add these links later.
Step 5: Invite Members
Once your Guild is created, it’s time to get some members. You can promote your crypto Guild through BitDegree Advertise, your own social media, word of mouth, or by sending direct links to people who might be interested in following.
Step 6: Start Building Missions
Whether or not people immediately join your Guild, you can now create custom crypto Missions that will help your members (and non-members) learn new skills or complete specific tasks.
What is the BitDegree Mission Builder?
The BitDegree Mission Builder is a powerful tool that allows anyone to create custom, fun, interactive experiences.
With the Mission Builder, you can gamify learning by incorporating quizzes, social actions, video tasks, and even rewards like cryptocurrencies or NFTs. It’s intuitive and requires no technical expertise, making it easy to engage learners and get your word out effectively.
How to Create a Crypto Mission on BitDegree
BitDegree’s Mission Builder allows you to create custom learning experiences, known as Missions, which are showcased within your Guild and shared with the BitDegree community at large.
Here’s how to create custom crypto Missions on BitDegree:
Step 1: Access the Mission Builder
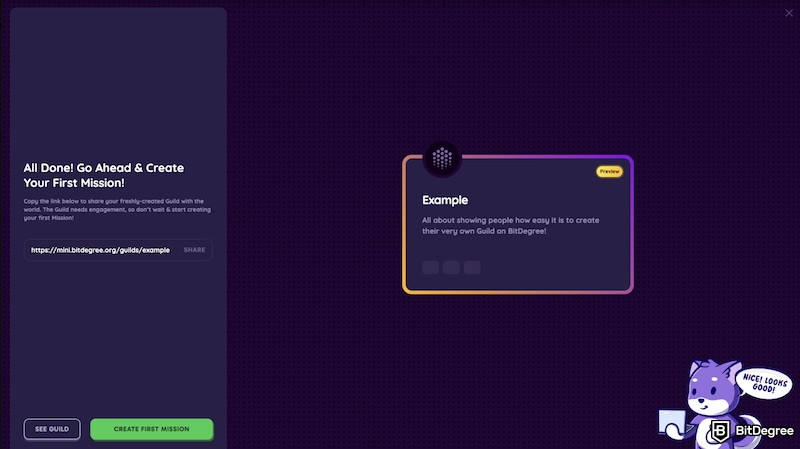
To begin creating Missions, head over to your Guild. Look for the “Create First Mission” tab to start the process.
Step 2: Create a New Mission
Before you can begin building your custom Mission, BitDegree requires you to fill out a Google Form. This form collects essential details about your Mission, including:
- Mission Image: Something eye-catching that meets our image requirements. Avoid adding too much text.
- Mission Title: A short and clear title describing the main goal of the learning experience. Title case, please.
- Mission Subtitle: A description of what learners will accomplish by completing the Mission. The rewards and prizes being offered should always be in the subtitles. Sentence case, please.
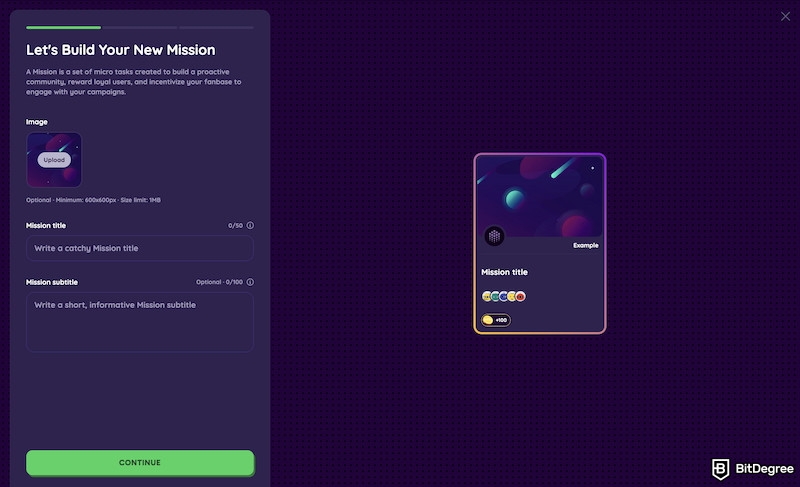
Keep in mind that you can change all these things later.
Step 3: Write the Mission Description
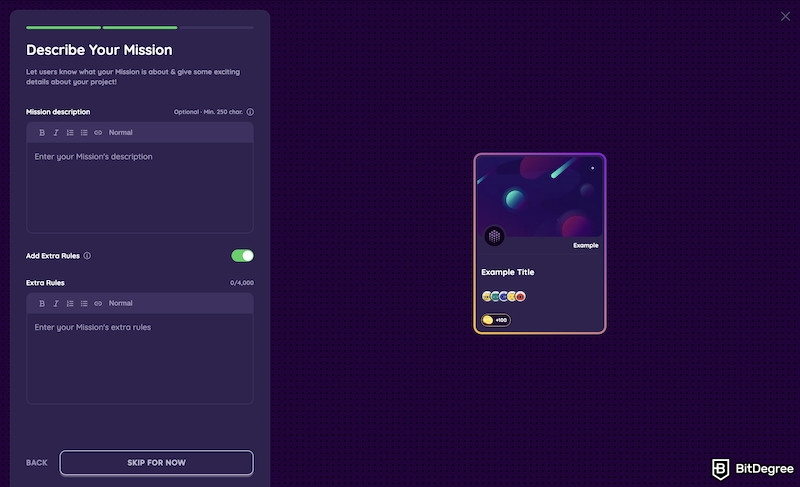
This is the part where you should clearly explain your Mission. Include its rules, what a person must do to win or earn the rewards, and any other important information like disclaimers or restrictions.
Here’s some quick description writing tips:
- Clearly explain who’s eligible for the rewards. Is it everyone who completes the mission or a select few?
- Understand the difference between “earn” and “win.” If you say “earn”, it means everyone who completes certain tasks will earn rewards. If you say “win”, it means that by completing the mission, players get a chance to win a prize, but are not guaranteed to win it.
- Make important stuff stand out. Use formatting (like bolding, italics, and headings) in your description to highlight the most important info.
- Include useful links. To add a link, highlight the text where you want to embed it and click on the link icon.
Still unsure how it should look? Check out (and feel free to use) our sample format below:
Platform description + CTA to the mission.
💰 Mission Cost (H3):
Free!
📅 EVENT END DATE (H3):
Month day, year
📅 LUCKY DRAW DATE (H3): (if any)
Month day, year
🎉 How Winners Will be Selected: (if there is a lucky draw)
✅ Complete the Mission;
✅ Get added to the Lucky Draw event!;
✅ Higher Degree - more chances in the Lucky Draw;
✅ Winners will be contacted separately.”
Then, if you have any rules, toggle the button “Add Extra Rules.” In the box that appears, you can include something like:
⚡ READ THE RULES (H3):
Missions can be retaken, but you will only receive Bits for your first try!
All Social Actions in the Mission must be completed!
Mission rounds cannot be skipped and must be completed linearly!
Rule 4
Rule 5
Etc…
Step 4: Add Rewards
There are 3 reward options you can offer to your Mission participants:
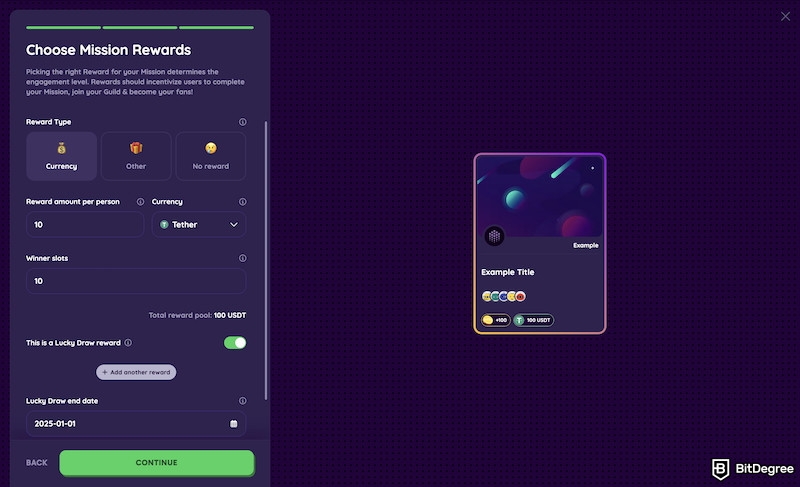
Cryptocurrency
Choose the “Currency” option if you want to include a cryptocurrency reward for users.
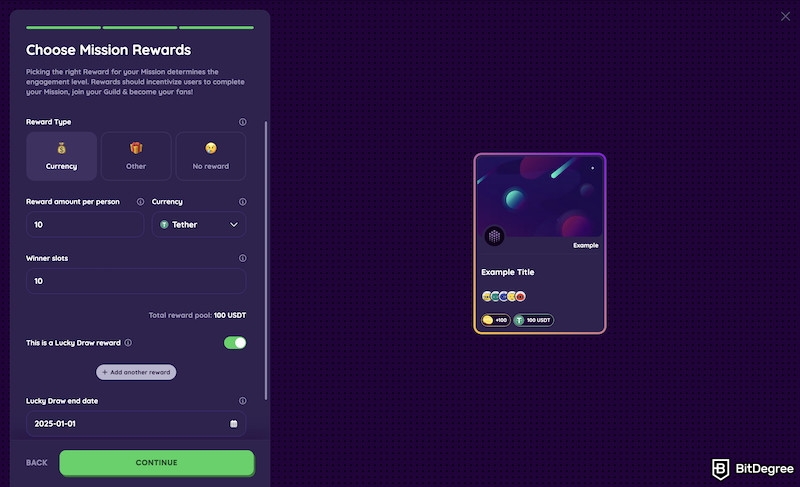
Input the amount per person and choose the type of currency (USDT, USDC, etc.).
Input how many winner slots you would like. The total reward pool is the amount per person multiplied by the total number of winner slots.
By default, a currency reward is part of the Lucky Draw event, so the “This is a Lucky Draw” option will be toggled on automatically. However, not all Missions must have a Lucky Draw event, so you can toggle it off.
If turned on, be sure to set the Lucky Draw end date. This is the date your Mission rewards will run until; after this date, the Mission can still be completed, but rewards will no longer be offered to participants.
To add more than one currency reward, click “+ Add another reward” and complete the above steps again.
When you have finished, click “Continue.”
Side Note: You can either choose from currencies that are tracked on the BitDegree crypto tracker, or you can add a custom one. If you go with the latter, you’ll also have to type in the ticker of the currency, but it won’t have a logo, just a default coin image, as seen below:
![]()
Other
Want to include a prize or reward other than cryptocurrency? Follow the directions below:
Choose the “Other” option for any other reward that is not a cryptocurrency (bonus, NFT, airdrop, etc.).
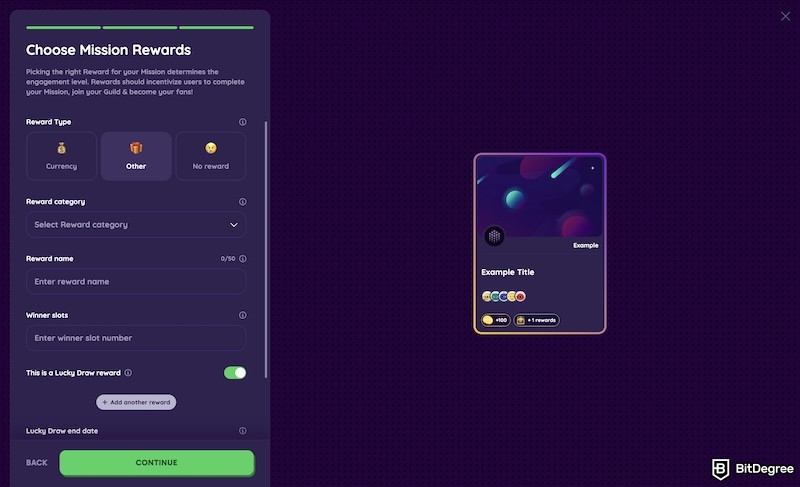
Select the “Reward category” dropdown and choose one of the following prize options:
- NFT: Digital collectible or asset.
- Bonus: Extra benefits or perks.
- Tangible: Physical item or product.
- Subscription: Access to a service.
- Whitelist: Priority access to opportunities.
- Discount: Reduced pricing.
- Other: Any custom prize.
Then, type in the reward name and make sure it's short and clear. For example, “Up to $20,000 in Bonuses” or “X Token Airdrop.” The reward name should be title-cased and have no punctuation at the end. It will automatically appear above your mission description.
Next, fill out the number of winner slots you wish to offer (how many of the prizes you listed will you be giving away).
To include this prize in the Lucky Draw, be sure to toggle “This is a Luck Draw Reward” button. If not, turn it off and then select the “Unlimited winner slots” button to make it a reward everyone can earn.
If turned on, be sure to set the Lucky Draw end date. This is the date your Mission rewards will run until; after this date, the Mission can still be completed, but rewards will no longer be offered to participants.
To add more than one Other reward, click “+ Add another reward” and complete the above steps again.
When you have finished, click “Continue.”
No Reward
While not recommended, you can choose to offer no reward by selecting the “No reward” tab, and then clicking “Continue.”
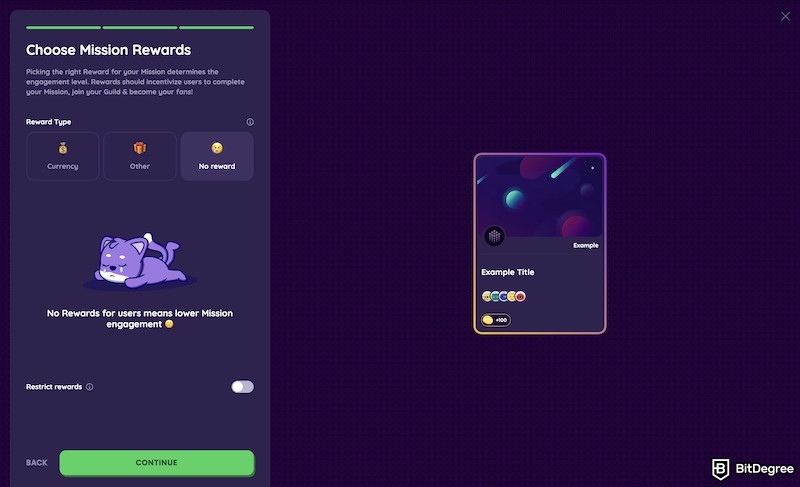
When selected, the only thing your Mission participants will get are Bits (in-game points) and the gift of knowledge. But heads up, no reward typically means much lower engagement…
Step 5: Build the Mission Rounds and Tasks
Now that you’ve finished adding rewards, it’s time to start building out your custom Mission by creating rounds, aka interactive learning tasks.
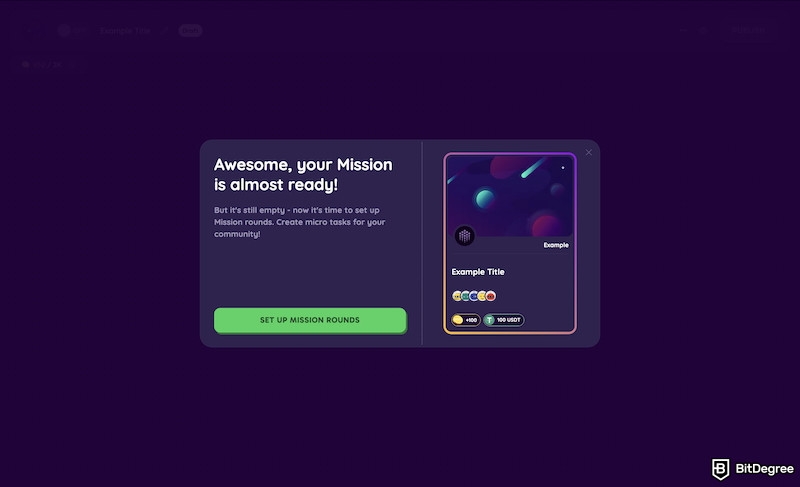
After you click “Set up Mission Rounds” or “Create a New Mission,” you will be asked to choose a round type. These are different kinds of tasks, activities, and actions you can add to your crypto Mission. How many and which ones you add to your Mission is totally up to you.
Simply select the type of round you would like to add and then follow the directions provided to add content and customize the round to fit your Mission.
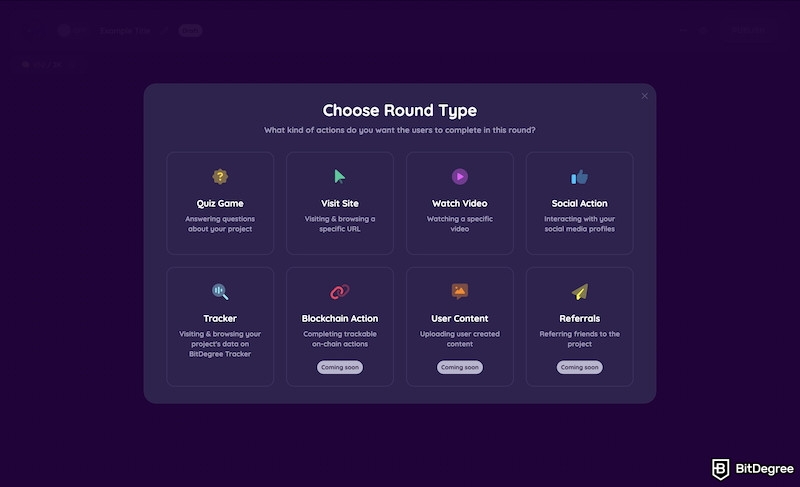
Here’s a breakdown of all the types of rounds you can create within your Mission:
Quiz Game
To create a Quiz Game round, first select “Quiz Game” from the round types menu.
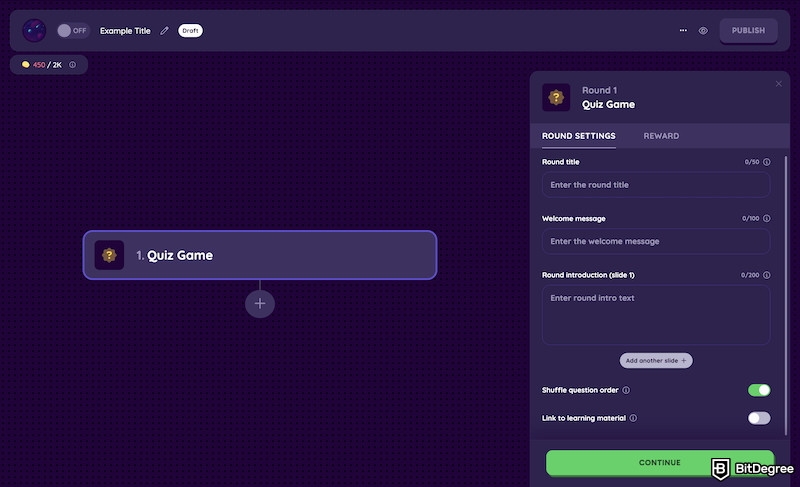
Then, fill out the round settings:
- Round Title: Write a short, informative name for the round that describes its essence.
- Welcome Message: This will be the first text that the user will see whilst starting the round. It can be a short, friendly greeting that welcomes & invites the player to start the round.
- Round Introduction: Write a short extra sentence that will be shown below the welcome message. Use it to spice up your Mission description. You can add more slides below if you need more text to be shown.
- Add Another Slide: Want to include multiple welcome slides? Click the “Add another slide +” button and repeat the above steps.
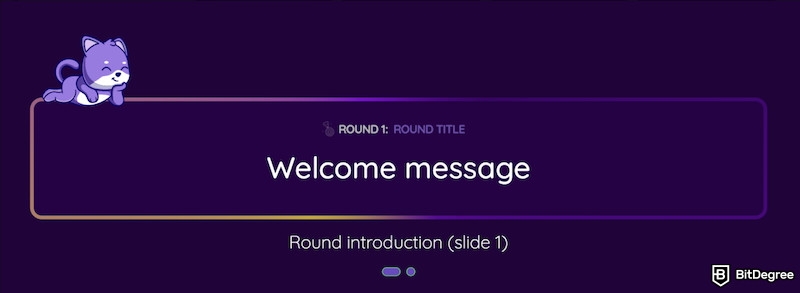
- Shuffle Question Order: If this feature is turned on, the round's question order is randomly shuffled for each user.
- Link to Learning Material: Activate and paste a URL if you want users to visit and browse a specific webpage. The round's tasks should be based on the information found on the page the URL leads to.
- Website Link: Copy and paste the full webpage link when asked in the text bar.
- Force Players to Click Learning Material Link: You can choose whether the users cannot continue the round if they haven’t visited your provided URL, or can continue freely.
When completed, click “Continue.”
Now add the round reward. It’s the number of Bits the person can get by completing the round perfectly. The maximum available Bit reward for a Quiz Game round is 600.
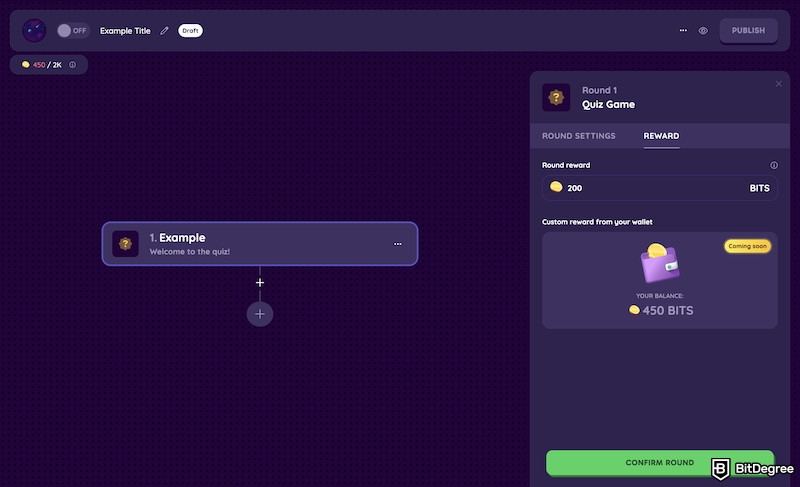
Then “Confirm” the round.
Now, onto creating the questions.
To add questions to the Quiz Game round, click on the smaller “+” (the bigger “+” icon adds a new round).
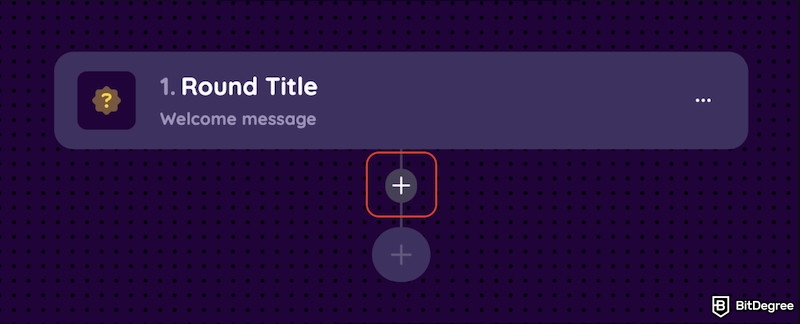
Here are the types of questions you can add to the Quiz Game round:
- Select Single Answer: Choose one correct option from a list.
- Select Multiple Answers: Pick all correct options from a list.
- Enter Answer: Type in the correct response manually.
- Sort: Arrange options in the correct order.
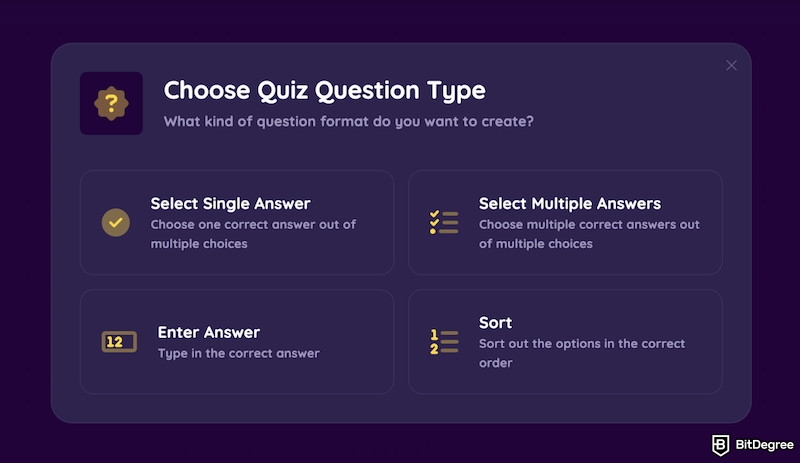
Add as many questions as you like, but less is certainly more.
It’s best to make the questions concise and short, to include various types of questions in your round, and to make the answers as clear as possible. Also, make sure the things you ask about are clearly indicated in your content piece.
Besides, note that there are limitations when it comes to the number of answers you can include. For example, the maximum number of answers you can add to a "Select Multiple Answers" question is 6.
Visit Site
Want learners to visit your website for more information on your services or products? The “Visit Site” round gives rewards for learners who leave BitDegree to visit your website.
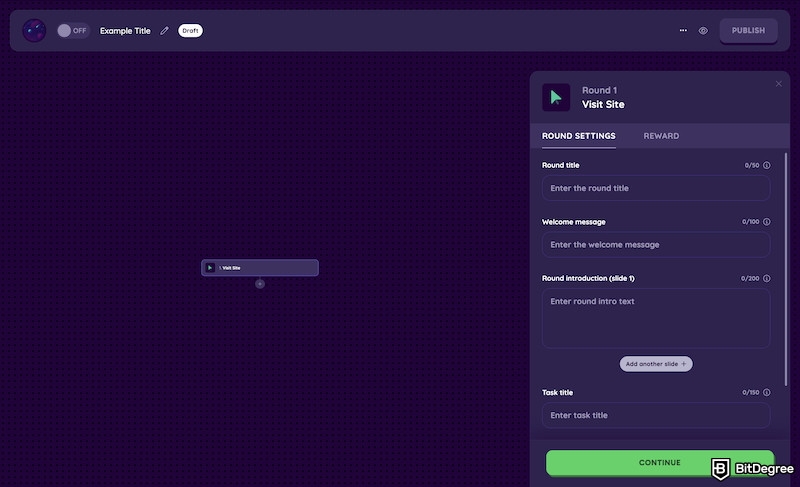
First, you need to type in the round title or name, a welcome message, and a round introduction that describes the task.
Then, add a link to your website or any piece of content you want learners to engage with.
Next, create a question for learners to answer that confirms their participation. In order to ensure learners visit your webpage, you should ask questions that someone could only answer if they have visited the page in question.
You can also use this round to include additional social actions that otherwise are not available in the “Social Action” round, like subscribing to the Crypto Finally Explained YouTube channel.
Social Action
What to grow your audience and your socials? Encourage learners to get the word out and create some engagement on Twitter and Discord.
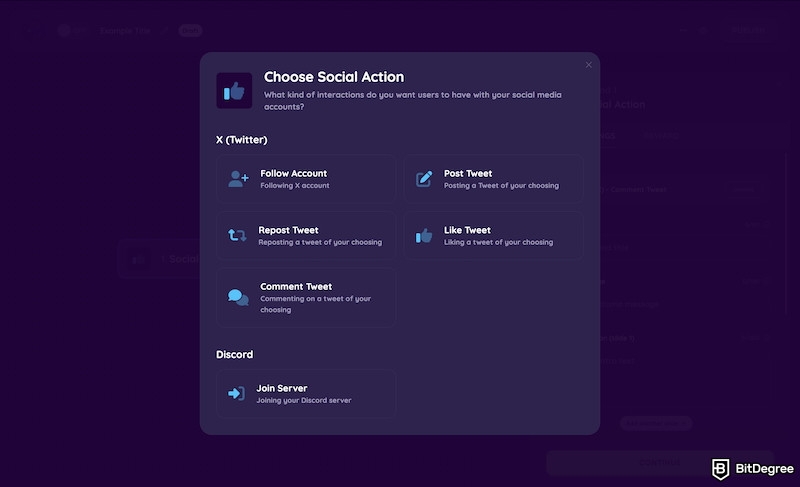
With this type of round, you can choose from asking learners to complete the following social actions:
X (Twitter):
- Follow Account: Follow a specified X profile.
- Post: Create and share a post.
- Repost: Repost a provided post.
- Like: Like a specific post.
- Comment: Comment on a designated post.
Discord:
- Join Server: Become a member of a Discord server.
And here’s a couple of extra tips:
If you use the “Post” social action, make sure to craft an engaging and fun post, because many users will share it.
Make sure you don’t include too many social actions in one Mission - this could lower your overall Mission completion rate.
Watch Video
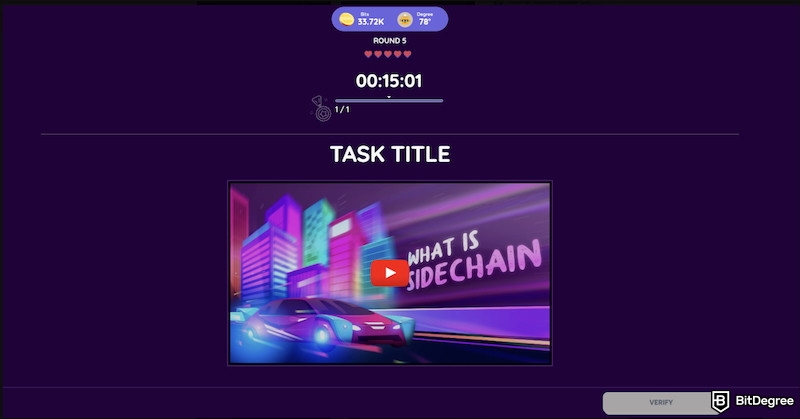
This round is pretty much the same as the “Visit Site” round, but instead of a link to a website, you add a link to a YouTube video (or other video page). The video will then be embedded and built into the Mission.
Tracker
In this round, you can use the BitDegree Crypto and Exchange Trackers to ask questions about specific cryptocurrencies or exchanges.
For example, you can ask what is the current price of an asset, how its price has changed recently, or what is the current trading volume of an exchange.
![]()
Please note that this option is only available with assets and exchanges that are being tracked on the BitDegree tracker. If, for example, you’ve recently launched your token, it will likely not be integrated into BitDegree yet.
New Rounds Coming Soon…
- Blockchain Action: Completing trackable on-chain actions.
- User Content: Uploading user-created content.
- Referrals: Inviting friends to a project.
Step 5: Manage Your Mission
Now that you've created all the rounds for your Mission, it’s time to put them together and publish.
By clicking on the dots on the left side of a round or a task, you can change the order of rounds or questions.
Clicking on the three dots on the right side of a round or a task will allow you to delete or duplicate it.

You can get back to Mission settings, description, and rewards by clicking on the three dots at the top right corner of the screen or on the pencil icon on the left side.

Next to these dots, you can also preview the Mission by clicking on the eye icon.
Warning: Don’t publish the mission until you’re sure everything looks good!
You can publish the crypto Mission either by clicking on the big green “Publish” button or toggling the Off/On slider to the left of the Mission title.
Step 6: Publish Your Mission
Once you’ve built your Mission and are satisfied with the content, it’s time to publish. Simply hit “Publish” on the top-right of the screen.
Congrats! Your Mission is now live!
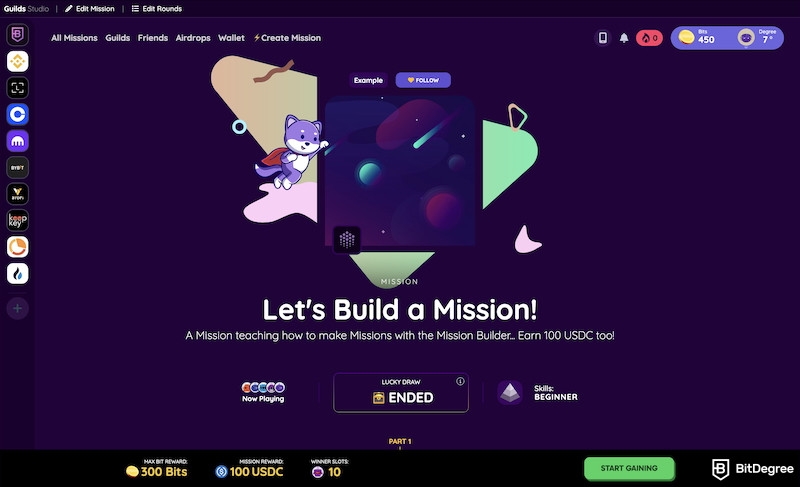
But what if you want to make changes or edits? You can edit already published Missions by simply going back into the builder and making the necessary changes.
After editing, the “Publish” button should turn green again (it’s no longer green once a Mission is published). If the button does turn green, it means that users will not see your current changes yet. To publish and finalize your new edits, click “Publish” again.

- Secure and reliable
- Accepts fiat currencies
- Lots of trading options
- Reputable exchange
- Accepts fiat currencies
- Offers various trading options

- Huge trading variety
- Regulation-compliant around the globe
- Fair trading fees
- Beginner-friendly
- A wide array of features
- Vast number of different crypto coins & tokens

- Beginner-friendly
- Secure
- Decent trading and withdrawal fees
- Crypto.com Visa Card
- Automated tools & bots
- Ecosystem synergy with CRO
Step 7: Sit Back, Relax, and Track Participation
After your Mission is live, monitor how your audience is interacting with it.
Are you getting a lot of traffic? Are learners starting but not finishing? Maybe one of your questions never gets answered correctly?
Missions are like all things - practice makes perfect. Experiment as much as possible and take note of your successes and failures. The only place to go from your first Mission is up!
5 Pro Tips for Creating Fun and Engaging BitDegree Crypto Missions
I've learned more than a thing or two creating Missions; here are five of ny hard-earned tips for beginner Mission builders:
- Duplication Is Your Friend: If you want to create a similar mission, you can duplicate it and then just adjust the mission settings, questions and rounds, avoiding creating everything from scratch.
- Always Be Saving: Don’t forget to click “Publish” or “Update” after changing something in a round or question you’ve already saved. If you just close it, changes will not be saved.
- Quality > Quantity: Create quality rounds and tasks. If you leave mistakes in the description or tasks, people might think that your mission is not legit.
- Put Fun First: Try to create a fun experience for the users; don’t just stuff your Mission with social actions. Creating nice storytelling between rounds is also a good practice for making it fun.
- Short Is Sweet: Keep your missions short and vary the round types. We usually create Missions with four rounds (Quiz Game, Social Action, Visit Site, Quiz Game).
Time to Create the Cryto Guild and Crypto Mission of Your Crypto Dreams!
Building a Guild and creating custom Missions on BitDegree is a great way to engage your audience and promote interactive learning.
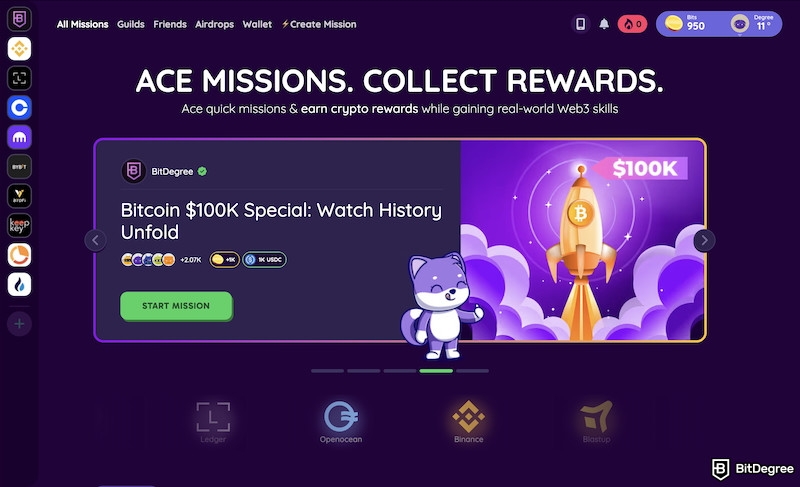
Whether you’re a teacher looking to share knowledge, a company aiming to build a reputation, or a community leader interested in raising Web3 awareness, BitDegree’s Guilds and Mission Builder provide everything you need to create a powerful and rewarding learning experience.
There's still a lot of work to do to make Web3 a reality – so what are you waiting for? Let’s get building your crypto community!
Get started today by signing up for BitDegree, creating your Guild, and exploring the Mission Builder.
The content published on this website is not aimed to give any kind of financial, investment, trading, or any other form of advice. BitDegree.org does not endorse or suggest you to buy, sell or hold any kind of cryptocurrency. Before making financial investment decisions, do consult your financial advisor.

