Stop overpaying - start transferring money with Ogvio. Sign up, invite friends & grab Rewards now! 🎁
Crust Network is a blockchain-powered project concerned with file hosting and data sharing. The network is focused on both providing individual users with the ability to store their files, as well as developers with the option to host their created dApps and user data. In this tutorial, we’ll be looking at how to use Crust Network, and all of its main features.
To be a bit more specific, this tutorial will be focused on the holders of the CRU token (the native token of the Crust Network), as well as crypto enthusiasts who want to store their files on a decentralized and anonymity-preserving network. While there will certainly be mentions of developer features, it’s not going to be the focus of this article.
If you’re completely new to Crust, and don’t have a clue what is Crust Network, to begin with, you should start off by reading my dedicated review of the project - you can find it here. After you’re a bit more familiar with the concepts and functionalities of Crust, you’ll be able to start learning how to use it!

Did you know?
Subscribe - We publish new crypto explainer videos every week!
Is Cryptocurrency a Good Investment? (5 PROS & CONS!)


Table of Contents
How to Use Crust Network: The Basics
To start things off, before we can even get to the “meat and potatoes” of things, there are a few points that you’ll need to cover, in order to start using the Crust Network to its full potential. Specifically, these points include creating a specific wallet, as well as getting yourself some CRU tokens. We’ll discuss the latter at a later point in the tutorial, though.
Latest Deal Active Right Now:Just to reiterate a point mentioned in the introductory part of this tutorial, though, allow me to say - I won’t be going in-depth on what is Crust Network, and what features it supports, in this specific article. Going through how to use Crust Network, I will be assuming that you’ve already read my review on the project - just a heads-up!
Now, while certain actions can be done at any point in time, in order to keep this “how to use Crust Network” tutorial consistent, let’s start off with the wallet creation process.
How to Create a Crust Wallet?
The creation process of the Crust Wallet is a crucial part of using the crypto project, to begin with, since it’s going to be needed with anything that you choose to do on the dApp. Whether you’d want to transfer tokens, pay for storage fees, or even simply interact with the network, in general, you’ll need a Crust wallet connected, at all times.
Let’s see how you can create the wallet, first, and then we’ll address some of the common confusion surrounding CRU token storage.
The Crust Wallet can be downloaded and installed as a Chrome browser extension. As I’ve mentioned in my Crust Network review, there are two ways of going about it - the super-simple approach, as well as a developer-friendly one. We’ll start out with the former.
Step 1: First, you need to visit the Chrome web store, and find the Crust Wallet app on it. Instead of manually searching for the app, you can click here. Click “Add to Chrome”.

Step 2: After the confirmations, the wallet will be added to your extension list. Click on it, and a new pop-up will open, prompting you to create a password.
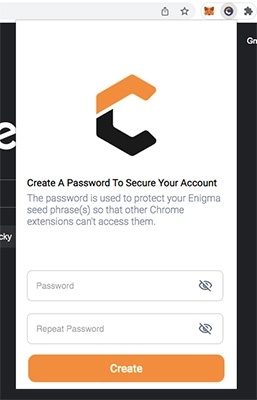
Step 3: Once you create a password, you will then be asked whether you want to generate a new wallet, or import an older one. Since this is your first time using Crust, choose the former option.
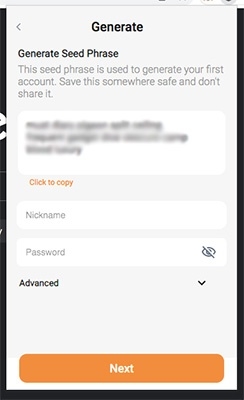
Now, what you see in front of you is your seed phrase. WRITE IT DOWN, AND STORE IT SAFELY! This is the most important piece of information associated with your wallet - if you lose your password, your seed phrase will be the only way of getting your wallet back!
You will also need to create a nickname for yourself. After you create it, you will be able to change it afterwards, so keep that in mind!
Step 4: Once you create a nickname, and write down your seed phrase, that’s basically it - you’ll be redirected to your wallet dashboard, where you’ll be able to start transacting CRU tokens, as well as interacting with Crust Network, in general.
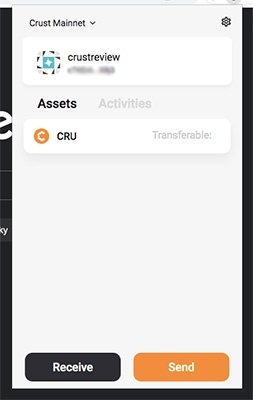
So, it’s obvious that the wallet creation process is rather simple, and is reminiscent of wallets such as MetaMask (except perhaps the nickname creation part). However, there’s an alternative method to creating the wallet - doing so with an installation package.
First, you’ll need to download and unpack the installation package - you can find it here. With your Chrome browser open, you will then need to enter “chrome://extensions/” into the search bar, and press “Enter”.
At the top-right corner of the page, you will see “Developer Mode” - click it, and then choose “Load unpacked extensions”. All that’s left to do now is to pick the folder, and install the wallet - that’s it!
Now, let’s address a common question that individuals who want to learn how to use Crust Network have - one that relates to token storage.
On the official Crust Wiki, the team states that CRU tokens that are based on the ERC-20 token standard are NOT supported by the wallet. So, in other words, if you were to purchase CRU tokens via, say, the MetaMask wallet (on Uniswap, or some other exchange that supports CRU), and send them to the Crust Wallet, they’d frankly be gone. Note that, as of recently, you are now able to purchase CRU tokens via Gate.io and SWFT, as well.
So… What tokens does the wallet support, then?
Well, it’s pretty simple, really. Crust operates on its own, native network called the “Crust Network mainnet”. In addition, it also supports the Maxwell testing network, too. In essence, CRU tokens that are based on the Crust Network mainnet will be supported on the Crust Wallet, while ETH-based CRU tokens won’t. However, the mainnet-located tokens can still be bridged to ERC-20.
In short, as you learn how to use Crust Network, you should be aware of the fact that the Crust Wallet will only support CRU tokens that are based on the mainnet. Now that you have your wallet created, this is actually the perfect segway into the file storage side of the platform.
How to Use Crust Files?
Crust Files is the part of the Crust Network where users would store their own, personal files. The team refers to it as the “first personal Web 3.0 storage”, hinting at its decentralized and anonymity-preserving nature.
If you’re just looking to store some files, in a data-preserving way, then Crust Files is going to be the main place where you spend most of your time, entire Crust Network-wise. That said, make sure to study how to use Crust Network thoroughly, since you’ll likely want to use many more features than just this one!
Step 1: First, you need to navigate to the Crust Files official website - again, you can find it here. Once you’re on the homepage, you’ll see a selection of different crypto wallets that can be used to log in. Since we’ve just created the Crust Wallet, we’ll be using it, but you may also choose to log in with MetaMask, WalletConnect, one of the multiple Web 3.0 wallets, and so on.
However, do keep in mind that, if you choose to log into Crust Files with third-party wallets, you will only be able to use the standard storage features of the platform. If you want the Premium functionality, you will need to be logged on with your Crust Wallet.
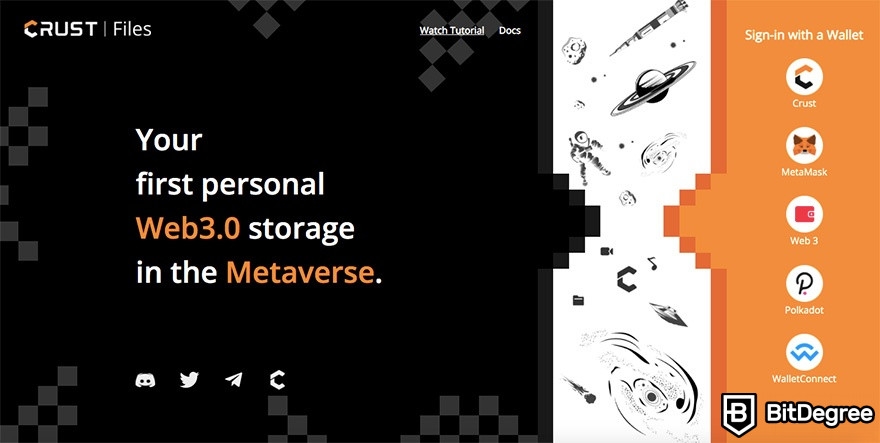
Step 2: After confirming your login with your Crust Wallet, you’ll immediately be prompted to create another nickname - this time, for your Crust Files account. Once again, this nickname can’t be changed, and it’ll be linked to your account. So, create carefully!
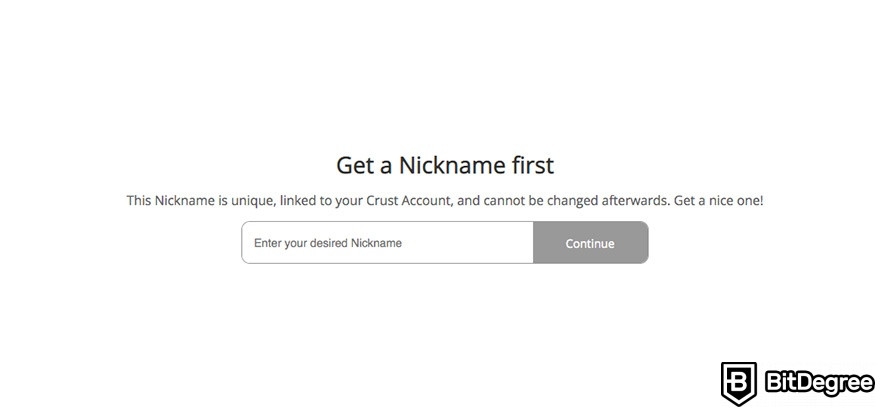
Step 3: After you enter your nickname and confirm it, you’ll be directed to the Crust Files homepage. This is where all of your file uploading and storing will take place!
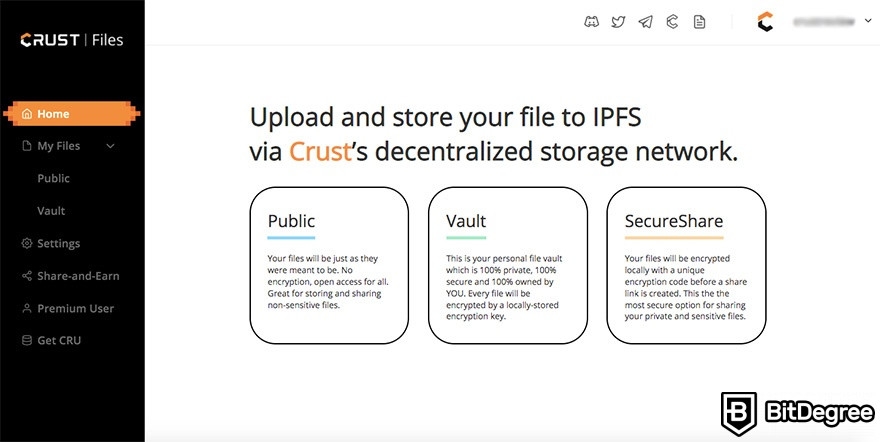
One thing that you’ll notice almost immediately is the fact that there are two types of user accounts - those with a trial version of Crust, and Premium ones. In order to upgrade to a Premium account, you’ll need to deposit some CRU tokens to your wallet - more on that later, though.
The good news here for anyone who’s looking at how to use Crust Network is the fact that everything’s pretty simple to navigate through. On the current page, you are able to start uploading public files - these files will be viewable by anyone and everyone, since they won’t get encrypted upon upload.
Premium users will be able to start uploading files to their own, personal Vault. Each file uploaded here will be encrypted with a locally-stored key, and only you will have access to what you upload. In the near future, Crust aims to launch SecureShare - a service that will allow users to share their files with other parties in a private and secure manner. People will be able to pay with ETH to view shared files, and thus, users will be able to make a profit by doing so.
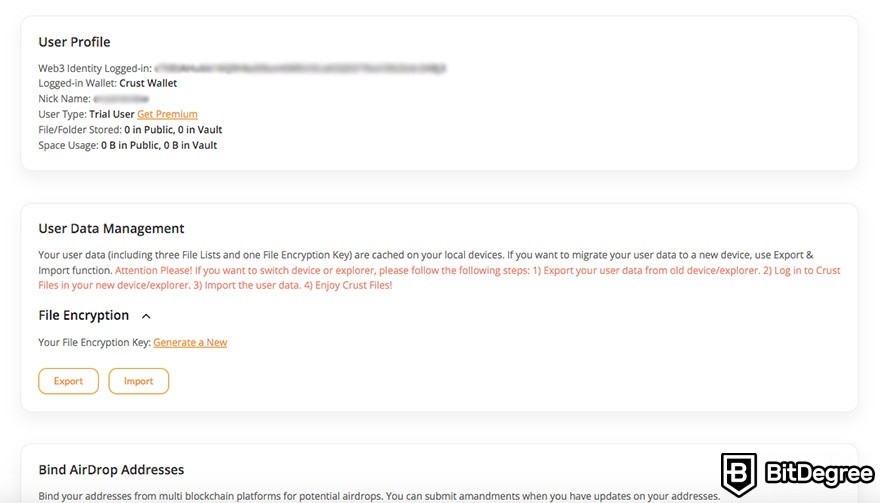
Under the “Settings” tab, you are able to view your profile information, as well as export & import your account (for switching web browsers or devices), and even bind an airdrop address to your profile, for potential future drops. Sweet!
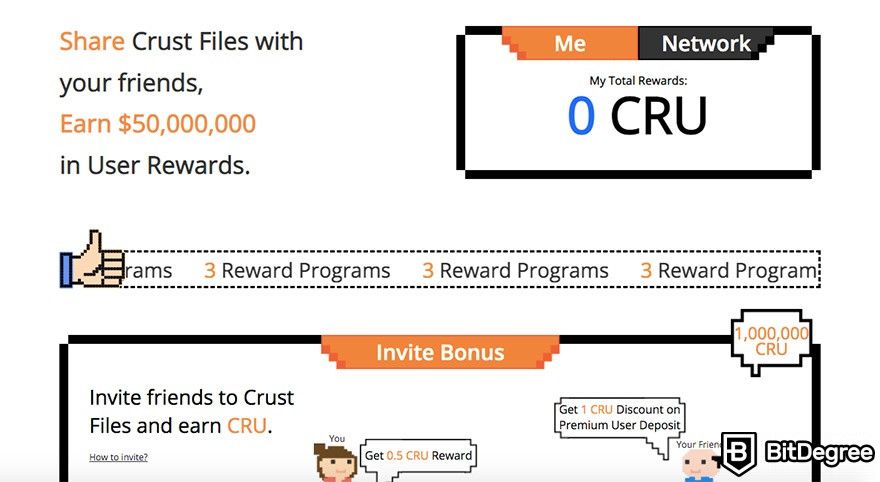
Next up, Share-and-Earn. This section revolves around the various rewards that you can receive by sharing Crust Files with your friends. There are three rewards programs, in total - invitation bonuses, Lucky Newbie, and the Grand Draw. Each section has detailed instructions on how to enter in order to win some CRU token rewards!
Lastly, you may also explore the benefits of becoming a Premium user, as well as get yourself some CRU tokens. Said benefits include End-2-End encryption, more space, permanent storage, bigger file support, airdrops, and so on.
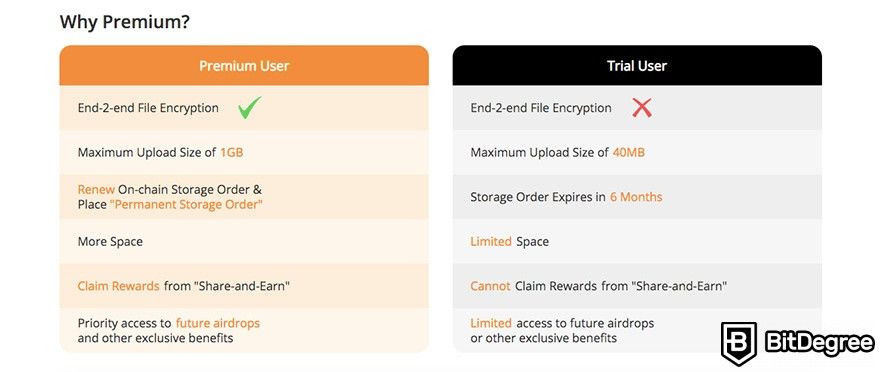
Before we get to the token acquisition process, let’s explore how to use Crust Network’s Crust Files, for all of your file uploading needs.
Step 4: In the “Home” section of your dashboard, click “Public”, and then “Upload” on the new page that opens up. Now, you will be able to select the file that you want to upload to the network, via IPFS. Keep in mind that files uploaded by trial users are public, and available for everyone to access and see!
Step 5: Once you select your file, you may now adjust a few additional settings, such as its encryption (reserved for Premium users).
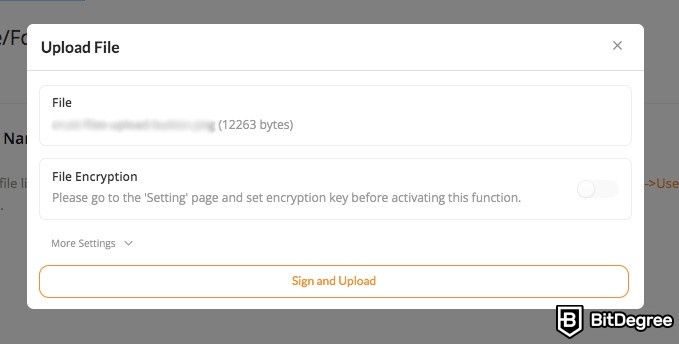
Step 6: Once you confirm the file upload, and sign it within your Crust Wallet (you’ll get a pop-up prompting you to sign), your file will be uploaded shortly, and will become viewable on your personal page.
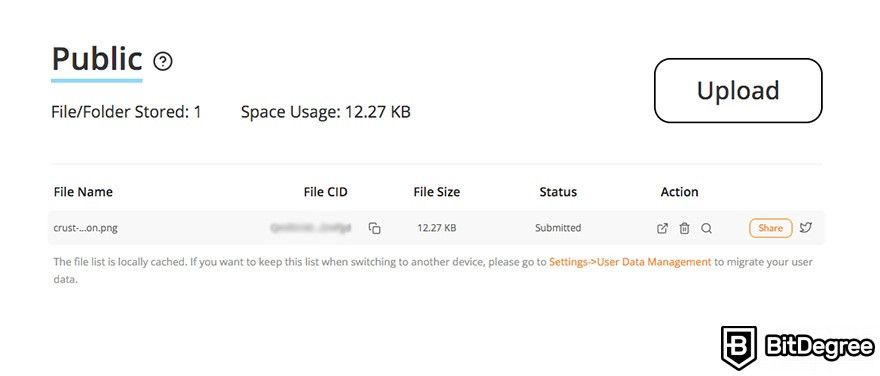
Step 7: From here, you may choose to share the file (with a Crust FIles unique file CID), perform an IPFS scan (another application based on Crust), and so on. The entire process of uploading the file is very user-friendly and intuitive, and shouldn’t cause any confusion, whatsoever.
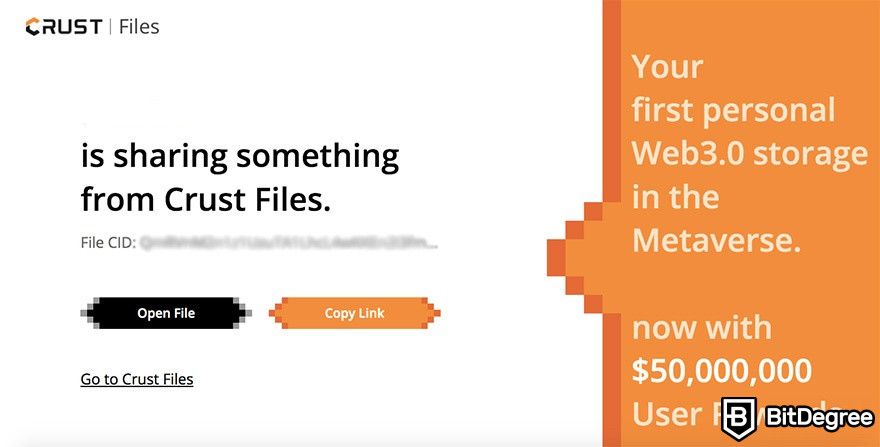
The file-sharing process is very straightforward, and can be done by simply copying the CID link, and sending it to your friend. Note that if your friend becomes a Premium user on the Crust Files platform (via your referral link with your nickname), you will receive CRU rewards, too!
How to Get CRU Tokens?
In my dedicated Crust Network review, I’ve gone through the effort to elaborate on how the CRU token acts as both a utility and a governance tool on the network in question. Well, the utility aspect is quite evident with Crust Files - token holders are able to become Premium users, and unlock the full list of features that the file storage & sharing project has to offer.
That being said, as you figure out how to use Crust Network, token acquisition undoubtedly becomes one of the biggest aspects that you need to be aware of, and knowledgeable about. So, let’s get some CRU tokens!
Step 1: Assuming that you’re still in your dashboard, on the Crust Files official website, you should navigate to the “Get CRU” section. This will open up a new tab on your browser.
Step 2: Now, this is where all of the magic happens. However, as you might immediately notice, you are going to need two wallets in order to get CRU - the Crust Wallet that you already have installed, as well as a MetaMask wallet with some ETH.
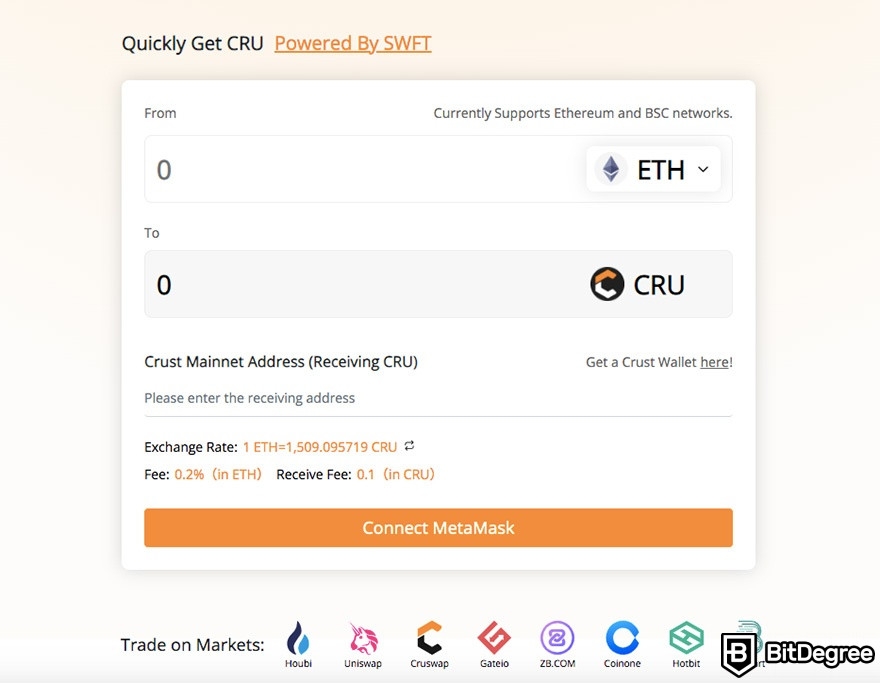
Granted that this is a tutorial on how to use Crust Network, I won’t go into detail on installing MetaMask, and funding it with some Ether. Instead, you may check our dedicated MetaMask review, as well as find out about all of the different ways of how you can get yourself ETH to fund the wallet.
In other words, as we move on, I’ll assume that you already have a MetaMask wallet browser extension, and some Ether coins within it to get started.
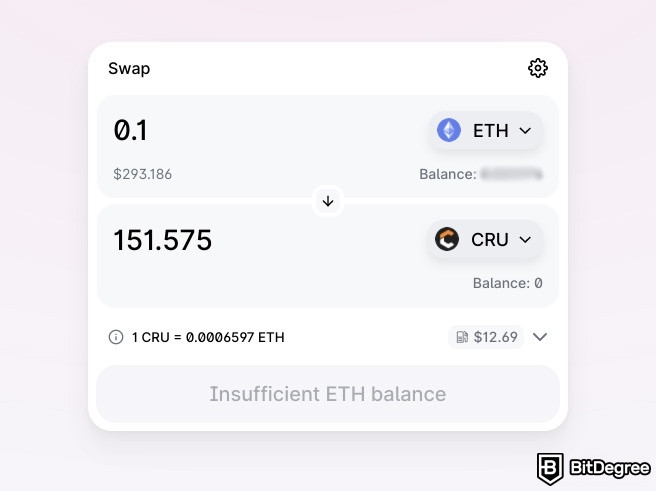
Step 3: Essentially, what you’ll need to do here is simple - connect your MetaMask wallet to SWFT (the token swap page you’re currently on), and then pick the amount of ETH that you’d like to swap. It will display how many CRU tokens you’ll receive, so you can adjust the number to your liking.
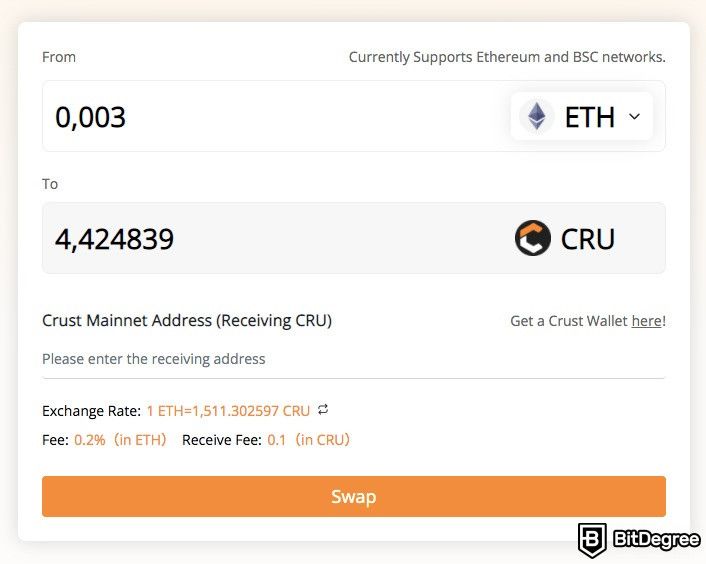
Step 4: Now, all that you need to do is enter your Crust Wallet address. Since you have the wallet installed already, simply navigate to it via your browser extension section, and click on the address at the top - it will automatically copy it to your clipboard.
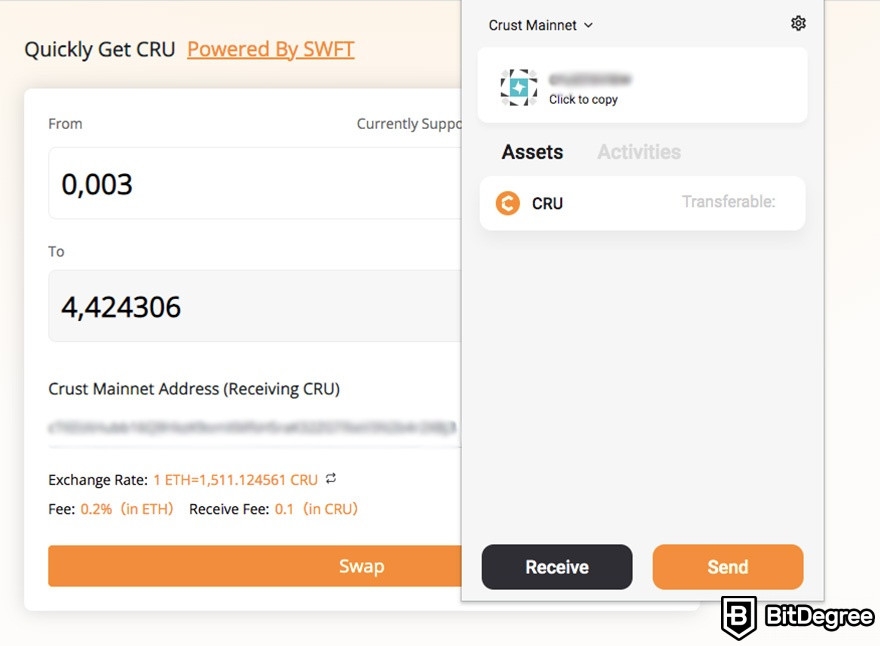
Make sure the copied address is correct, though - if your system is compromised, and you have some sort of a keylogger, it might change the receiving address upon pasting it on the swap page!
Step 5: Once you confirm the transaction, assuming you’ve done everything right, you should receive CRU tokens in your Crust Wallet shortly! That’s it - you’re now a CRU holder!
The token acquisition process can be really simple, or it can actually be one of the more-complicated parts of how to use Crust Network. It really all depends on your prior experience with crypto trading and wallets, as well as whether or not you already have a MetaMask wallet with some ETH.
Now, do also keep in mind the fact that you may acquire (purchase, trade) CRU tokens on a few different exchanges (centralized and decentralized ones), too. The list of supported platforms can be seen at the bottom of the swap page.
How to Become a Storage User on Crust Network?
Up to this point in the “how to use Crust Network” tutorial, we’ve covered the Crust Wallet creation process, CRU token acquisition, and how you can start using Crust Files for all of your file storing and sharing needs.
However, what if I told you that there’s an alternative route to take - one that would allow you to participate in Crust Network mining and Crust Network staking, by becoming a validator node on the actual mainnet of the project?
Admittedly, concepts such as Crust Network staking are a bit more specialized and “techy” - they’re aimed at developers who want to start earning CRU tokens by dedicating their hardware resources to the ecosystem. That’s not something that we’ll cover in this tutorial - instead, allow me to tell you how you can start hosting files on the actual network!

Why do so, if there are Crust Files? Well, admittedly, becoming a storage user on Crust Network is quite a bit more complicated than doing so on the Crust Files platform. However, once again - if you have an interest to eventually start staking on the network, and get involved with its DAO functionality (more about this point in the Crust Network review), this is the way to go!
Furthermore, Crust Files is more of a Web 3.0 and Metaverse-oriented project, while storing files on Crust Network will allow you to get your data stored on IPFS, via the secure and decentralized network that Crust provides.
Note that in order to upload files to Crust Network (become a storage user), you will need to have some CRU in your wallet - around 1-2 CRU tokens should be fine. The storage fees on the network are very low, as well - around $0.001051 per GB, per year.
Step 1: The very first thing that you’ll need to do is go to the Crust Apps - you can do so by navigating to the Crust Network’s homepage, and then pressing “Get Started” and “Crust Network” at the top of the menu.
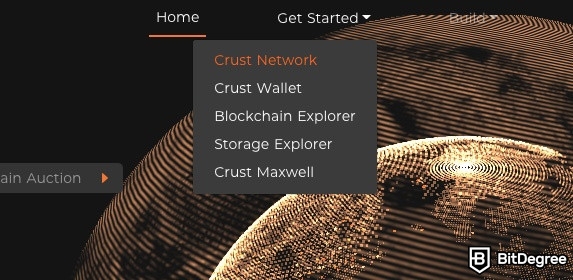
Step 2: Once you’ve been connected to the app section, you will now need to log into your account. Since you already have a Crust Wallet created (and the extension installed), you should be prompted to log in automatically, as you enter the app page.
Step 3: Crust Network mining and staking aside, you will now need to navigate to the “Storage” section at the top of the page, and click “Storage User”.

Step 4: The page that opens up will give you two choices - either go to your storage user dashboard on Crust Network via a newly-launched gateway (which is definitely the recommended option), or via IPFS, if you have the service installed on your desktop.
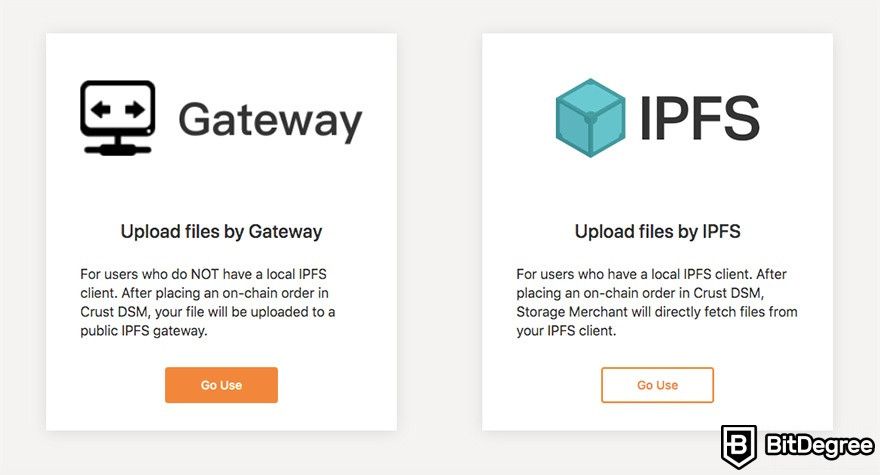
Since we’re trying to do things the simplest way possible, we’re going to choose the gateway option. That said, if you’re a developer, you might find the IPFS route to be more approachable. Also, IPFS can be used to upload larger files, up to 32GB.
Step 5: Here, you may select the gateway via which you’d like your file to be imported - the default gateway will do just fine for now, but after you get the hang of things, you may tinker with the settings in order to optimize your uploads.
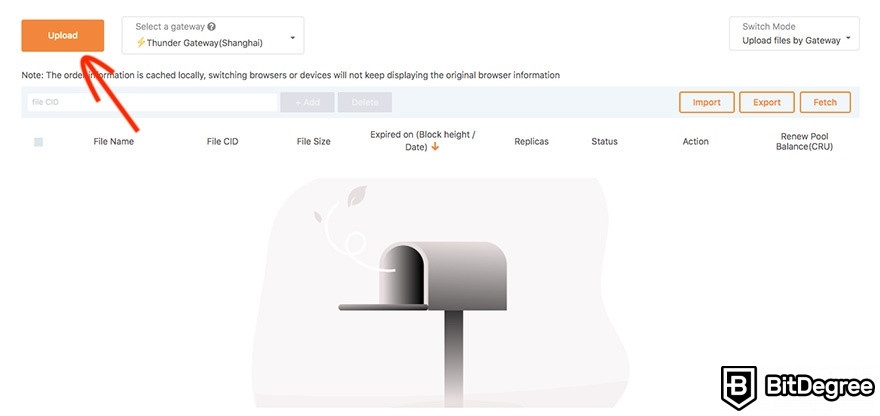
Click the big orange “Upload” button, and select the file that you want to upload to the platform.
Step 6: After you choose an account (or simply leave the default one) and sign the upload with your wallet (enter the wallet password when prompted), you will see the order screen.
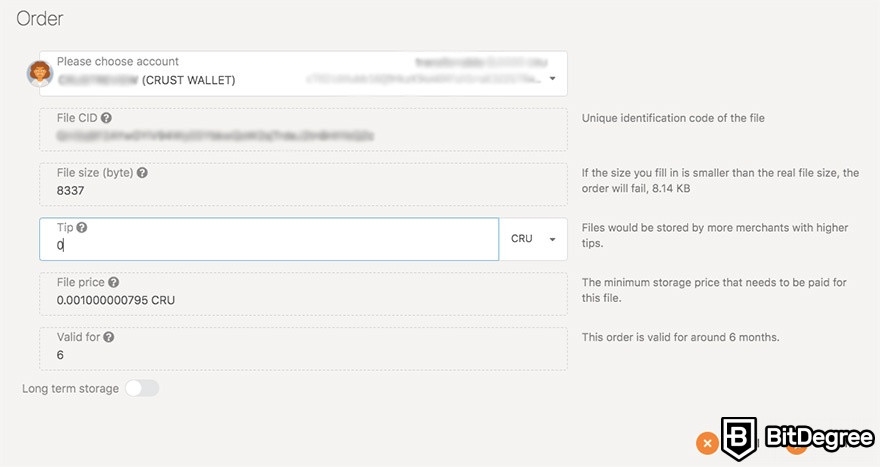
This popup houses your file’s CID (unique identification code), its size, storage duration, as well as the price that you’ll need to pay in order to upload it. The price is paid in the form of CRU tokens - that’s why I told you that you need to have some CRU in your wallet, in order to become a storage user!
Step 7: Once you confirm the order, and pay the upload fee (which will mostly depend on the size of your file), it shouldn’t take long for it to appear on your dashboard. Once your order is finalized, that’s it - you are now a storage user on Crust Network!
Admittedly, learning how to use Crust Network’s file storing services can seem intimidating, if you’re just starting out. That being said, it really all depends on how well you know the crypto space - if you’ve used cryptocurrency wallets before, and know how to transfer tokens from one wallet to the other, you shouldn’t face any troubles using these said features of the network.
That being the case, naturally, if you’re interested in utilizing the full spectrum of services available on the Crust Network mainnet - things like Crust Network staking and mining, becoming a validator, etc. -, it all gets a lot more complex. These features, however, are mostly aimed at developers who have worked with Web 3.0 blockchain tech before, and are familiar with Polkadot, JavaScript, and similar technologies.
For your average individual who’s just looking to store and share files in a decentralized manner, though, everything we’ve talked about in this tutorial should be sufficient!
Conclusions
Crust Network is certainly one of the more-interesting and useful pieces of Web 3.0 tech to come out of the market. Its unique value proposition includes user data storage and sharing, in a decentralized and anonymity-preserving manner. No matter who you are, there’s obvious value to be seen in technology like this!
Oftentimes, though, advanced crypto tech can scare potential users away, and crypto sector-specific buzzwords don’t do well with anyone who’s just starting to get the hang of how this industry works.
In this tutorial on how to use Crust Network, we’ve checked out everything from the basics (creating a Crust Wallet, funding it with CRU tokens), all the way to the more-advanced functionality of the project (Crust Files, becoming a storage user on the network). By now, I do hope that you’ve noticed that things aren’t necessarily as difficult as they might first appear to be!
Crust is an ever-evolving project that receives frequent updates and changes. This, in turn, means that, with time, it should become even more user-friendly, and simpler to use. Aspects like these are especially important when you take a look at Crust Network staking functionality, and similar, higher-end features available within the ecosystem!
All of that being said, thanks for reading my “How to Use Crust Network” tutorial! Don’t forget to check out the Crust Network review, if you hadn’t already, and good luck with your crypto ventures to come!
The content published on this website is not aimed to give any kind of financial, investment, trading, or any other form of advice. BitDegree.org does not endorse or suggest you to buy, sell or hold any kind of cryptocurrency. Before making financial investment decisions, do consult your financial advisor.
