 HTML
HTML  CSS
CSS  PHP
PHP  JavaScript
  SQL
SQL  Bootstrap
  Solidity
  jQuery
  Git
Git  Chrome DevTools
  C++
C++  Python
 Experimenting with CSS rules and HTML code in the Elements panel is convenient if you need to change the appearance of your website temporarily. However, if you want to make such modifications to the front-end permanent, you need to learn how Chrome Workspaces are set up in DevTools.
If you are manually transferring changes from DevTools to local files, Chrome Workspace will perform this task automatically and save precious time!
Developers use Chrome Workspaces to save the modifications to CSS, DOM, and JavaScript of a page. Therefore, you can automatically transfer various changes that you made to the style or code.
To set up your workspace, you need to perform two main actions. First, map your local folder to your workspace.
Then, map local files to URL to make sure that the applied changes will persist. Both of these actions are explained in this tutorial.
If you need to open local file in Chrome, you can do this by selecting Open File from the File menu. You can also use shortcuts: press CMD + O on iOS. For users of Windows and Linux operating systems, Chrome open local file works by pressing CTRL + O buttons.
After setting up Chrome Workspaces, you can easily modify files without having to jump from the browser to the code editor!
Contents
Chrome DevTools Workspace: Main Tips
- In this tutorial, we show you how to set up and use the Workspace in Chrome Developer Tools.
- Workspaces let you save the changes you make during live edits in the Sources panel.
- While changes to CSS via the Workspace are shown immediately, you must manually save and refresh to display modifications to the DOM.
Workspace Explained
Chrome Workspaces are used for saving the changes you make via the Chrome Developer Tools interface.
So, this includes changes to the DOM, CSS or even JavaScript.
If you are developing locally, you can add folders to DevTools' workspaces by:
- Right-clicking on the interface that is displaying source files, and selecting Add Folder to Workspace.
- Dragging and dropping the folder on the Sources panel interface.
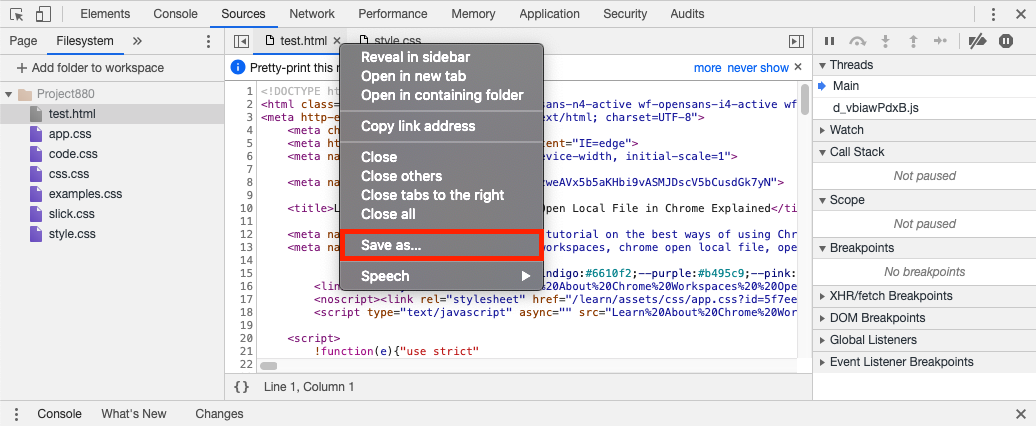
Then, you will be able to access files in the Sources panel interface and save the changes by right-clicking the tab of the file in the editor and selecting SAVE.
After refreshing, the HTML DOM will show the new content as well.
Ways to Manage Local Files
With Workspace, you can also manage files on your computer.
You can add, delete, back up, refresh, and search for them. Consequently, this makes developing with DevTools even more convenient. We provide simple instructions on how this file-management is done.
Add
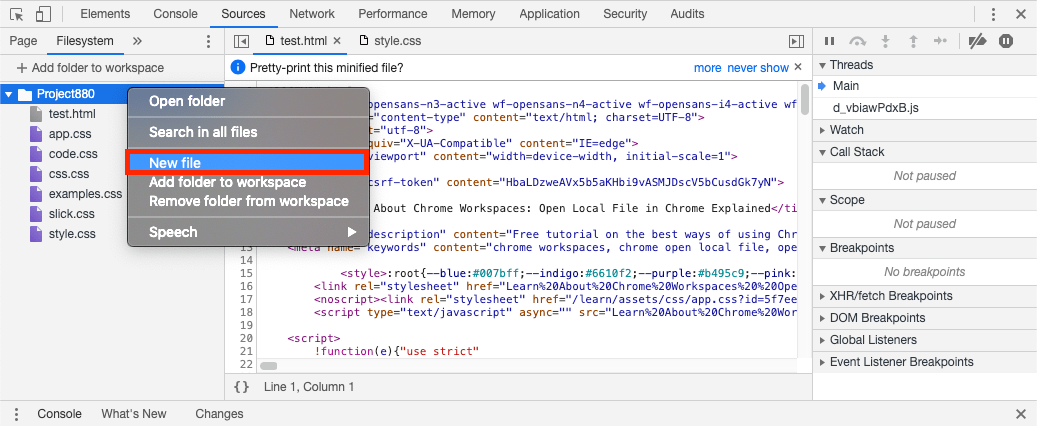
Find the folder in the right pane of the Sources panel and right-click it. This is the folder you are planning to add a file to.
Select the option New File.
You need to type in a name for the file. The extension must be a part of the name as well.
Delete
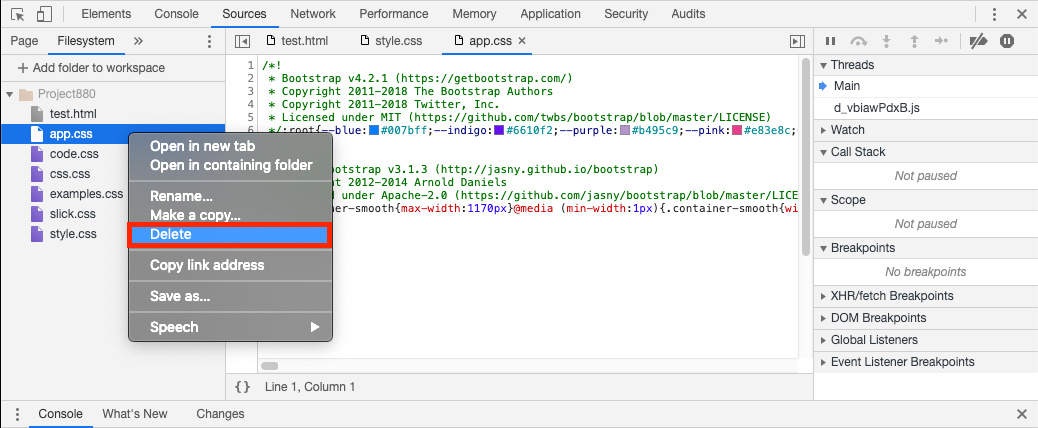
Find the file in the right pane of the Sources panel and right-click it.
Select the option DELETE and confirm it.
- Easy to use with a learn-by-doing approach
- Offers quality content
- Gamified in-browser coding experience
- The price matches the quality
- Suitable for learners ranging from beginner to advanced
- Free certificates of completion
- Focused on data science skills
- Flexible learning timetable
- Simplistic design (no unnecessary information)
- High-quality courses (even the free ones)
- Variety of features
- Nanodegree programs
- Suitable for enterprises
- Paid Certificates of completion
- Easy to navigate
- No technical issues
- Seems to care about its users
- Huge variety of courses
- 30-day refund policy
- Free certificates of completion
Back Up
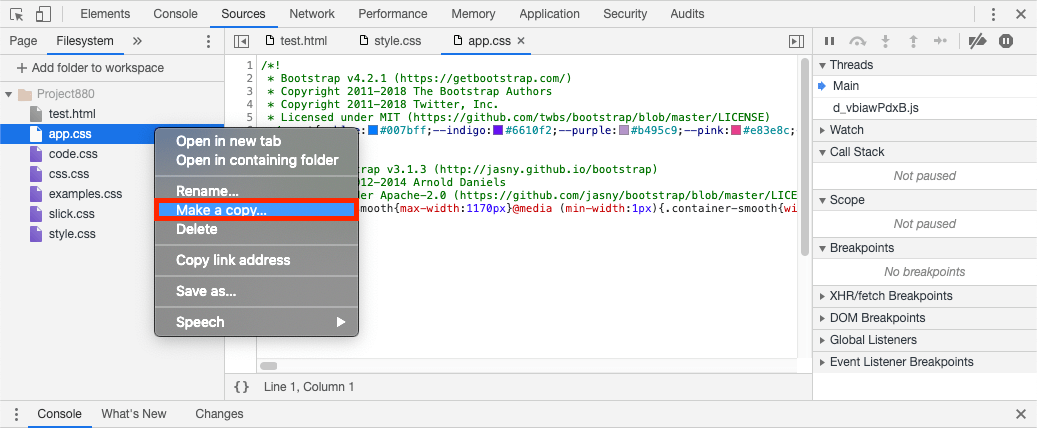
Often it may be useful to create a duplicate of a file before major changes are applied.
Find the file in the right pane of the Sources panel and right-click it.
Select the option Make a Copy.
Add a name to the copy of a file. Remember that you must include the extension in the file name.
Refresh
To refresh a file or a folder, right-click it and select REFRESH.
This feature is helpful when you make changes using an external editor, and want such modifications to be displayed in Chrome Developer Tools. Usually, this is done automatically, but you can do this manually as well.
Search
To open up the Search menu, press CTRL + SHIFT + F on Windows and CMD + OPT + F on Mac.
These shortcuts open a pane on the bottom of the Sources panel.
In this pane, you can search for files by their names or by their contents.
Also, you have various options for whether they should be case-sensitive, or whether they must look for a regular expression.
Limitations of Workspace
The Chrome Workspace seems like a handy and dynamic tool for editing pages on the browser.
However, the feature comes with certain limitations.
The following list contains the limits of Workspaces in Chrome:
- In the Elements panel, only changes to CSS persist, not to DOM.
- You can only save CSS changes into .css files.
- If files are mapped to a remote server instead of a local one, Chrome will reload the page from the remote one upon refreshes. The changes will persist on disk anyway while editing in the Workspace.
- If a file is mapped, the full version (including the file extension) must be in the specified path.
Chrome DevTools Workspace: Summary
- Our tutorial explained how you can prepare Chrome Workspaces and use them.
- Workspaces allow people to automatically save changes they make in the Sources panel.
- While modifications in the CSS are displayed automatically, changes in DOM need to be saved and refreshed manually.