 HTML
HTML  CSS
CSS  PHP
PHP  JavaScript
  SQL
SQL  Bootstrap
  Solidity
  jQuery
  Git
Git  Chrome DevTools
  C++
C++  Python
 Git commit command is the main function for saving changes to local repository safely. Commit takes a snapshot of the project and treats it as a version.
Contents
Git Commit Command: Main Tips
- In Git, commit is the term used for saving changes.
- Git does not add changes to a commit automatically. You need to indicate which file and changes need to be saved before running the Git commit command.
- The commit command does not save changes in remote servers, only in the local repository of Git.
Staging and Committing
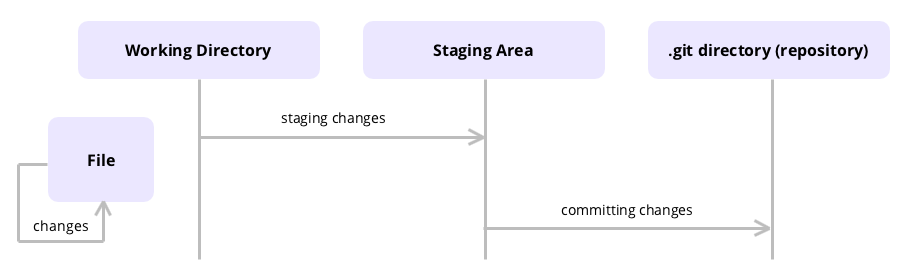
Staging in Git refers to a phase which includes all the changes you want to include in the next commit. Here are the steps leading to staging:
- You make changes to a file in the working directory.
- You use the Git add command to move those changes from the working directory to the staging area.
- Git does not save changes yet. You need to run the Git commit command to move changes from the staging area to the local repository.
Additionally, you may use git status command to check the status of the files and the staging area. If changes are not staged for commit, they won't be saved.
Note: do not confuse git add with svn add command. svn add creates a Git clone from any repository that belongs to Subversion while Git commit command finalizes the changes.
Staging Changes
The Git add command moves changes to the staging area.
Here is a basic example of using add:
git add <file>
Git moves all changes of <file> in the staging area to wait for the next commit.
This example adds the entire <directory> to the staging area:
git add <directory>
During the Git add session, you can pick the changes you would like to commit. Before that, you need to start an interactive session:
git add -p
- Use y to stage a specific portion.
- Use n to ignore a specific portion.
- Use s to divide the portion into smaller parts.
- Use e to edit the portion manually.
- Use q to exit the interactive session.
- Easy to use with a learn-by-doing approach
- Offers quality content
- Gamified in-browser coding experience
- The price matches the quality
- Suitable for learners ranging from beginner to advanced
- Free certificates of completion
- Focused on data science skills
- Flexible learning timetable
- Simplistic design (no unnecessary information)
- High-quality courses (even the free ones)
- Variety of features
- Nanodegree programs
- Suitable for enterprises
- Paid Certificates of completion
- Easy to navigate
- No technical issues
- Seems to care about its users
- Huge variety of courses
- 30-day refund policy
- Free certificates of completion
Committing Changes
Git commit command takes a snapshot representing the staged changes.
git commit
After running the Git commit command, you need to type in the description of the commit in the text editor.
This Git commit example shows how you set the description with the commit function:
git commit -m "<message>"
The following example shows how to save a snapshot of changes done in the whole working directory. This code only works for tracked files.
git commit -a
Pushing Changes to Remote Servers
Git push command moves the changes from the local repository to a remote server.
This example creates a local branch in the remote repository, including all specified commits and objects:
git push <name of remote server> <branch name>
The following example pushes changes even if it does not end in a non-fast-forward merge. Beginners should not use this option:
git push --force
This example adds all local branches to the indicated remote repository:
git push --all
The following example pushes all local tags to the remote:
git push --tags
Note: the Git push command makes sure that you share your changes with remote colleagues.
Git Commit Command: Summary
- The Git committing process requires several steps: moving changes to the staging area and saving them with the commit command.
- Once you move the changes to the local repository by using Git commit command, you can use Git push to transfer them to a remote repository.