How to Record Webinars
By now, most of us are used to online meetings, conferences, and webinars. Due to the COVID-19 pandemic, it’s kind of the new normal for office life. Turning an online event into a lecture recording is also a great simple option if you need to make the information accessible at a later time (e.g., for trainees who couldn’t attend the meeting at the original date). The majority of commonly-used video conference tools have this functionality – let’s see where you can find it and how to make the most of it!
BitDegree Classrooms
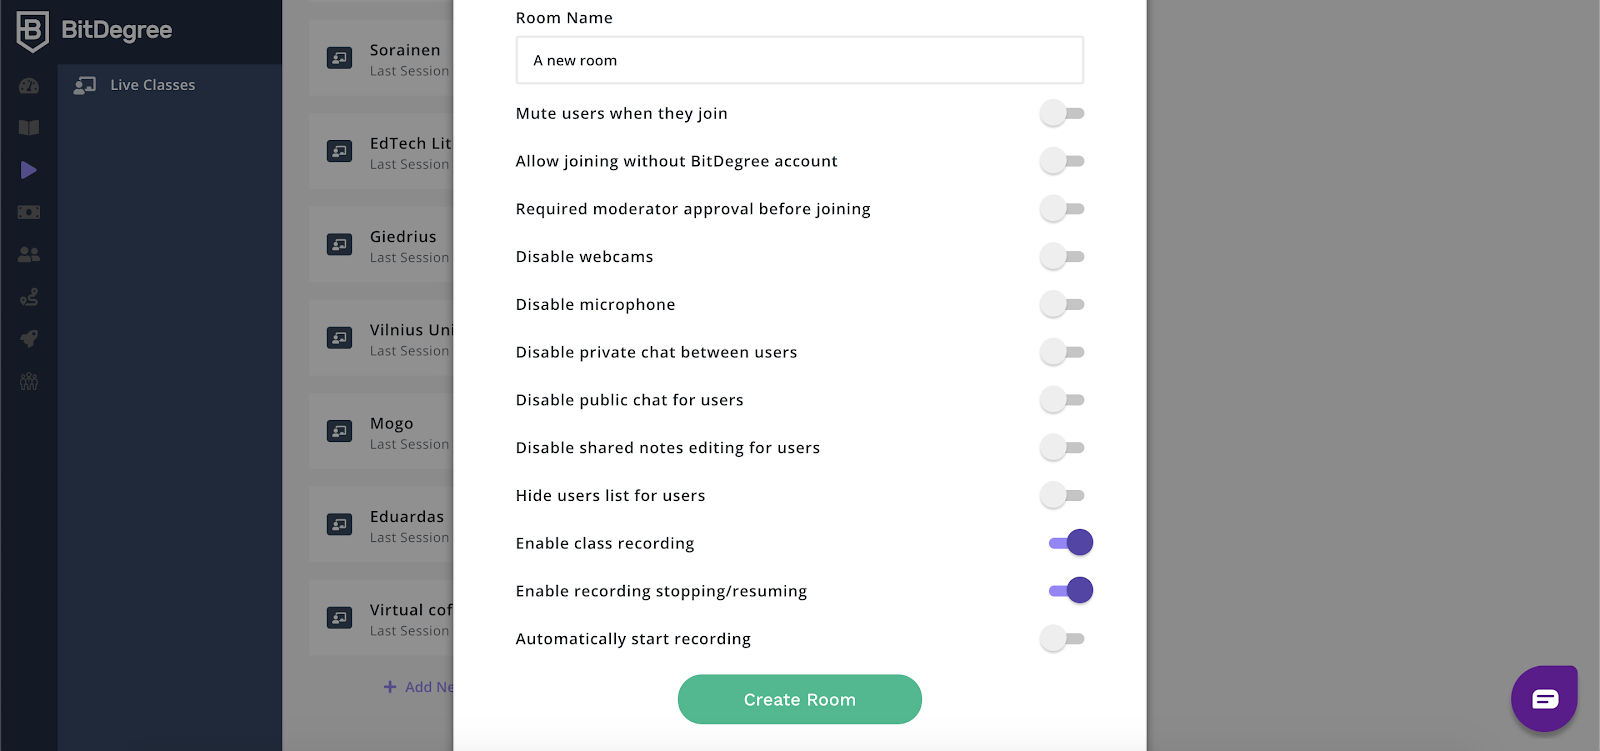
One of the simplest ways to turn a webinar into a lecture recording is using BitDegree Live Classes where you can create individual rooms for your video meetings and invite the participants via a shareable link. Not only is the interface very beginner-friendly and intuitive, but there are also no harsh limits for session duration or file size. In addition to that, the recordings are also highly secure (only available for download for the room owner).
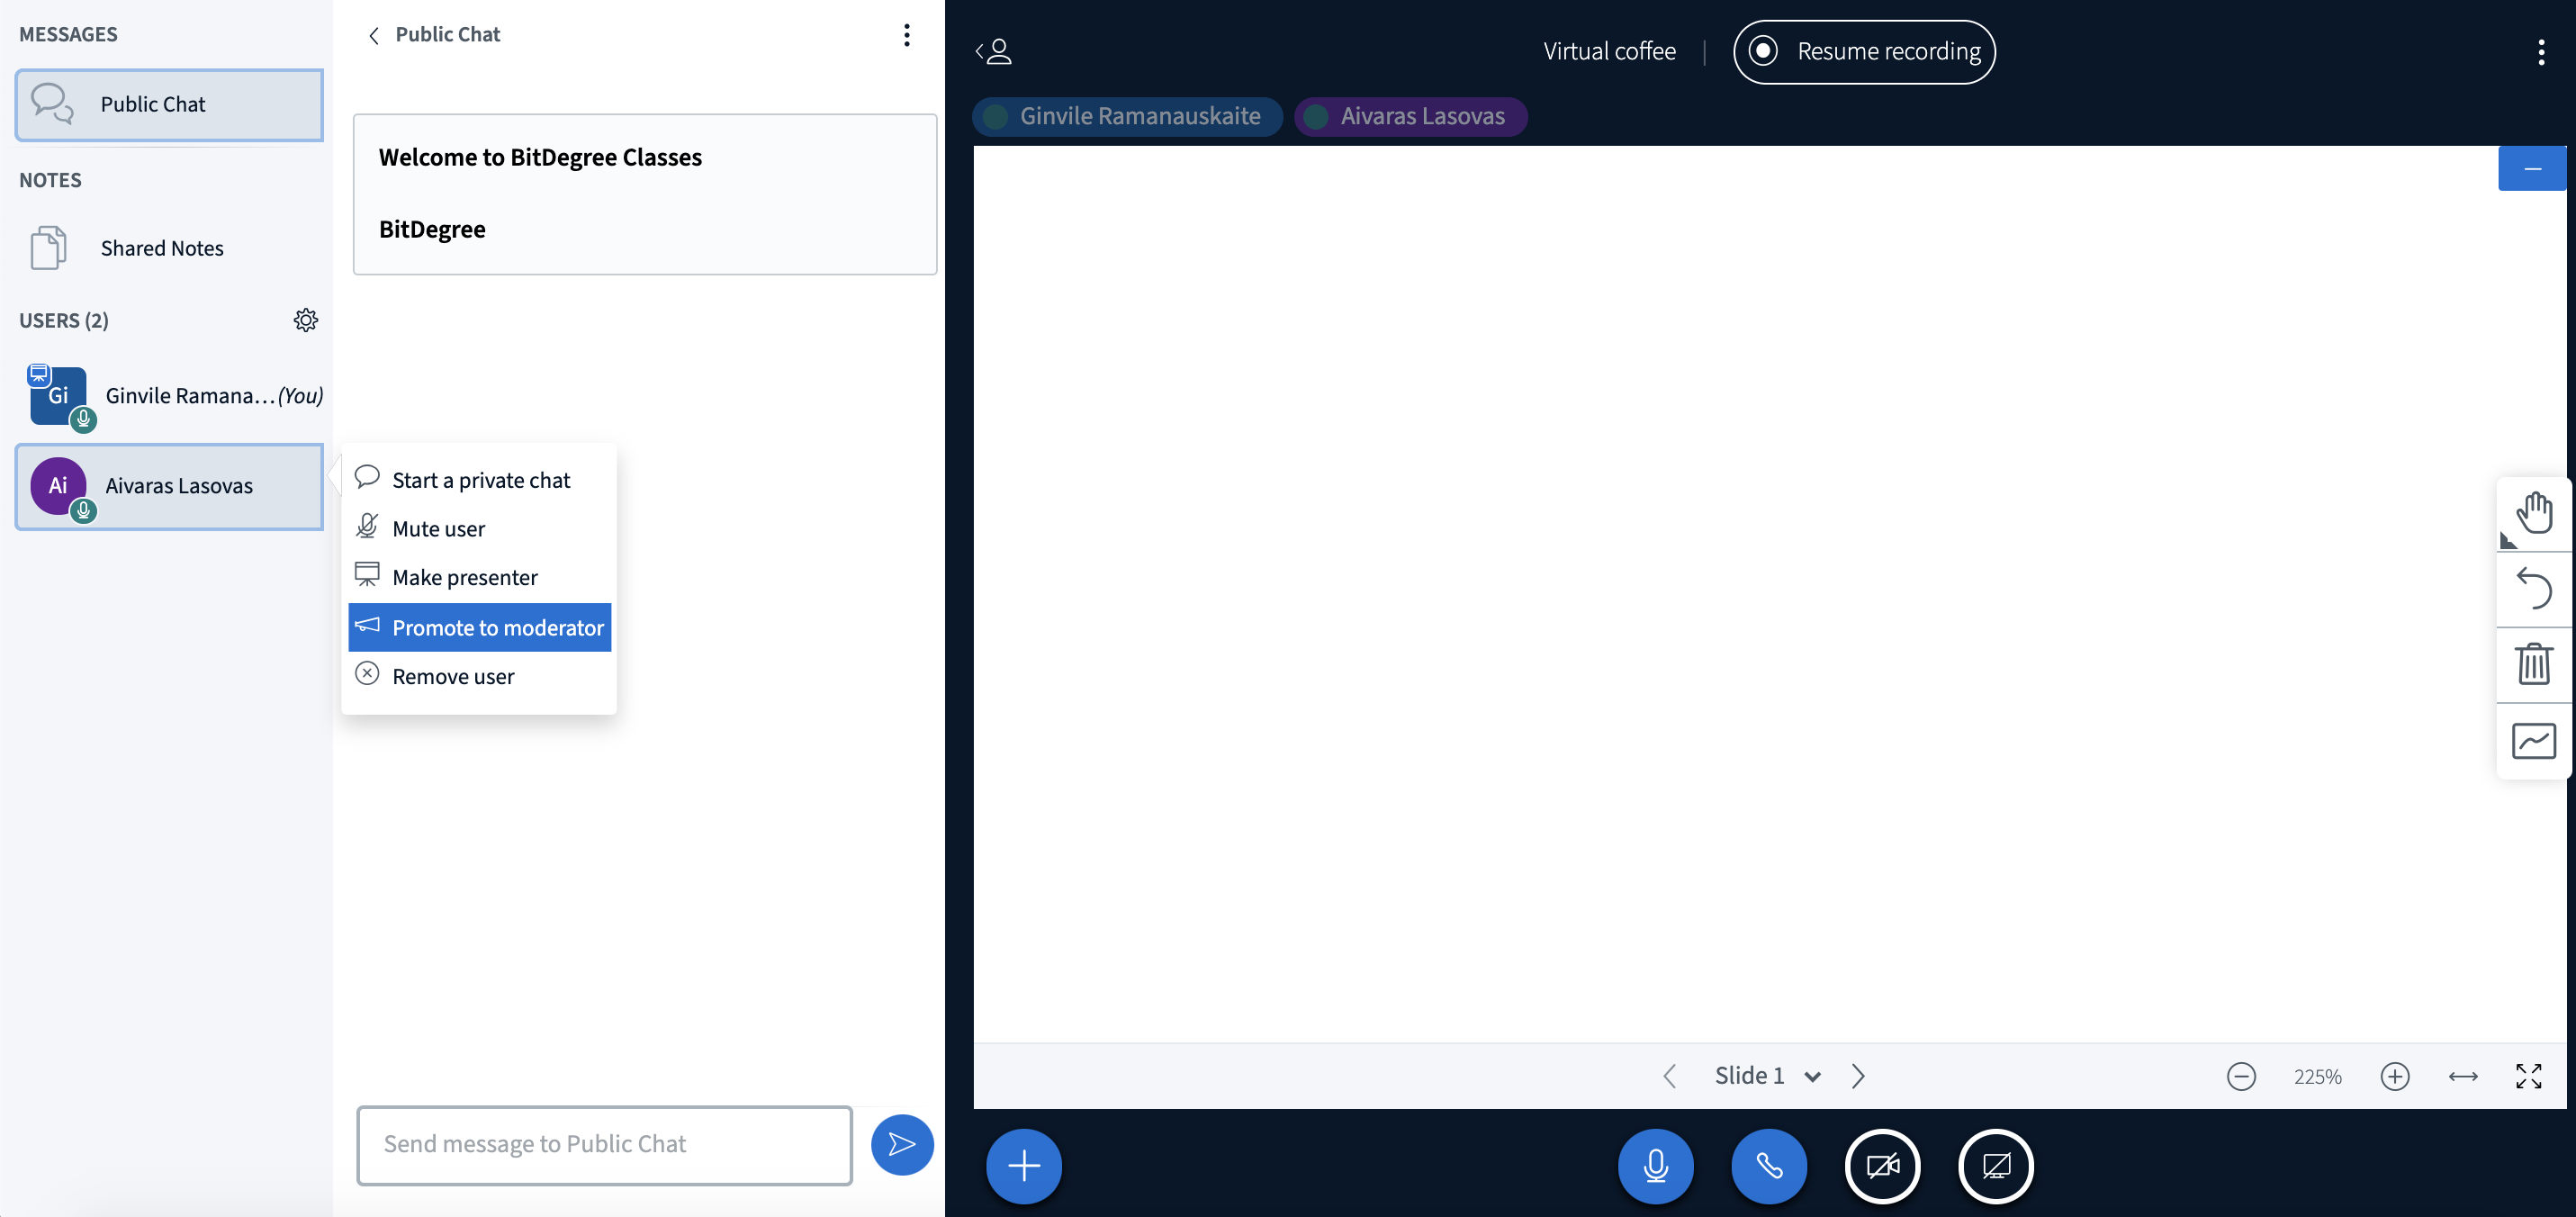
As you create a room for your video conference (Instructor Studio > Live Classes > Add New Room), you will see a setting called Record Sessions and be able to choose whether you would like the recording to start automatically or upon clicking a button at the top of the screen once all the participants connect. You can also enable or disable stopping or resuming the recording.
To start the lecture recording, you need to have the role of the moderator. It is assigned to the owner of the room by default, but they can also give the role to other participants by right-clicking on their name on the list and selecting Promote to Moderator. Then, the newly-assigned moderator will be free to start recording at their own will. Notice that all the participants can see whether the conference is being recorded.
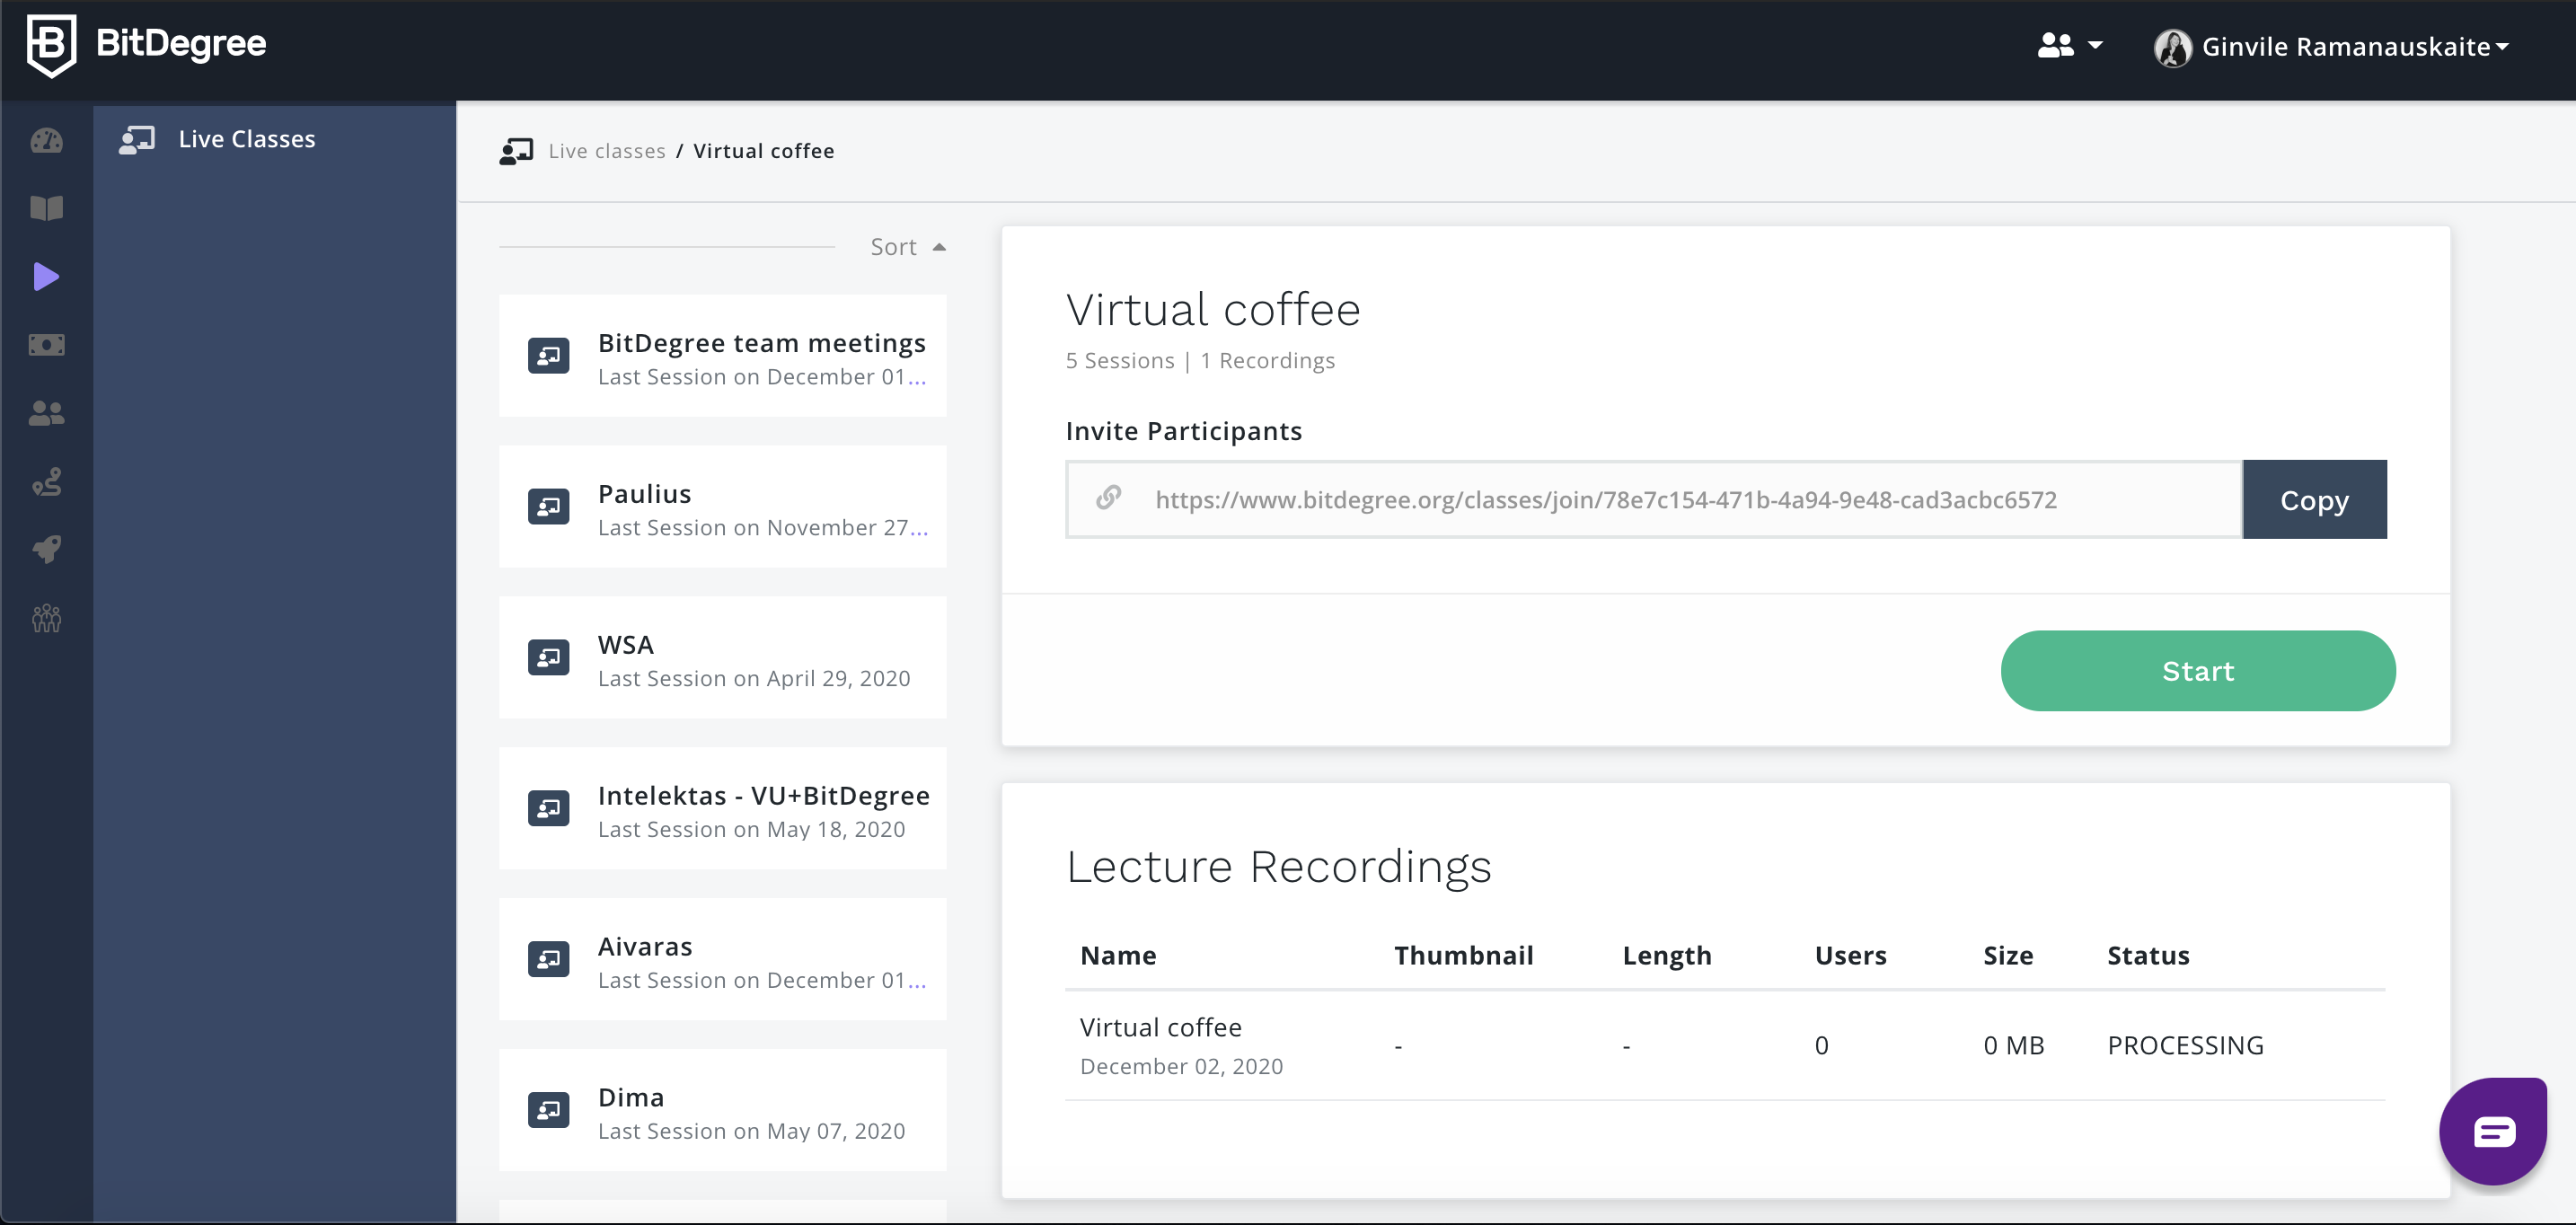
Once the webinar or a training session is finished, your lecture recording will be processed. It will take a little time, but don’t worry – it will be done in a few hours tops (you can always check the status of the recording in the Live Classes section of the Studio). The exact processing time depends on how many participants connect to the room, how many of them turn their cameras on, whether someone shares their screen for others to see, whether the participants are using the whiteboard (which, by the way, is a great tool for collaboration), and other elements. After the processing, you will be able to download your recording to your computer from the same section of the Studio. The file will be in MP4 format, which is perfectly compatible with not just the BitDegree course builder, but also most well-known media players.
Zoom
If you’re more used to Zoom, you should know it offers two recording options: you can get your video saved on your computer (available to both free and paid subscribers) or in the cloud (available for licensed users with Pro, Business, or Enterprise accounts). Note that cloud recordings usually take more time to process, especially during busy times, when it can reach up to 72 hours – you will be informed by email once it’s ready to view.
To make a lecture recording, you’ll need to use the Zoom Desktop software (≥2.0 for local recordings, ≥3.5 for cloud recordings) or the Zoom Mobile application (≥3.5 for cloud recordings; not available for local recordings). However, you will need to use the Zoom web client to enable them first: sign in as an administrator with the privilege to edit account settings, then go to Account Management > Account Settings > In the Recording > Local Recording / Cloud Recording.
From this point on, the steps are simple: once you start a Zoom meeting as a host, you’ll notice there’s a Record icon at the bottom of your window. Pressing it will either start recording straightaway (if the cloud recording option is not available to you) or let you choose between the two types of recording if both are available to you at the time. You can pause or stop your lecture recording at any time, and once you finish the session, processing will start. You can also allow other users in the meeting to record on their side.
Make sure to always choose the best recording layout for your materials to shine. Active speaker view will only show one speaker at a time (the one who’s talking – might be great if, say, you and your colleagues are presenting individual points in monologues), Gallery view will show a grid layout of participants (up to 25 – good for an active discussion), and Shared window view will be perfect if you have a presentation or other materials you want to show by sharing your screen.
If you choose to save the video on your computer, you will find it in a folder called Zoom, which will appear in your Documents. Just like on BitDegree, the file will be in MP4 format, ready to send directly to someone or upload for teaching online. If you picked the cloud option, you will find the shareable link in your Zoom web client (this link cannot be used to embed a video on a public web page).
Google Meets
If you’re a fan of Google Meets, you can use it for lecture recording as well. Your files will be stored in the Meet Recordings folder on your Google Drive, so they’re easy to both access online and download. Before you start, make sure recording is permitted for your account: an administrator can do this by opening their Google Admin console, going to Apps > Google Workspace > Google Meet > Meet video settings > Recording (note that in some cases, these changes might take up to 24 hours).
Just like with Zoom, there are certain requirements: you can only use the computer version of Google Meets and not the mobile app. The editions that allow you to record are as follows: Essentials, Business Standard, Business Plus, Enterprise Essentials, Enterprise Standard, Enterprise Plus, G Suite for Education, and G Suite Enterprise for Education. Once you start or join your meeting, you can click More > Record meeting; when you need to finish the recording, click More > Stop recording. It’s that simple! Recording will also stop automatically if all the participants leave the meeting. Once it’s finished, the file will be generated and saved for later use (both the meeting organizer and the recorder will receive a link in their inbox).
If you want to share your screen during the lecture recording, you can do it by clicking Present Now on the bottom right. You will be able to choose whether you’ll share your current Google Chrome tab, your window, or the entire computer screen. Keep in mind that if your camera isn’t turned off, your video will also be active as you present.
If you’re looking for more unique online teaching tools, Google Meets offers one more useful option – using a Whiteboard (or, as it’s called here, Jamboard). During the call, you can either start using a new blank one (More > Whiteboard) or open the one you had before (Choose from Drive). Unlike on BitDegree, the file will be opened in a new browser tab (a link to it will automatically be shared in the chat, but you can also share your screen and record it).
Preparing to teach online
Recording a webinar or a meeting might be the easiest but not necessarily the most suitable option for lecture recording. We all know the issues with online meetings: someone’s camera view gets all pixelated due to weak Internet connection, one participant interrupts another or takes a ton of time to answer an unexpected question, people forget to mention crucial information or spend way too much time discussing something irrelevant – and don’t forget all the can-you-hear-me’s!
If you want to be the only presenter (no other participants), address the audience directly, keep it engaged, help them follow the content and retain information, or simply have the luxury of taking multiple takes (let’s be honest, everyone makes mistakes!), your safest bet is using video recording software on your computer. Naturally, the best options for that depends on the operating system you’re using – but let’s start from the beginning, a.k.a. preparation.
Coming up with a lecture outline
Before you start preparing your lecture recording, you might want to dedicate some time to crafting a script or an outline. An outline is basically an extensive plan – a roadmap for teaching online, so to speak. You define the key points your lecture recording should include, then structure each one into a few steps that allow you to explain the point clearly to the non-expert audience. Following a milestone-focused plan allows you to make sure the lecture is steadily leading the audience towards the goal and not mulling over the same step for too long.
If you’re great at winging it when it comes to teaching online, great – but if you’re not, a simple plan will help you feel less stress and express your ideas much clearer. In addition to that, you will find it a lot easier to choose the main concepts or topics to cover and organize them in a way that makes the most sense, thus ensuring the lecture is informative and effective.
If you choose to go with an outline (as opposed to a complete script), think of the first and the last point of the lecture recording: what does your audience know already, and what is the goal of the lecture? Once you clarify this, it will be easier for you to identify the steps needed to go from the current stage to improved knowledge. Think of the questions and issues the students might have while learning, and work on explaining those in advance. Understanding how to teach online has a lot to do with the fact that unlike face-to-face classes, you students won’t be able to ask questions straightaway, so you need to work on maximizing the clarity of your materials and preventing any misunderstandings in advance.
Make sure your lecture recording starts with a clear introduction: in the first 5 minutes, your students should get the idea of the topics you will cover, the problems you’ll tackle, and the goals they will achieve by the end of it.
Do you need a script?
Preparing a full-on script is also a common option for teaching online, but if you’re recording your camera view, we’d only recommend it as the last straw. Many people believe having the text ready makes it easier, but it’s actually the opposite: you either rely on reading, which never feels natural, or try to memorize it, which makes you anxious about getting everything right – and it shows (don’t get us wrong, memorizing everything perfectly and feeling more relaxed because of it is possible – it just takes way more time that you can probably afford!). If you know the subject you’re teaching online like the back of your hand, a clear and concise outline is more than enough for you to kick off and create an engaging and useful lecture recording.
If you are only recording your voice or hiring someone to do that for you (more on that later!), however, a script is a great option: when there’s no need for eye contact and relaxed poses, you can read all you want. To prepare a script, start with an outline, and build on it: explain each of the points using examples (mere definitions rarely do the trick), and connect them to the visuals you’re showing on the screen.
Another good thing about scripts is the possibility of editing them before you record (or even after that first far-from-ideal take). Avoid long and complicated sentences that can be hard to follow. Try reading the text aloud a few times: you’ll find it a lot easier to identify tongue-twisters this way, as well as feel which sentences leave you out of breath before you even finish it.
Most importantly, think of the knowledge your listeners already have: if you’re aiming at beginners, it might be smart to rethink your vocabulary and get rid of industry jargon or specific terms they may not be familiar with just yet. To make your lecture recording as useful as possible, you should avoid irrelevant information: a practical example is great, but you shouldn’t let it dominate the lecture and confuse your audience. If you have the time, testing your script with a friend or family member might be a great idea: you’re most likely familiar with their level of knowledge, so it’s a great chance to get a beginner’s opinion on what might be harder to comprehend.
Software for lecture recording and editing
We already discussed how to record webinars using the most common video conferencing tools, but if you want to record yourself alone, you will be needing some special software. Luckily, there are some free programs available that are simple enough to use for beginners and allow you to produce pretty good videos.
QuickTime Player
If you’re a Mac user, you will probably want to start with what comes inbuilt in your OS. Why download anything if what you already have works pretty well, right? QuickTime Player is pretty intuitive, too: find the player through your Launchpad so its icon appears in your Dock, right-click on it and select New Movie Recording / New Screen Recording (the first option will capture your camera view, and the second one will record your computer screen). You’ll notice there’s also an option to record audio, but don’t worry: if you’re making a video, your audio will be recorded automatically – you don’t need to do it separately, just make sure your computer’s microphone is selected in the settings.
If you’re thinking about how to edit a video you captured, QuickTime Player has a few handy options for this, too! You can trim your lecture recording (open it, then select Edit > Trim, and use the trimming bar), split it into multiple separate clips (View > Show Clips, then pick the place of split, choose Edit > Split Clip > Done), rearrange the clips (View > Show Clips, then drag and drop them into a sequence you prefer), flip or rotate them (View > Show Clips, select a clip and do the desired action via the Edit menu).
Screencast-o-Matic
Another free and excellent option for lecture recording is Screencast-o-Matic, which is available for Windows, Mac, iOS, Android, and Chromebook users. What boosts its reliability a lot is the fact that it was recognized as one of the best online teaching tools by Common Sense in 2019.
Screencast-o-Matic does have paid plans (Deluxe and Premier – by the way, the pricing for both is very modest), which allow you to use extra editing options or add effects. Still, you can record, trim your movies, add captions, and take care of all the necessary tasks with a free account. Other handy options include using the picture-in-picture effect (usually used for sharing your screen and showing your camera view in the corner of the lecture recording), adding stock music (free users are limited to 30 tracks), and quick sharing on YouTube, Facebook, Twitter, Google Drive, and Google Classroom.
OBS Studio
This software is also free, and it’s available for Windows, Mac, or Linux users – and if something’s backed by tech giants like Facebook and Twitch, you just know it’s solid, right? You can use OBS for lecture recording, as well as for capturing, recording, compositing, encoding, and streaming any video content.
This option is not as intuitive as, let’s say, QuickTime Player, but that’s mainly because of a much wider range of options you get – for example, instead of simply recording your voice, you can use a smart audio mixer with noise filters. You are even free to rearrange the UI to make it more convenient for you to use. OBS also makes it easy to add beautiful transitions between scenes and combine different video and audio sources.
Camtasia
Camtasia is applauded as one of the most intuitive and professional video recording software: according to The Tech Advocate, it’s ‘the end-all, be-all screen recorder option for professional use.‘ It’s available on Windows and Mac and currently has >24 million users. Not only does Camtasia allow you to enjoy various lecture recording options (webcam, screen recording, MS PowerPoint integration, media import, etc.), but it’s a brilliant option if you have no clue how to edit a video: the editor is extra beginner-friendly, complete with drag-and-drop functionalities, themes, templates, and even royalty-free assets.
If teaching online is somewhat of a one-time thing for you, you might not need all of those features. However, if you’re serious about building online learning materials and want to make them as professional-looking and engaging as possible, Camtasia might be of great help. It even includes handy online teaching tools, such as quizzes, interactivity, animations, interactive tables of contents, annotations, and closed captions.
Camtasia's biggest flaw is the fact that it’s paid (a pretty hefty one-time fee, no subscriptions). You can, however, enjoy a free trial – it is limited to 30 days, but if you have your outlines and ideas ready, it might be more than enough to create a solid course for teaching online.
Perfecting your background and sound
If you decide to film yourself presenting – great! Audiences always find it easier to relate to the lecturer if they can see them and look them in the eye. To make your lecture recording look as good as possible, start with the right background: it doesn’t have to be completely blank, but make sure there are no distractions, such as extra-bright colored or moving objects. Your face should be lit well, preferably by soft lighting (too bright can cause sharp shadows and squinting).
When it comes to sound, you should follow the same rule: the more clarity, the fewer distractions, the better. Naturally, you will close the windows and inform others around you about an ongoing lecture recording they shouldn’t disturb. Still, you should also think of choosing the right space for recording: the less hard surfaces, the less chance of your voice echoing.
If you worry about your ability to present or pronunciation (or have an accent that you believe might be harder for your target audience to pick up on), you might want to skip the speaker view and think about hiring a voice actor to record the script you prepare and use them for your lecture recording. These days, it’s easier than you think; you don’t need to hold auditions or anything like that, as there are a ton of freelancers online. For example, on Fiverr, you can filter the voice actors by language, accent, gender, age, tone, location, price, delivery time, and additional services – and, in addition to that, you can listen to their audio samples prior to contacting them or even registering on the site.
Feeling ready?
Understanding how to teach online is a multiple-step process – however, with the right guidance and quality tools, it can be easier than you initially anticipated. Whichever software you choose for lecture recording, the most important part is to be eager to share your professional expertise, plan your videos in a way that allows for the most effectiveness and engagement, and make them available to everyone who could benefit from hearing all the things you learned through years of experience. Good luck with teaching online and helping your students improve one topic at a time!